How To Make A Lace Closure Wig Tutorial |Aliexpress| Ali Queen| Brazilian Deep Wave Curly Hair
- Posted on 05 November, 2016
- Lace Closure
- By Anonymous
HEY REVAMPED DOLLS: ALLTHINGS BEAUTY|| HOW TO MAKE A CUSTOM LACE CLOSURE OR SILK BASED CLOSURE WIG FOR BEGINNERS WITH NO LEAVE OUT. Don't forget to Subscribe ⊹LIKE + SHARE + FAVORITE THIS VIDEO!⊹
EXPAND FOR DETAILS!
In this video I show you how I make a lace closure wig with elastic band using an aliexpress vendor
____________________________________________________________________
PRODUCTS USED
Water Bottle
Spandex Dome Cap https://www.amazon.com/King-Spandex-Do...?
Needles
Nylon Thread (May use Cotton Thread Instead)
Canvas Block Head https://www.amazon.com/Wig-Head-Repell...?
Elastic Band
___________________________________________________________________
AliExpress Vendor- Ali Queen
Hair Details:
Brazilian Deep Wave Curly
Lace Closure 10"
(1) Bundles of 12"
(1) Bundle of 14"
(1) Bundle of 16"
link- https://www.aliexpress.com/item/6A-Bra...?
____________________________________________________________________
FOLLOW ME:
INSTAGRAM: TolaIsShe
SNAPCHAT: TolaIsShe
____________________________________________________________________
BUSINESS - for all business Inquiries and Hair/Products Reviews Email - [email protected]
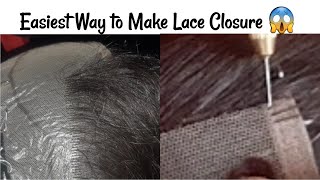
Hey, let's welcome to my channel where we revamped all things beauty. Today we are doing a lace, closure wig. The first thing you want to do is cut off the excess material on your lace closure. Now I'm using a canvas blockhead to make my unit. So it's already pre-measured. I am my 22 inch, so therefore everything fits perfectly I'll. Give you the descriptions to how you can size your wig on my next video. If I get enough thumbs up on request, but here I am taking it down with some T pins. Now that all my four corners are tucked down with my teeth in I can now so the perimeter really easy, and so I'm just doing small stitches surrounding the perimeter of this lace closure. Here'S a quick slo-mo of my stitching technique, I'm doing blanket stitches all the way around the lace closure you, okay, this is how you tie a knot on your thread. You just loop it three to four times and pull it through and that's a secure or not. So once I'm done with one side of my lace closure, I'm gon na move on to my next side just to keep the balance on tension equal and I pull it down. Slowing all the way around. Just make sure that the lace closure lays flush and flat. So you do want to make sure, there's tension, fold outwards and then throw the back. So I'm showing is not technique twice, didn't get the first time, don't get it this time loop it three to four times and just pull it through and you have a tight, secure knots. So, yes y'all we got the first part done. The lace closure is on nice and secure tack down nicely. You can take out the t, pins and you'll have a nice flat lace closure. So, let's begin with our bundles, shall we so we have our first one and what I do is I use these t. Pins all at a time time, I'm not telling you that she shouldn't use the T pins. But if you do use the T, pins, you'll notice that it's so much easier. And when I go ahead and do it's our tack down my West and then I begin stitching whatever it's been tacked down so here I am doing my stitching and I make sure I go through the hole first and then I go ahead and loop it now. I am doing knots on every stitch, just pay extra security, but she told you don't have to do that part. Just do a regular stitch and you'll be fine. Yes, we want to fold our web. You don't want to cut them because cutting your wax causes shedding. So I folded it put my T, pin on the opposite side and begin stitching again, you now I'd like to dramatically emphasize the fact that, as you are sewing and folding, these wax on this band area do not stitch inside the band just stitch onto the material Itself, because if you stitch on the band is not going to stretch and you want it to stretch so just sew on to the stretchy material, but not on to the band itself, I'm gon na try not to talk so much because it's pretty much visually explanatory. So just watch and enjoy. I must say this stitch game was pretty proper, so I'm gon na toot my own horn, but toot-toot. Yes, that stitch game is looking flawless. You hear me now. I know I said folding. The West is really good because it reduces shedding, but when I get to the sides here, when I'm almost getting to the top, I like to cut my track, so it can lay really really flat. This is totally optional. You don't have to cut your weft, but I do cut my webs at the top area. Let'S talk about hair details while we're observing, shall we so I use a 12 inch, 14 inch and 16 inch in the bundles and a 12 inch lace closure. Now placement is key, I'm going for a bob look, so for that you need to make sure you use the 12 inch at the bottom and the longest on top. So in conclusion, I'll use my 12 inch first. My 14 is second and my 16 inch on the top, because it's a four by four lace closure, it's so small. A 12 inch is easy to get away with, so the length doesn't really matter once you sewn all the web, then the cap should look something like this. Now you want to cut off the inside where the lace closure spit now she's. Looking kind of rough, we need to wet her and shape her, so she can be good to go with my razor with cutting off the pieces, giving it a bob look, I'm cutting up a bang as well just giving it some kind of shape, I'm using 80 % water and 20 % conditioner. This is some cheap conditioning like swab or bo5, and I'm just breaking it through. If you have used a condition and water concoction, you don't need to use a peeper curly cream that I have here. All you need to do is add some argan oil and be done so you get a band from Joanne's or any fabric store. They even have it at Walmart as well, and you want to make sure you measure your circumference of your head, I'm a 22 inch. So I'm minus 4 from that which will be an 18 and then X is 2 inches, so it can stretch which will be a 16 inch. So my bed is a 16 inch in length with this BAM Bay Bay, your wood ain't going nowhere. Thank you all for watching, don't forget to rate comment and subscribe and I'll see you on my next video


Comments
Niah: yeessss