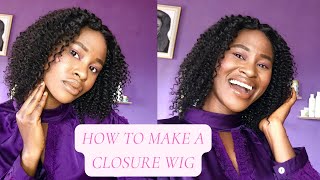
How To: Make A Lace Closure Wig Very Detailed | Beginner Friendly | Start To Finish Ft. Lavy Hair
- Posted on 06 May, 2019
- Lace Closure
- By Anonymous
Hey guys! Here is a very detailed, step by step tutorial on how to make a lace closure wig. This process took me about an hour and a half to complete. Prior to this video I dyed the hair jet black and bleached the knots. If you have any questions about anything mentioned in this video feel free to leave a comment below. Thanks for watching! ❤️
snap:
kinzeeyy
***ABOUT ME***
Name: Kinsilo
Location: Louisiana
Age: 22
***BUSINESS INQUIRIES***
Song: LAKEY INSPIRED - Chill Day (Vlog No Copyright Music)
Music provided by Vlog No Copyright Music.
Video Link: https://youtu.be/vtHGESuQ22s
Song: Aaliyah x H.E.R Come Focus Mashup by amorphous
❤Extra $10 Off, Code: kinzey
❤Hair: Brazilian 18"20"22 with a 16" 4*4 lace closure body wave hair
❤Direct hair link:https://www.lavyhair.com/superior-grad...
**Make a Wig Service: https://www.lavyhair.com/complete-wig-...
More options :www.lavyhair.com
Broke know we get this money, so I guess I can't go, but what's up guys, I'm Kensi ray and in today's video I will be showing you how to make your own lace closure, wig right at home. So in this video I'll be installing some Brazilian body wave hair and the inches of 18, 20 and 22, with the 16 inch closer and the hair was provided by levy hair. Alright, so jumping straight into the video I'll be using this neck wig cap that I got from my local beauty supply store for about five dollars. I really like using this kind of cap because remember when my head is big, so I need something that really stretches and the elastic on does not do it for me also, I like that it has clips on it, so you know you can adjust the size And it's really easy to get the needle through the little holes on the net. So that's why I prefer uses this one. Now I'm going to be taking these needles that I got from the craft store and I'm just going to use these to pin the corners of the wig cap down just so that it won't move. While I'm sewing the hair on all right and again, this closure is provided by La Vie, hair. It is the 4x4 16 inch body wave closure and it's a lace, closure and all I'm doing right now is taking the closure and I'm putting it in the center of the mannequins head. You want to make sure it's centered and you want to make sure that the closure is a little above the wakeup, so you're gon na place it to where it kind of hangs over the front in which you will kind of see in this video. And then I'm taking my pins and I'm just pinning it down and disclaimer. I am NOT a professional, so don't be drilling me in the comments y'all. This is just how I do my wigs I've done about maybe eight weeks so far, so I'm still a beginner, but I just felt comfortable enough to where I feel like. I could show y'all how I do mine. So this is how it looks after I pin it down and then I'm gon na go ahead. Flip the hair up and stick a pin in the back to hold the back down as well. Alright! So now I'm just taking a rubber band and I'm just pinning the hair up just to get it out of the way. And then I'm going to grab my needle and go ahead and begin threading, the needle and thread you can literally get it from your local beauty supply store for like a dollar. So that's what I'll be using and I'm gon na go ahead and get started alright. So now I'm just taking my needle through the closure and I'm doing it kind of to the edge just to make sure that the closure doesn't go anywhere and I'm gon na pull it through. Until I get to the knot at the end of the string and then I'm gon na go ahead and go in again and then this time I'm not gon na come up all the way I'm going to stop and make a loop and then you're gon na Grab the loop and just put your needle through it and then you're going to pull it tight and make a knot, and this just secures your closure all right. So after I make my knot, then I'm just gon na go in and begin sewing it down, and I don't really have a certain like technique when it comes to sewing. But when I do my closures, I kind of like to make sure that I so close together just to make sure that you know it doesn't come up. We want it nice and secure it down so yeah, I'm gon na fast forward. Through this part, I'm just gon na be sewing it all around you all right. So now that I'm done sewing my closure down, I'm gon na go ahead and move on to the tracks and I'm starting off with my longest bundle. So I am just going to take the bundles and go from ear to ear and just make sure that it's lined up and even on both sides, and I don't go all the way to the bottom of the wig cap because the straps are down there. So I kind of go above the straps just to make sure that you're still able to move those and again this is the body wave hair. This is my 22 inch bundle all right. So now I'm gon na begin filling my tracks down. So for this part I take my needle and I start threading a little for a couple inches away from the start of the track and then I go back in and then I go behind where I just started, I'm trying not to confuse all so yeah, then I take the needle and go behind that stitch and I bring that up and that kind of makes an X, which I'm sorry that I did not get that on camera. But it makes an X and that holds the track in place. And after that, then I just begin selling it down. So, unlike the closure, when I sew on my tracks, I do the stitching far apart, because I'm trying to stitch them close together. It'S gon na take you all day and we got all day to be doing this week so yeah whenever I stitched my tracks in I just stitched far apart saves you time so here I am just stitching it down. It'S the stitching sewing it down, sewing it down, and whenever I get to the end and I run out of string, I just make a loop and make a little knot and then I go in again make a nothing knot and that's what holds it in place And then i restreamed my needle it gots to turn for it. So now I'm at the very top on my last track and whenever I do this, I noticed that when I watched a lot of videos, I noticed people sold the track on toothy closure. But I don't like that because from the wigs that I've done in the past, when I tried that method, I noticed that it was kind of lumpy right there, because when you flip the hair down from the closure, it kind of like sits on top of those. Two tracks sewn together, so I like to sew it a little bit below where the lace closure sits just so it lies a little flatter all right. So now that I'm done sewing all of the hair down. I just took my wig off of the mannequin and I'm going to place my hand underneath where we sewed the lace closure down, and you have this little pocket under here, which you don't want. So I'm going to take my scissors and just cut around make sure not to cut what you just sewed down, because that will be a complete disaster, so cut a little bit away from where your stitching is and I'm just going to cut around and get this Little pocket off so we're coming to the end of the road. Now I'm taking my rat tail comb and I'm making a middle part, and you want to make sure your middle part is straight. So I started from the nose of the mannequin and went up and made sure that it was straight all right. So after I got my part straight now, I'm taking my 1 curler and I'm just flattening that hair down just so it's easier because I'm about to begin plucking it - and I want the hair to lay down nice and flat. Now I'm taking my tweezers and I'm just going in and plucking my middle part just to make it a little more defined and whenever I pluck it, I like to make sure that it's not excuse my bunny. In the background, I like to make sure that it's not like too straight, because I want to kind of natural looking so yeah, I'm just gon na go ahead and do that and I'm not gon na spend too much time on this. If you guys want to see like a full video on me, like customizing, the closure and everything just leave a comment below and I'll definitely do that alright. So now I just do the wig on and I'm going to cut off that front part of the lace closure moving on to the baby hairs, so this closure actually came with like some already. They already had baby hair, so I'm just cutting them a little bit because I just want to make my little swoop in the front of my head, and I actually realized that I might have cut a little too much, but we go make it work and the Edge control that I'll be using in this video is by second touchdown. It'S a 48-hour edge control and they have three different kinds. So this first one is the coconut, and then we move on to the shea butter and then they also have a black, castor oil and they all smell so so good like. I cannot get over how good these edge control smell and it's 48-hour control, like I said so. I personally been using the black, castor oil one and it definitely does help keep my edges together and lay down throughout the day and, as I said, its 48-hour hold. So you know you get the extra hold in there and it's also antibacterial it moisturizes your hair nourishes it has tea tree oil or Ganahl. So you know definitely go Compu, some second touchdown - and this is the finished product y'all. I am so satisfied with how it turned out, I'm so proud of myself, because I did it. I think this is the best week that I have made yet I'll check my description box for discounts for this hair and also a link to the hair again. This is levy hair and I have the inches 18. 20 22, with the 16 inch closure, and that is it for this video. I really hope you guys enjoyed it. If you have any questions, please don't hesitate to leave them below, and I will see you guys in my next one bye,
Comments
SoulfullyKy: You got me wanting to try to do one now! I'm just getting into wearing them, but now you got me wanting to make one! And you made it look so simple. Thats what i love! You defintely have a new subbie
Tamia Dixon: Oh girl you come thru with these videos! I will definitely be getting into doing more styles with my hair since i can’t afford many styles & I don’t really like people in my hair so thankyou so much! New subbie!
Hello Angel: Girl yes you make it look so much more simple than alot of these youtubers lol! Love your channel
Cheryll: It came out so good Gurl I do not ! DO NOT have the patience to make my own wig ♀️ espically with a 2 year old running around. Maybe one day I’ll try lol.
danielle ansley: I really like this tutorial! I also don’t like when people make wigs and sew the last track to the closure because it looks bumpy! Also if they ever wanted to change the closure and revive the wig, the whole wig is gonna fall apart when they do that method! Thanks for sharing !
Briana Crump: This was a great video! I love that fluffy bunny in the back
Alyssia Vick: When you get to the end do you cut your tracks or do the flip over method? I def wanna try this way !
Tamia Dixon: Yes video on customizing & plucking!
CuzImAwesome: Love itsending love from the Caribbean. I do similar videos btw
Alexus Raw: i love it !!!
Chillax: ❤