My New Wig Install Method Using Got2B Glued Gel!! | Ft. Unice Hair
- Posted on 11 March, 2021
- Lace Closure
- By Anonymous
Within 30 Days NO Reason Free Return Only for My subscribers Place Order
●▬▬▬▬▬▬▬▬▬♛#UNiceHair♛ ▬▬▬▬▬▬▬▬▬●
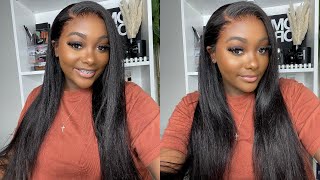
I’m using the Ombre D427 lace frontal Straight wig in the video: http://bit.ly/3es1h0x
Hair detail:22 inch 150% density 13*4 Lace Frontal D427 Straight wig
https://www.unice.com/ UNice hot selling lace frontal wig: http://bit.ly/3l3Cm4K
Use My Special coupon code for 10% OFF: myunice
Sezzle UNice Hair Now. PAY 4 equal payment OVER 6 weeks!
UNice New arrival FB30 wig: http://bit.ly/2N9dr3m
UNice Hot selling headband wigs: http://bit.ly/3vm4kh9
Looking for 40 inches HD lace wig? http://bit.ly/3qyNWWU
Download “UNice” App on your phone to Save more➤ http://bit.ly/3dUKyTj
Cut to Get FREE HAIR on “UNice” App➤ https://www.unice.com/bargain
New Product Save Up More Group Deal➤ https://www.unice.com/groupbuy
Unice NO.1 selling 5*5 HD Lace wig➤ http://bit.ly/3kQVweb
Aliexpress TOP UNice Hair store➤ http://bit.ly/2kKDmAh
Instagram @unicehair: https://www.instagram.com/unicehair/
Unice YouTube Channel: https://www.youtube.com/c/UniceHair
Facebook @UNiceMall: https://business.facebook.com/UNiceMal...
#UNICEHAIR #BETTYOU#WIGREVIEW
______________________________________________________________
#prettymy
LIKE COMMENT SUBSCRIBE
⬇️ JOIN THE EMAIL LIST FOR 15% OFF YOUR FIRST PURCHASE! ⬇️
SHOP: https://www.shopmidasbeauty.com/
FOLLOW ME:
*Instagram: Itsprettymy
_Midasbeauty
*Snapchat: Mavbeme
*Twitter: ItsPrettyMy
BUSINESS INQUIRIES/ SPONSORSHIPS:
PO Box 530906
Saint Petersburg, FL 33747
What'S good pretty game? Welcome back to my channel, it's pretty mine, and today i'm installing this highlighted wig from yuni's hair. I'M also going to be introducing y'all to my new technique of installing my wig. I'Ve only been on youtube for like a year and some months so the last time i changed. My technique was probably like six months ago, so this only got to be spray thing to make them faster. So now i have a new way of doing it. It'S a little bit slower but like it gets the job done and it has a stronger hold. I use got to be gel. I told you on my last video that i promised i would make out tutorial on how i did it and also how i did my edges with the gorillas knot. So this is like a full install video, but if y'all haven't already check out my last video, the one where i did the two braids, that is where i first did this method and you can see it looks seamless this way i didn't bleach the knots. I only plucked it so it's not gon na look as seamless as that, one that one had bleach knots and it was plugged and it i did a new baby hair method on that one, and this one just didn't make the baby hairs, go check out that Video, you don't even have to watch it. Just go, look click on it and look how my hair looks in that way. That'S the method, i'm showing you today, minus the baby hair technique. I didn't do it in this video because the knots aren't bleached. So the effect i just didn't think the effect was gon na, be good enough for me to take all that time. To do my baby hairs. That'S enough talking, though i'ma let y'all get into the video get into this hair, and you could continue watching right now. Don'T forget to like comment and subscribe to join the pretty gang, so you can be pretty gangster like me and i'm gon na catch y'all in two seconds, all right y'all. So here's the wig i'm working with today. This hair is from uni's hair and it has these pretty blonde highlights underneath the hair overall, it's brown, but they put these little highlights underneath i thought it was really cute and unique. I just want to show you how the density you can see it's natural. It'S not too thin at the bottom, but it's not overly thick either and yeah. This is just the hair fresh out the box, nothing done to it and hasn't even been flattered, yet so here's the inside of the wig. I just wanted to show you. I have three clips, not it matters because you have a ball cap, but i just want to show the inside. This wig is bigger friendly because, as you can see, i'm putting on my head right now, okay, so we're just gon na get to the install um. I just like to cut two slits, so i can have three areas to apply it, but you don't even have to so we're gon na got to be gel and we're gon na just put that over my whole hairline, you want to do a thin super duper. Duper thin layer. If you can like the thinnest way you can, it should pretty much just look like it's water on your forehead. Like you see right here, it's just like a thin sheen. I'Ve got to be. I don't know how to explain it, but, like you know, just don't make it. You don't have to try to make it thick, just rub it in almost and then blow dry it and we're gon na do more than one layer, but you want to have on your cap and half on your skin so that the cap is getting some extra Security too and then you're gon na go in with your second layer. You see, i just put a little bead on my finger and i go from ear to ear and looking back did i have to cut those three sections, no, because i literally installed it as one piece, but whatever it just makes me feel better. When i do it, i feel like i'm in control. You know, but yeah. Here'S me doing the second coat right here, making it kind of thin. You know really the thickness really just helps you work faster because you make it too thick it'll take forever to dry, but here i am spraying some got to be sprayed onto my fingers and then i'm putting a thin layer of that. On top i did. I did this while the gel was still wet, so you don't have to wait for the dry. Nothing and you see i'm just putting that layer on top, and this is going to be our last layer. I only did two layers: three, if you count the spray, but once that's on there you all you have to do is blow dry it with a blow dryer, and you don't want this to get dry. You just want it to get a little sticky. You see. I touched it to make sure it's sticky um. I don't know how to explain that, but just keep touching it and making sure it's sticky. I almost touch it on the side, though so you don't mess up your front like i almost did cutting the three sections kind of helped me pull it into place, so i guess i can see why i did it now, but you just want to pull it Directly, on top of the gel or a little bit in front of it, it doesn't matter which one, but i think i put mine pretty much directly on top because i didn't want to cut off any hair when i was cutting my lace. So here i am combing it into place, but just to make sure it dries down all the way i'm going to tie it down with this silk scarf for like 10 minutes once i take it off, though that's when the install is done. So it's pretty much on my head right now and i'm taking a razor and cutting this so that it'll have like a jagged edge, so it don't look too perfect or wig. Like you know, this is a really good lace, though you could barely see it right now. Look at this so, as you can see right now, there's kind of like a white trace around the edges which had me not feeling this too much because it can be cleaned up. But it's the fact that i don't want to have to clean up my wigs that much when i'm installing them, so you know to each its own. If you have, if you don't have extra time to like clean this up, then don't do this method. Just do the spray, but i had time today so here i am just touching up the edges and i'm just going ahead, i'm going ahead and just cutting off the section by section. Each time i cut off a section, i kind of touch it up with the rat tail comb. That'S what i saw me doing going back in with the gel and touching up any lifted areas, and just touching it up can help sometimes get get rid of that line around the edges. If you don't so here, i am once all that is done. I'M just going ahead and straightened up my part because i parted it. While i was on my mannequin, so obviously my hair is going to fit a little different. I'M going to put some wax stick in the middle to lay down my middle part, because it wasn't really like set into place or nothing, and then i'm going to work on my baby hairs. While my hot comb heats up because it wasn't heated up yet so. For baby hairs, we're just pulling out a small portion, it's up to y'all how much you want to pull out and then i'm just going to take the back of my hot comb. Be very careful because i definitely burned myself once or twice and yeah be careful. But use this to pull the hair forward and then i'm using a razor to cut this, because i want it to be different, i'll, never use a razor, my baby hairs. I don't know what i was trying to do or prove this day, but i used it, and here we go with the gorilla snot, so i have a bittersweet relationship with this at the moment um. I do not recommend using gorilla snot if you are using got to be gel on your wig. This may look fine in my video and it looked fine in the last video too, with the braids, but i promise y'all it lifts really fast and when it does lift it's hard to get back down without having like a yellow messy look on the outside. So i do not recommend this at all. You could do the same thing, i'm doing right now with eco styler and just tie it down, but i would not recommend using gorillas knot with got to be joe because it did not look good after a couple days of wear, you can only wear this. Look one day and then it's done, it's literally done. They don't mix well at all and it makes your install so messy. But here's my baby hairs complete on one side. I just did the other side and then i'm tying it down into place for about 10 minutes and while that's happening, i'm just going to be hot, coming my middle part down and we're just going to start plucking it after this i plucked the part for this Unit because i didn't bleach the knot, so obviously it was standing out a little bit too much for my liking, but yeah here i am just plucking it. I can make a more detailed video on it. You see, i just parted here and ripped it off, but i can make more detail video, because this really doesn't show you how or what i'm doing so. Let me know down below if you want to know how to pluck your part. But here i am cleaning it up with some concealer since i didn't bleach the knots or anything, and you can see it looks like freshly bleached knots like it's nothing to it once i'm done with that, and the edges are dry, i'm just going to unwrap this And then i'm just gon na finish the rest of my part, i'm just plucking it and adding concealer to it, and then this is the end of this look. I hope you guys enjoyed it. I hope it was easy. So that's how i style my wigs. Only using got to be products i like it because it has a stronger hold than just the spray i felt like. I had to touch it up a little bit more, but right now i'm looking and it doesn't look like i'm going to have to, but the last one was my first time doing this and i was touching it up every day. You do that with a spray too, but this um started showing like lifting on the edges, but i'm gon na. Let y'all know what this one does this time, because that was only my first time doing it and it was a little messy last time. But this time it's not messy and i like how it turned out. I hope it was straightforward easy for y'all to understand, though, because um i did promise. I was gon na put this video out, so i'm just glad i got to film it so early as far as the hair goes, this hurts from eunice hair. As i said in the title, i want to say this looks like a 13 by four and i like it, it's really soft. My only thing is they put the blonde so low. The only way you can see this. If i do this - and i don't want my highlighters - i don't like it in person with it like moving and stuff you'll, see it through the back and then you'll also be able to see it um face to face, but on camera. Of course you only get to see one angle, so it's not showing up how i bet they intended it to show up. What i wanted to do was some curls with this because i feel like then the blonde will show more, but i cannot curl y'all know i'll be trying all the time. I literally i have curl tutorials on my channel and i just can't get the curls that i want to get like. Those are not the curls. I mean i could waves, but they never come out like big body, curls yeah, that's the only thing i have to say about this hair. The box was pretty empty. It came with wig cabinets. It'S of course, all the details for my hair be down below. I hope this tutorial was easy for y'all. I am hoping it was very detailed because that's what i was going for if y'all have any questions as always leave them down below and don't forget to check out uni's hair down below as well, but yeah. I'M gon na see you guys in my next video. You
Comments
Jasper101: Your tips helps me so much ty ❤️
Lanese Fields: keep being honest with your reviews thats what made me subscribe too you plus i like your video's but your honesty did it.
Scorpios Finest: ✨I love the install & this Color ✨ ✨Slayed ✨
Cassie Law: that wig
Allove Hair: Waiting for your latest updates check Email
nas mims: Prettyy
Stephani Cruz: Laaaaayeddddddd