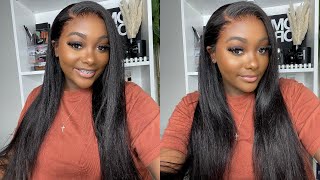
Epic Hairline⁉️ Easy & Simple Ready To Wear Wig Install | Beginner Friendly! | Xrsbeauty Hair
- Posted on 01 August, 2022
- Lace Closure
- By Anonymous
●▬▬▬▬▬♛ Xrsbeauty Hair ♛▬▬▬▬▬●
►Now Use 15% Exclusive Coupon Code: XRS511
▶Use Coupon Code to Buy it in here: https://bit.ly/3BodIpE
SKU: LFW11
Length:18''
Density:200%
Lace: 13*6 Front Clear Lace
New Clear Lace & Clean Hairline
Clear Lace Melts with Your Skin.
Clear & Transparent for Real!
Natural Hairline Transition
▁▁▁▁▁▁▁▁▁▁▁▁▁▁▁▁▁▁▁▁▁▁▁▁▁▁▁▁▁
New CLEAR LACE is real clear lace, it’s undetectable on your head.
New CLEAN HAIRLINE is much more natural than a regular pre-plucked hairline. They customized this natural hairline to make it melt perfectly!
▁▁▁▁▁▁▁▁▁▁▁▁▁▁▁▁▁▁▁▁▁▁▁▁▁▁▁▁▁
—Share looks on facebook, instagram , youtube and tag @ #xrsbeautyhair , customers will get $15 dollar for next order.
Contact:
YouTube: http://bit.ly/2KXjerD
Instagram: https://www.instagram.com/xrsbeautyhai...
Facebook: https://www.facebook.com/Xrsbeauty
Pinterest: http://bit.ly/38VFY3a
My Socials
IG: @kamanijeann
Twitter: @kamanijeann
TikTok: @manijean888
Snap: @manijean
Wig IG: @wigssoldbymani
Email me for business inquiries only [email protected]
Hey everybody and welcome to my channel welcome back, be right, returning view where I have to come to you guys from the normal lighting to show you guys how this was giving scalp. Okay, this wood came pre-bleached pre-plucked ready to wear. So if you guys would like to see how easy it is to install this wig keep on watching, okay, guys, hey what's up yes, y'all can see. I got a new piercing if y'all couldn't tell her notice yeah. I got my Medusa Pierce, but that's not this. Video is about y'all. Let'S get into this hairline, it looks so clean. You guys can see how easily my hands are running through this hair where their hairline began. I mean like I love XRS Beauty here for doing this for us, because no work is needed. Okay, so this big install is going to be very quick and easy. I'M taking my Ruby kisses cream foundation in the shade rd15. I'M not even doing a bar cap with this wig, it was unnecessary, didn't need to be done, but um yeah, you guys be still wanted to give caps. I mean scalp, so I still wanted to give the illusion of a bald cap and I wanted to make sure that the product was right on where the cat began. So I went back and added some more makeup because that is what's going to help. Give you the illusion that you know we did a bot type and we worked extra hard and we really didn't but yeah you guys, I'm cutting off my ear to herbs now and, as you guys can see, that's what it's looking like there moving on to the Next side, I don't have a specific guideline for this. I really just eyeball it now, but it does help if you clip the hair back to see it better. If you are a beginner, but now that that is done, I'm going to be cleaning off my skin with the Sephora alcohol, it's like 70 percent. It could be 90, it doesn't really matter but y'all, making sure that my hairline is super clean, because you want to make sure that the stuff sticks. So I'm going to be taking my ebb and wonder: lace, spray and I'm using that for this install today I was on my head when I said using. This was a glueless the last time. So I'm going to say it's just um lace, spray since y'all, so technical whenever, let's see how you guys, I'm spraying this all over, not all over, but around my hairline, where I want this lace to lay pretty far down below my um cap. Like a half of an inch, nothing crazy, but I did use four layers of this. But of course I only showed you guys two, but each time you want to make sure to blow dry it on a cool high setting and also make sure it is tacky. Before using the next layer, okay, so yeah you guys that's what I'm doing here blow drying this last layer, as you guys can see, it looks pretty built up and um. Now I'm going to be taking this lace and putting it right where it was now. I noticed that it was a little wet still, but it wasn't nothing crazy. So if yours is still a little wet, so you don't want to you, don't want it to be completely dry. So if it's a little bit wet it's nothing to blow dry it once the lace is on I'll. Tell you guys, I'm just pressing this lace in to this spray and then I'm going to be blow drying. That, like I said because it was a little bit wet, so I'm gon na make sure that um it is dry down and then I'm going to be applying my elastic band and letting that sit. While I style this hair with every wig that I install. I make sure it's a hot comb, the hairline before putting the wig on, but you know after manipulating it and doing all that extra stuff to it. During the process, I like to hot, combine it again to make sure it's getting that clean push to back. Look still so I'm making the part now which it was very easy to do like y'all. This hair was so silky, and I have it still on my hair. Now it is so silky so like making. This part was fairly easy. I didn't have to do too much manipulating of like trying to get the comb you know like it wasn't. A hard process is what I'm saying, but this wig was very, very lumpy and bumpy, so I had to put in extra work to use my hot comb and go over it many many times to make sure it was as flat as possible foreign heat processed through The hair I'm going to take my carry care, wax stick and get this even more pressed out foreign for maybe 13 14 minutes just because this was lace spray. So I wanted to make sure it was really sticking but um yeah. You guys. I just cut two pieces off to get a guideline for cutting off this lace and, as you guys can see with my eyebrow razor I'm going in a zigzag motion. This is what's going to help, give the illusion that it is scalp okay, and it definitely was giving that like. I need to started using Evelyn Spring more for my installs, because I can take it on take it off. It doesn't really stick that much in it's fairly quicker like it was a quicker install for me, but nevertheless yeah you guys I'm cutting off this lace all the way around and, as you guys can see, if you can't notice this is in real time. So everything that I'm doing is at this pace very concentrated. That'S how y'all want to be very concentrated, get the lighting big mirror. Oh yeah y'all. I got me a new mirror, which I see me do my hair in, like the mirror that I do my hair and it is bigger - and I have to say y'all should definitely get a big mirror to see and when you're doing your hair, because it helps A lot, but nevertheless you guys not that the lace is off, I'm taking some more of that ebbing. Wonder lace, spray and I'm spraying that along the hairline to get that grid look kind of going of the lace and I'm going to be tying that up and having my elastic band around there. But here I am showing you guys the difference between transparent lace, which is where my finger is right there here and then new, clear lace, which is the kind of lace I was used to make this wig, as well as all of XRS Beauty's. Wigs, as you guys can see the new clear lace, it is like super seamless on my skin. You cannot see like any harsh lines, anything compared to the transparent lace. So I just wanted to show you guys that clear lace is the newest version of lace. It is upgraded even from HD lace, because it is clear and super seamless. That is why I didn't have to do too much work with the bald cap or really anything but put this wig on, because the lace did Justice. You know what I'm saying as you guys can see now I am plucking this part to where I didn't get widen it up a bit because it was getting a little scrawny, a little thin and that's not natural but yeah. Now that that band is off you guys, it was definitely giving scalp. I had to add some more of that rd15 cream foundation. I didn't actually put it onto it. It was just left over from the brush from putting it on the lace by higher too, but but yeah you guys yeah, I'm talking real fast. I'M excited to do this voiceover for y'all, I'm sorry but um yeah y'all. Now I am doing the baby hairs. Putting these out, I wanted them to be dramatic, so you guys will see how I styled these but yeah. I took out a good amount of Sideburn because, like I said I do want this to be dramatic, so yeah yeah foreign, so now that I'm styling this actual hair with the look I was going for, I wasn't even really achieving it, but it's okay, because it Still came out cute, but basically I wanted super acrylic bumped in, but they was looking real straight like it's, probably because this hair came straight and already like fresh out the package ready to wear so it wasn't. The density wasn't really showing that much when I was trying to style it so yeah I attempted to put some rollers on there to I don't know. I thought that would help a little bit which it did you guys will see, but tell you guys. That is the look that I was going for. Like I said this hair already comes um silky. I did press the flat iron through this hair, though a little bit to have it looking fresh but show you guys. That is what I did to style this hair. It'S very easy, very simple took very little time. I did not have to do much, which I loved, like I love to do hair, but sometimes it's cool to have something. That'S pretty plugged and ready to wear, especially for y'all beginners like y'all. Don'T have to do much at all but know how to style this way, I didn't know how to do it, but at least try you know like I got ta try. I got ta, try and practice, but yeah guys. I just cut off my baby hairs. I didn't do nothing special like I didn't cut it any certain way: um yeah, but yeah, guys, I'm taking my red kiss pencil flat iron and I'm curling these baby hairs, which they was looking super fluffy like these baby carrots come out. Super super pretty, which I loved I'm gon na, take my ORS olive oil gel, and that is what I'm going to be using to style my baby hairs. I didn't really try too hard with these, because I wanted the curl, because how good it was looking. I was like I want to keep this curl, looking, not the curl looking curl, but basically like the baby. Hair is looking curly or whatever, like you guys, will see how it turns out. In the end, let me tell you guys, I'm basically just swooping everything together. Just trying to manipulate it see how I wanted to look and how I want it to go. Of course, I'm not going to show you guys the whole process, but this is basically the steps that I took to get these baby hairs like especially tucking it behind my ear. That is mandatory that you take gel to do that and I do cut in between. Like I don't cut all the baby hairs that I want to cut off right then, and there when I'm cutting it off, cutting them off, I do it as I'm doing it. I don't even know how to explain that, but yeah I cut the baby hairstyle off as I'm doing my baby hairs like just so it can be too Perfection like how I want it to look exactly but yeah I just took some um got to be glue. Gel in the black version to kind of help sleep that behind my ear, but as you guys can see, I'm being really delicate with the baby hair in the front. Because I wanted it to give the illusion like that, was the curly little piece and it was given that but yeah I just comb down my size per Sideburn and I am using that same gel. The ORS olive oil holding gel and I am making a dramatic spoop y'all, see the end of the curl like that was so cute to me. I'Ll tell you guys. That is what it is looking like. That is what the baby hairs is looking like, and now I'm taking rd09 cream foundation by Ruby kisses and this small detailed makeup brush and cleaning up this part, I'm kind of patting it through and then smoothing it out towards the front once I take it all. The way to the back back and then I'm going to smooth it out with my fingers just like this, so it can look clean and like it's not makeup, just sitting on top of the lace. The last thing I'm going to do is be taking my Tresemme holding spray in my hot comb to get everything to be molded in place and to just look really clean, sleek and put together. You know what I'm saying: if you hear a little Sizzle, that is: okay, okay, you want to hear that Sizzle, that's going to mean that it's getting pressed out and is pressed through I'll tell you guys. I just took the rollers out and it was looking exactly how I wanted to look, but then I started doing too much. I wanted to comb it out that I wanted to add a little bit of oil in it to add some shine and that it up, but it's okay, because it was still cute, like it looked like a little fluffy um curls at the end, but yeah y'all. That is the look I was going for. This is the end of the tutorial. Thank you guys so much for watching hope. You guys learned something and make sure to check the description box for all the information on this hair, and I will see you guys in my next one. Bye.
Comments
iiamgavii: Thank you for dropping this FREAKIN VIDEO literally im going to make a video of me installing my wig for the first time and idk wtf I’m doing
Fitima Tucker: It’s giving natural
Shanya Mariee: i love your videos
Life As Nikki: Slayyedd
watch you wanna know?: I love how u do your wigs but is it possible for anyone to put on a wig and not see the wig cap? btw I am a beginner
Meka: I love watching all your videos, can u tell me how did you get wig companies to sponsor you, I’m getting interested in that
GanjaKay: Period
Samara: Hey ? How long did the wig stay on ?
Martine Augustin: Did you bleached it
Life As Nikki: Come be my hairstylist
Ali Pearl Hair: