Bolin Hair && Unice Hair Review/ Tutorial
- Posted on 12 September, 2016
- Lace Frontal
- By Anonymous
-~-~~-~~~-~~-~-
Please watch: "GET TO KNOW ME TAG | BEAUTYBYAJ"
https://www.youtube.com/watch?v=4ZnVbs...
-~-~~-~~~-~~-~-
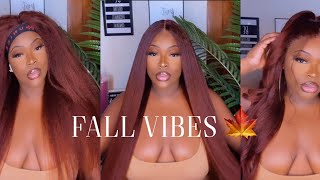
Hi guys this is aj and today's video is going to be a hair tutorial, but it's going to be like a hair of you also. So if you notice this is some straight hair. Yes - and this is a frontal. So if you're interested please stay tuned, and i will also like to thank all of my new subscribers and old - i am now at 45. I believe - and that is really good, because that's almost 50, which is half of a hundred which is like 900 away from thousands. So thank you and if you're new to my channel subscribe and yeah, so we're just going to jump right into the video alright guys. So the frontal that i'm wearing is a lace frontal and it is from the company bowling hair bo li n and it will be linked in the description box. But this hair was the frontal was $ 45, but it did um hi like twenty dollars shipping. So it ended up being 64 23, which again really isn't that bad considering like you, can get in front of her like a hundred dollars and it probably won't even be seen okay. So this was a Malaysian straight frontal and it did come with baby here. But I cut them cuz, it was all the way down here and then the hair that i'm wearing is, of course, you nice hair, and it is in the length 18, 20, 22 and the frontal is 16 inches. I believe, but everything will be linked in the description box and the you nice hair. I don't have any clips of it, but if you want to see clips just look at my you, nice, hair video, because this is the exact same hair same length and all it's just not the same batch different badge but yeah as you can see after I Straightened is so so much better but yeah, so I have some specs about the frontal when I was looking at it. The hair look the exact same as in my you, nice, hair video, so I'm not going to like go into that, but the frontal something that I noticed and i'll insert some pictures and some clips below or after this and I'm sorry. I keep looking at my phone, but I made me so when I got the frontal it. I know that it had a lot of short pieces. It was a 13 x 4 and it had it wasn't really that thick, which I didn't want a fake frontal anyway, because i already had two. I wanted it to look flat and I wanted to not look different than the hair because it was so different companies. So ended up working out really well, but it wasn't really that dick and I ordered a free part and it kind of looked like it had three parts any, but it wasn't really that defined, but it looked like it had three parts in it and it it Did have the dips and grooves of a natural hairline, and it was good because it didn't like just go straight across because I didn't want to look like I had a straight across the hairline, I'm what else um there was an odor to it, but it wasn't Like corn chips, it's not like something, but I don't know what it was and I didn't even wash the hair after I put it on the way, so the smell did go away, but it was all over to it. I don't know what it was then and, as I said before, there were some short pieces and there are a lot of different colored pieces. There'S like gray and blonde and stuff - and I don't know if you know I want to dye it or if I want to leave it, but it's making it noticeable that it's not that it's a frontal or making a notable that it's like not leave out, which I mean I don't really care, but it's like it's it's noticeable and what else, although frontal, was really really really really really really really soft, so that is a plus and it did look like the 16 inches might have even been longer than that. So nobody's complaining about that, but you know everything all the Conda stuff that I just said it ended up working out like nothing was like. I can't use it so, as you can see like it blends with the hair, so bowling hair and you nice hairdo go together and it just looks really really nice. So, if you're interested in seeing how I actually put this wig one stay tuned for that, because that'll be on the next part of this video and yeah. I just wanted to make a quick note before I show that if you remember, in my other frontal video and i'll link that below um, i had to use the gossipy glue, because i couldn't figure out how to put the elastic band on it without a pulling The frontal back and i figure out how to do it. It was something i was doing wrong. I was connecting it to the wrong part of the cat, so now this is how my other weeks are like. I can just take it on and take it off whenever I feel like it, so that's a real good plus, which is the reason why I wanted to show you guys, because you know, as I keep updating how I'm making my wings. I want everybody to be informed that way. You'Ll know how to do it too, and what else was I going to say um yeah. I wanted to show you guys how the hair looked while it was like I Ward and a phony stuff like two days, because i had share practice and you can see that the hair was still like silky and still soft, but it just wasn't like this. So you'll see that and you'll see like the process of that. So if you're interested please stay tuned for this clip, okay, so, as you can see, i have my little bonnet on, so i'm just going to take it off and, as you can see, i have on a like fishnet kind of cap thing, and that came with This frontal, so i'm just using as like a wig cap kind of thing. So I'm just going to slide the elastic band to the nape of my neck area, kind of like where my ears connect and then I'm going to just slide the back down and then, as you can see, the front will kind of got like bunched up together. So I got to pull it down, so it looks like it's in the right, but and then I'm just going to adjust it and, as you can see, the little side pieces they weren't staying down. But it doesn't really matter because I'm not going to where it needs to be down, but eventually i'll start using the god to be glued with the elastic band to get it to lakeland. So now i'm just going to section off the top of my hair. So i can lay down the baby ears and i'm just going to use my little toothbrush, not the toothbrush. I brush my teeth with and eco styler gel and my little spray bottle with water and i'm going to spritz the toothbrush, then dip it in jail and lay down the baby hairs. So now I'm going to straighten my hair, and this section actually doesn't look that bad. As you can see, the hair still has body and it's still soft and silky looking, but I still wanted to straighten it and get the little crimps out from the hair tie. So I'm going to section that section off and this is the instyler flat iron it's in the one and one-fourth bit row i believe, and it's on the highest setting, which is like 4, 10, 4, 15, 425, something like that and yeah I'm just straightening it and When you straighten within sorry, you have to go like really slowly, because it's not like a real flat iron. So, okay, so I finished one side, so the right side is done and the left side is not and as you can see, it's a difference like the way it looks it's shinier, okay. So now i'm all done and it's i just love the way. The hair. Just turned out like it's really really really good hair, alright guys. So that was today's video. If you liked it, please thumb up this video if you're new subscribe and if you have any questions comment and if you have any video requests comment, because it's getting kind of hard to think of what to record, because I feel like I've recorded pretty much. You know in every aspect that I wanted to dabble in except there's I did want to make a tutorial for how am I here for cheer practice and like four games, since I am a college cheerleader now. So if you're interested in that, let me oh and yeah um, that's it! So my guys!
Comments
Fran L: It looks so good on you, like really natural. Would you recommend ?
Cl J: Great video. You're very knowledgeable.