Neat & Sleek Straight Lace Wig Install -- Cyber Monday Sale Is Underway!
- Posted on 03 December, 2020
- Lace Frontal
- By Anonymous
-------- WowAfrican's CYBER Monday is underway ----------
Up to $80 OFF + $50 Wig Kit + 2X Loyalty points
$80 OFF - $499, Coupon : CY80 $60 OFF - $399, Coupon: CY60
$40 OFF - $299, Coupon: CY40 $20 OFF - $199, Coupon: CY20
Link to the wig:
https://www.wowafrican.com/360-lace-wi...
360 Lace Wig 180% Density Silky Straight Brazilian Virgin Hair [TLW01]
LENGTH:18in
Density:180%
Cap Size:Average(22/22.5in)
Pre-plucked hairline
Bleach knots & Elastic Band
Free Shipping World Wide over $89.
***Coupon code:Youtube Discount: $10 for all site
WowAfrican Popular Affordable 360 frontal wigs, pls check here:
http://www.wowafrican.com/360-frontal-...
More beautiful Lace Wigs pls check this page:
https://www.wowafrican.com/lace-wigs.h...
JOIN WowAfrican Social Channels:
Youtube: https://www.youtube.com/user/wowafrica...
Instagram:@wowafrican_Official https://www.instagram.com/wowafrican_o...
Facebook: https://www.facebook.com/wowafricanwig...
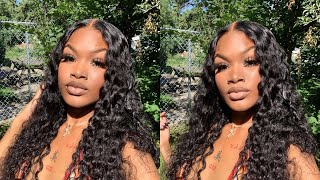
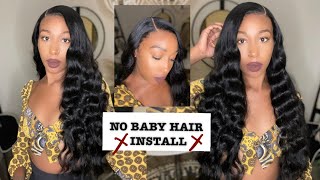
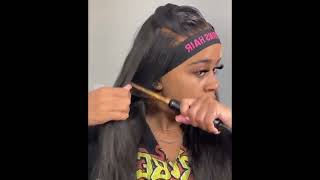
Hey beauties and welcome back to, i am beautiful, husky tv today, we'll be doing a side. Part slay with um this straight away from wow african hair, and this wig came with the notch already pre-bleached and it is a 360 lace, a 20 inch and it's like more than two to length because it's like way longer than what it says it is and Also um, you know all i had to do was just you know, pluck the front of the lace wig, some more um and yeah, i'm just gon na go. You know, jump straight into the installation process. Now, as i mentioned, this is a 360 wig and you know i mean i'm not going to glue down the back, because we typically don't like to go down the back. So we're just going to glue down the front and we're going to do a side part with some baby hair, but i'm going to tell you guys now, so you don't get disappointed. I am not going to show you guys how i did the baby hair in this video because i told y'all i am preparing for our baby hair sleigh video. So i did record me doing the baby hairs, but that's going to go in our baby hair tutorial because i told you guys i'm going to do a video showing different techniques and different styles of baby hairs. Okay, so don't kill me, you still don't see it. Just not at this moment, but, however, i'm going to go ahead and begin to add my layers of adhesive and before i apply that glue. I did use my scalp protectant and applied it on the hairline and blow dried it on a warm setting, and then after that was dry. That'S when i started to add my layers and then for today's installation. I will be using four layers of adhesive and once it's done um like now, i will go ahead and you know apply the wig and you know just do my typical steps of the melting process and then we're going to get into pretty much the styling portion Of this video, so don't forget to subscribe. Thank you for watching and stay tuned chief uh changes. So, as you guys know, um asia does have like a small forehead. So much of the lace that i have like pulled downward the head, i have pulled downward. It will be cut off once i go in with the eyebrow razor to raise off the extra lace, and this is typically none of the hair that is needed for the installation. So i would just go ahead and razor it off, but i like to just go in with my scissors first and make that little slit. And then i will take that eyebrow razor and just razor right on off and you want to get as close as to the hairline as possible, especially where that lace has been tucked down really really good, because if it's not needed, you don't need it cut it Off, but if you need some extra of that, you know lace to um, you know match the hairline perfectly. Then, of course, you can go in and just tuck down, whatever else may have got missed when you apply that adhesive, but i'm just going to go ahead and continue to raise everything off and once i do that, i will pull down a section for the baby Hairs get my side part going and start to get everything pressed out. Oh now, that all of that lace is cut off, i'm going to go ahead and begin to pull down the section for my baby hairs and then um just go ahead and start to sleek out my parting area, with my wax stick and, of course, the hot Comb and uh, once i get all of that done, i will just get everything sleeked out and i will um part the baby hair part that i pulled down into little planet sections, because afterwards i am going to um. You know spray that hairline with the holding spray and then tie it down. So i'm just going to before. I do that. Just pluck out a few hairs from a certain spot of the hairline, where i feel like it's too much um hair and then i will proceed to follow those steps. Uh you let's go now when trying to achieve a very, very sleek. Look you want to make sure that you go into the frontal part of your wig and really hot comb, everything out nice and sleek, because that's what's going to help you get that really nice flat look and also that very sleek look. So i'm going to part off sections and apply that wax stick and just keep going in with the hot comb to make sure that every part is nice flat and sleek from the roots down to the ends. But of course i still have to go in with the flat iron and still fly on the hair out, but this is the first thing i'm going to do before i even get into their whole flat ironing process. Oh oh foreign! So now now that all of that is sleek, i just went ahead and kind of clipped it back so that it's out the way - and i know i'm not going to show the baby baby hairs, but that will be on the baby hair tutorial. So for now, i'm just going to go ahead and spray that hairline tie it down and when she do come back on the camera. After removing the melt barrel, her baby hairs will already be completed, and all that will be left to do is just you know, finish the flat ironing process and concealing the part, and that would pretty much something to uh. Some of this tutorial - and i know y'all will be dying to see how i did the baby hairs, but i have big plans for our baby hair tutorial that i will be releasing so just bear with me guys. I'M going to be cropping out a lot of the baby hair parts on. You know the more recent videos until i have enough footage to just do a full baby hair tutorial. So i'm sorry, you guys won't see it in this video and i apologize in advance for the ones you won't see as well, but it's in the works just work with me: y'all it's in the works championships, kids changes and the baby hair is complete. This is a quick view of the baby hairs or whatever, and i did this uh using the uh, the gel method, um, you know with the baby hairs. I know i usually do like the um holding spray or whatever like that, but today i went in with the gel method, so i'm going to show you guys um in that video different method using different products. But, however, her baby hairs aren't complete and um. The video looks a little bit darker now i noticed like it looks darker here, but once i actually um show y'all the finishing look with her standing up against the wall. It will look more, you know, like you, will see it better like you would really get a clear vision of the look. So i'm sorry, this is a bad angle as far as tutorial, but um, the finishing look is so bomb, and this is her stand up against the wall with better clear lighting, but i hope you guys enjoyed this video. Thank you guys for tuning in and see you guys. Next time don't forget to subscribe. Bye!

Comments
Katrice Johnson: Yes honey yes!! You did a beautiful job!!
p m: looks like natrual born with hair she looks gorgeous you are Bless & talented by Heavenly Father GOD thank you beautiful lady Blessings ✝️