Super Detailed Glueless Frontal Wig Install For Beginners | No Glue! No Wig Cap! | Hairvivi
- Posted on 07 September, 2022
- Lace Frontal
- By Anonymous
Enjoy $30 OFF DISCOUNT: Africana (Limited Time)
Wig in Video: https://bit.ly/3cBGauc
Length & Density: 20 inch & 160%
Cap Construction: 13x6 Lace Frontal
Cap Size: Large
▬▬▬ JOIN #HAIRVIVI LOVER CLUB ▬▬▬
https://www.hairvivi.com/pages/vip
- Hairvivi Club Exclusive Free Gift
- Exclusive VIP Customer Service
- Free Wig Repair Service
- Free Customize Wig Service
- Choose Your Own Sale Day
▬▬▬ MORE WIGS FOUND HERE ▬▬▬
▶ Best Seller #LaceFrontWigs: https://bit.ly/3pWJFi6
▶ Hairvivi 13x6 #HDLaceWigs: https://bit.ly/3R8oLIF
▶ Hairvivi Official Website: https://bit.ly/3Q9pNCS
▬▬▬▬ Hairvivi Social Media ▬▬▬▬
Instagram: https://www.instagram.com/hairvivicom/...
YouTube: https://www.youtube.com/channel/UCWK7J...
TIKTOK: https://www.tiktok.com/@hairvivi.com?l...
Facebook: https://www.facebook.com/hairvivicom
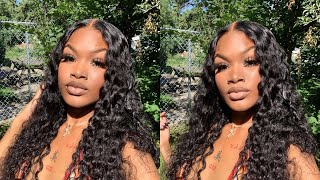
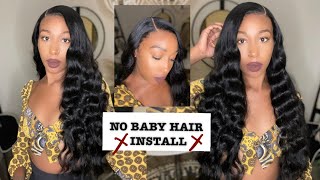
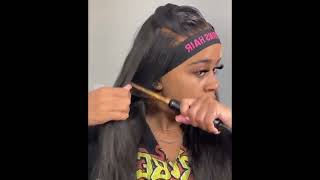
What'S up africana fam, it's your girl younger for kind of back at it again with another video and today i'll be showing you guys how to do it. Easy glueless! Yes, glueless install! So if you want to see how i achieve this look from start to finish, then keep on watching so the hair sponsor for today's video is hair vv. I have their haven blonde highlight wig with the natural hairline. The hairline is pre-plugged. It came nicely packaged like this with some goodies as well, so we got some hair goodies. So when i'm styling my hair, i'm able to use those things, i'm going to use it during the video. As you can see, the hairline is nice and plugged. This is super beginner friendly, y'all like this is a ready to wear wig, and on top of that, this wig comes with a 13x6 parting, as well as the ball cap method. So it gives that scalp, like effect with some combs and also an elastic band. So you are good to go as a beginner y'all, so i'm just slapping this on my head, as i can see like the wig, is wigging like it's looking good, it's giving scalpiana already y'all, and one thing i like about this wig - is that this wig actually Fits my head, i have a big head and i also have trouble with just company sending me wigs and sometimes it's a bit too small for me, but yeah hairline, completely bleached and plucked i'm going to go ahead and tip my lace with the amazo bay smear Tint in the color mocha and i'm going to let that sit for about 10 to 15 minutes and let that air dry, i'm just applying one layer on there, because the the lace already is already kind of like on the darker side a little bit. So i'm just only doing one layer letting that sit and air dry for about 15 minutes and now i'm going to go ahead with the styling, so this hair is already pre-parted in the middle. So i'm going to stick with it in the middle again. Super duper beginner friendly. If you don't know how to part this wig is already coming in clutch for you. So i use my character wax stick just to press down those flyaways and i'm using my hot comb just to press out the hairline just to see what we working with y'all. You know you just you got to see what you're working with so go ahead and press that hair out, so everything is nice and straight and there's no humps and dumps because we're not trying to look like humpty dumpty dumping off the wall. No so yeah, i'm just pressing out the hair, i'm just you know, pressing the hairline backwards, just see what we're working with now. This part is completely optional, but this is not a young africana video without me being extra, of course, so i'm just going in just you know, adding in some nice face framing layers. You know i love a good bombshell. Layered! Look it just gives, and especially with highlights. Why aren't you not layering your hair, baby girl, i'm telling you when you put color and you put layers and you curl it it's just chef's kiss y'all every single time, so i'm just cutting some layers, i'm not really showing you guys. How i do that. I have a whole video dedicated to that on my youtube channel i'll leave that down below and stuff for y'all to watch it. If you want to learn how to layer your hair like a pro okay um but yeah, i'm just lightly layering, my hair, usually i'll, go a bit heavier, but i'm going pretty light today. I didn't want to cut off too much length, i'm just giving it some more body and now on to curling, i'm just going in sections and i'm using my babyliss titanium pro curling iron. This is the one and a half inch barrel for those bombshell, curls, i'm just curling away from my face. Pretty repetitive: pretty you know young africana is you know this is this? Is right? Okay, i'm just gon na go ahead and curl. My hair. Give that bombshell, type look, yadda, yadda and just keep on watching y'all, and i don't know if y'all been watching and you know been clocking my moves. But what i do is when i release the curl i just like to hold it in my hand. While it's still hot so that, like you know all the heat, just don't drop down into the curl, and this just retains the curl to be a little bit more curlier you'll definitely see a huge difference once you start applying that rule. So just let it sit in your hand. I know it's gon na be a little hot, but y'all got this. Come on. You can't take the heat, get the f out the kitchen all right. After 10, 000 years we finally made y'all. So i'm just gon na go in with my chi hairspray and i'm spraying that all over the hair, just for it to last now on to the fun part, the install my hair looks crazy. I know what have been touching it and it just got extremely frizzy. I'M overdue for a new hairstyle. It'S coming soon! So yes don't mind my hair, but i'm using my bolto liquid gold from the hair diagram and i'm using that to slick down my edges and what i'm doing is i'm going to apply some right at the you know, perimeter where my edges are using the hair Vv brush the edge the edge control brush or edge brush, and i'm just you know, swiping my hair back and then just holding it right there and then blowing my hair with the blow dryer on medium heat. That was a lot of words just now, but yeah. I get the gist is to dry it off and when i tell y'all this holds this holes. My hair is on the courses side, as you guys can see, and this will literally hold any type of edges. Y'All, i'm telling you it will hold your life together. Okay, go ahead and get you this, i'm also going to be using the same bolt hold look at gold and again it's from the hairdiagram.com go ahead and get y'all some. This is my holy grail. As i can see, the edges is looking snatched. You want to make sure, there's all your hairs away and nice and slayed and stuff, but i'm going to be using the hair diagram both hold liquid gold, also for my um glueless install, and this could last you up until a week. All you need is water to remove it and you're good to go, but right now i'm gon na go ahead and prepare my hair. I got the wig on where i wanted to be at, and i cut some slits at the temple and now i'm just using a razor eyebrow razor just to um cut the lace as close to the lace as possible, and now i'm just cutting off the ear Tabs around my ear, which is just the excess lace. That'S around my ear, i'm just cutting that off and i'm just going to go ahead and lift the lace up. I'M not going to pull it back, i'm going to just lift it up and apply a thin layer, only one layer, y'all. I want to make sure that it's nice and flat there's no bubbles or bumps on the gel blow it on cool to medium heat and just let it get tacky, don't let it dry, let it get tacky and then put your lace down and then continue to Dry, it afterwards and it's gon na stick like glue yeah. I promise y'all. This will last me about a week. I don't do glueless installs often, but when i'm in a rush i do these and these will literally last me for a week. I should you not so go ahead and do this, and this is literally just like the same technique that i use with my glue just with gel and i'm just using my rat tail comb just to kind of detail any of the lace that i missed. I'M going to go in with a thin layer, you want to make sure that's nice and spread out and there's no, like you know, excess gel and stuff, and i'm gon na go ahead and dry that for a little bit let that get tacky and then press Down the lace onto it and use my comb to press it down, while i'm blow drying it, and i'm going to be doing this throughout the entire perimeter of the lace of course, so blow dry it on medium heat, just let it get tacky i'll say blow Dry, it for five seconds literally five seconds, then go in press in your lace into the gel and then use your comb. The teeth of your comb or the back of your comb, just to press down the lace and then blow dry, the rest of it. And it's stuck and that's literally it this is foolproof. If you mess up, you could literally just use water and just start all over again. There'S no alcohol prep, there's! No! Nothing like you. Don'T have to prep your skin and put on any type of you know. Adhesive primer on none of that this is foolproof and this is you're gon na get it okay. This is definitely beginner friendly, okay, yeah. So now i'm going to go ahead and i'm working in sections. Overall, i worked in five sections, so one in the middle um, the temple area and then the tendril area, and i like to work in these sections because sometimes when you're working on the entire side at once, it may not stick all together. So just work in smaller sections, like i said, five all together, one in the middle and then two on each side, so i'm just working on the tendril area. Well, so i'm working on the temple area and now i'm working on the tendril area gon na blow dry, that on medium to low heat, just for, like five seconds, make sure it's nice and tacky press that down and then go back in holding down the lace And go back in with your blow dryer until you feel like it's dry, and i usually just let that sit for about 10-15 seconds and i'm just gon na go back in detail and blow dry. It'S really that simple! All right, you guys! So this is like the finished result. I know it's looking a little crusty, but we're moving trust the process. Okay, i've seen what y'all seen in the beginning. It was looking nice, so trust the process. So right now, i'm just cutting out some baby hairs. I'M just doing two baby hairs on each side. You know something really calm. It was a little bit hard for me doing the baby hairs considerably, because considering how silky the hair is, the hair was kind of like hard to you know curled the baby here for it to stay so like that's kind of the only downfall, but we love Silky hair, we love a good silky hair um, that's just about it. You know, there's not that much texture for it to really curl curl. You know like that, so yeah, but right now i'm going in with some spritz, and this is how we're melting the lace y'all i'm gon na go in with some spritz i'm using the mega hold one and i'm gon na spray that all around the lace area And you wan na let that dry for a little bit, because if you just put the elastic band on it, while it's wet, it's going to be a whole disaster. Trying to take it off because it's going to stick gel is already sticky on top of spritz. That'S already sticky you're, just asking for double sticky icky and that's not giving at all. So let that dry for a little bit with your blow dryer on medium heat, then i'm going to go ahead and use my elastic band and let that sit for 20 minutes and now that's done and we're still looking a little crusty but we're getting there. Now. I'M gon na go ahead and cut off um some of the baby hairs. I'M gon na leave it about like an inch or inch and a half long. I could have cut it shorter, but i i didn't - and this is where i kind of struggle a little bit. You know i use my tvx um three fourths flat iron, just to curl the baby hairs and um. I did the spritz method trying to curl the baby hairs at first, but it wasn't really staying so that i ended up using my mousse and oh my gosh. I miss using mousse to carpet my baby hair. So much like, i feel, like i've, definitely had more flawless installs with the mousse and the mousse also just sets the lace and that's how i actually got rid of the crustiness with the lace is using the mousse to remove kind of like the crust a little Bit you know so yeah, i'm gon na go ahead and apply the mousse on the baby hair just to form those baby hairs with the baby hair comb and then also apply some of the mousse on the rest of my hairline as well. You'Re not gon na see that in the clip of course, it's only me putting it on the baby hairs, but i also put it just a little bit on the rest of my hair and used my elastic band just to press it down and that's how i Got rid of the white cast all right y'all, so i'm gon na go ahead and let that sit and let that dry for about 10 to 15 minutes do my makeup off camera, and these are the final results. Drum roll, please, okay, viv! Any zayn now come on we'll be happy anticipating for no reason give me a couple of seconds. It'S gon na come there we go. These are the finished results. I hope you guys enjoyed this video like comment subscribe to my channel for more content and educational content. Like this, for your edges, okay, for the stick, your edges subscribe to my channel like this video go ahead and do what you got to do i'll catch you guys in the next one later you

Comments
Young Africana: I missed y’all so much, you know teacher Darkskin Muva of Color had to cater to the GLUELESS GWORLIES. The frontal is giving SCALP yall comment some ♀️♀️♀️ in the comments
Anika Ross: First and this hair looks flawless ❤️❤️
Zainab Jimoh: Omg she’s back
Wiggins Hair: Love you so much!!
Beautx Biscous: Hi queen do you put anything on the hair before you curled it
fidelis ogaldez: Your so beautiful!
Sammy Da Goat: You Da Bomb Lovely Makeup
Wiggins Hair: Love you so much
Anton Homin: Alles sehr schön. Aber zuerst zusammen die Nummern 10 und 1. Eine CountryGirll.Space Brünette und eine anderey Blondine. Es wäre unfair, wenn ich 4 wählen würde
fidelis ogaldez: Yes! I miss u girl!
денис макаров: ❤Only for fans over 18 year⤵️ Alles sehr schön. Aber zuerst zusammen die Nummern 10 und 1. Eine warmthhh.Online Brünette und eine andere Blondine. Es wäre unfair, wennx ich 4 wählen würde
Bob Hemmington: