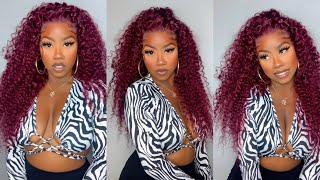
Perfect Blonde For Brown Girls Outre Tatienne | Synthetic Lace Frontal Install
- Posted on 12 October, 2022
- Lace Frontal
- By Anonymous
#outrewigs #syntheticwigs #protectivestyles
Follow Eleven11 Beauty on Instagram:
https://www.instagram.com/eleven11_bea...
Follow me on social media:
IG - https://www.instagram.com/diabinhaverd...
Tik Tok - https://vm.tiktok.com/ZMeKFoDLm/
Watch my last wig review: https://youtu.be/l0zLUEmY2pY
Link to purchase: https://m.wigtypes.com//outre-perfect-...
Hi guys it's Tanya and welcome back to my channel, I'm back with another wig review. Welcome to my channel if you're new, my name is Tanya M and I love reviewing synthetic wigs. I'M obsessed, I buy like almost every new release, and I come on here to do reviews on them to make myself feel better about spending so much money anyway. So today I wanted to try this beautiful, beautiful color on this Wig by outre she's fairly new she's. Not like new new but she's, really new. I actually bought her when she first launched, but I never wore her. This is uh the wig, Tatian and um. I happen to color drf4, slash, vanilla, caramel. I really want to try this because I actually have been looking for um a blonde highlighted wig with dark roots. Even to the point where I was about to buy a human hair, wig um. So I'm so glad that I'll say drop this um little specks about this unit, she's a 26 inch wig. I actually took her out the pot out of the box to look at the color because I was kind of unsure um. So that's why she kind of have like some bends in here, but that's okay, because you can either straighten her out or we could do an updo which I'm thinking about doing a cute little swoop, bang up, half updo, um yeah, so other specs, she's HD lace Of course is part of their perfect hairline, so she's a 13 by 6 unit. Look at all that parting space. Definitely gon na have to tint the um lace, but that's normal. She comes with um adjustable straps um, two Combs behind the hairline um, I'm sorry behind the lace, a larger comb in the back, and it comes with an extra band um. So, if the, if you're, if you have a larger head, it might be uncomfortable with this extra band, but you can just cut it out: okay, um, so I actually want to show you guys what they're on, because I want to show you the hairline. So I did want to come in guys and show you this hairline she's, really good. Look at that. You honestly don't have to pluck it if you're bad at plucking definitely get this unit. She covers. My hairline, especially like right here, is where my Peaks come in. Like right here, she covers that I will probably go through and do some plucking on this side here, because I do have a lot of room to do that and yeah, but just in this area, she's good she's, definitely good. So I was thinking about recording the install. I might just go ahead and record it, and so I was going to do a tick tock, but it, but I'm not gon na - do a tick tock, because I think this time, because for the last two weeks I did, I didn't show the install. So I do want to show the install this time but anyways. This is how she looks no snags or tangling as of yet, but there will be he's a good density, so I don't think she's gon na snag or tangle a lot, and I kind of like this color for my skin tone but yeah. I'M thinking about doing a side swoop, definitely can't show you how that I'm gon na do that now, but like an updo with the side swoop and the rest of the hair out in the back, I think that'll be really cute in like 90s type of style, With the blonde hair very ratchet very chic and very chic ratchet, like I'm gon na, be a Chic bougie ratchet with his hair um. This color is definitely great for brown. Skin girls dark skin brown, skin girls. Like me, this color is blonde. It'S really nice, like if you're not really like, if you like blonde hair but 613 is a little bit too much for you not too much for me, but if it's too much for you try this blonde, it's so pretty! So so pretty I'm gon na try to actually find a website that still has a color, I'm gon na try and I'll post it in the description box. If you don't see a link in the description box, he's gon na google, her name, but that means I did not find a link to a store that has this color still in stock. But I'm in love right now and I can't wait to install her so I'll be back once I do my ball cap method and then we can go ahead with the install okay guys. So I'm doing a voiceover, because I wanted this video to be faster than what it was going to be um anyways, jumping right into it right here, I'm cutting off the ear tabs, so it can be customized to my hairline. Basically, that's all I do and measuring cuts all right. Now, I'm taking an eyebrow razor to trim the lace off the hairline um. This just makes it look more um, not as straight as if you were going to use scissors, you want to look a little rigid or raggedy. I guess because it tends to blend better into the skin when it's not straight, when it's straight, you can see the lace once you lay it and I'm just um making sure I cut off the larger sections that I, where I left the lace on all right. So, as you can see, this is before I glued it down. You can see how seamlessly it lays, but I will be using go spawn glue to install this wig and um. As you can see, I did the ball cap method to protect my edges. What you're going to do is just take the got to be glue, you're going to do one layer and you're going to spread it out with a popsicle stick or you can just get these from the craft store. I got mine from Dollar General, it's very cheap! It'S just wooden sticks and you can spread that out um as evenly as you can, because you want the glue to dry evenly and I usually only do two layers of glue. But for some reason, when I did two layers, it just didn't lay correctly and it could be because I didn't um wipe my skin clean with rubbing alcohol before not really rubbing alcohol. But, like you know the 90 alcohol. So definitely do that. First guys, I'm just um clean the skin, with rubbing alcohol cleans off any oil or any residues left um. Now I'm just going to lay the lace there and prep I mean and press the lace into the skin um and I think I ended up doing like three or four layers of glue. But if you clean the skin off, you only need to do like two layers. I promise you but yeah. I just take the back of the of my comb and just press the lace into this into the glue. There will be some spots where it will lift because it's a little bit before the glue, but that's fine just put some glue there and then press down now to like secure the lace and let it melt I'm using the ebb and Lace spray in the black Container, I'm just spraying that along the hairline and then once you do that you can lay that down with a elastic band. You can blow dry for it to dry quicker, but you can just wait a few minutes too um. So it's installed now, as you can see, it's melted into the skin. It'S flawless, I'm just showing you the parting um, that's the middle, a middle bust down, but I'm not going to do that. I'M actually, like I said in the beginning, I'm going to do like a side swoop: um, updo, half updo, swise, side swoop, bang half up seal, but I wanted to show you guys how it looks parted like on the side. I love a left side, part and um yeah. I just wanted to kind of give you a guys, an idea of different styles that you could do with this. It is a frontal lace wig, so it definitely do a lot. A lot of different styles, with this um I usually do like one or two Styles before I end up getting rid of the wig. I do love this color, so I'll probably be saving it. I ended up actually cutting it shorter and um, but I think once I wash her and have other ideas, I'll definitely um come back and let you guys know maybe on my Tick Tock New styles, that I do with the wig um and yeah. So you're about to see the end results. That'S what I did. I love love love. This look. I got so many compliments. Definitely a nice episode have a good day and don't forget to subscribe and like this video


Comments
beautiful queen hair: It looks pretty on you! You made an awesome job, We're from a hair factory with 20 years of experience, Could we cooperate with u?