How I Style My Lace-Front Wig With Uniwigs!
- Posted on 14 January, 2019
- Lace Frontal
- By Anonymous
Subscribe to my channel!
Watch in HD!
IG: @katrinawest
_ _ _ _ _ _ _ _ _ _ _ _ _ _ _ _ _ _ _ _ _ _ _ _ _
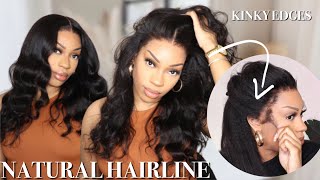
Hey team! Thanks for tuning in! Today I'm showing you guys how I style my UniWigs 'Morgan' Remy Human Hair Lace Wig! Xx
If you want to purchase one yourself, you can use my code Katrina15 for 15% off your order! Check it out at the link below! x
Link for this CL1808 Morgan Remy Human Hair Lace Wig: https://bit.ly/2T634uB
Coupon code:Katrina15 for 15% off
Length: 16’’
Color: 808 Celebrity Color
Cap Size: Average 22''
UniWigs Human Hair Collection: https://bit.ly/2rqWdzZ
Please find us on IG: @ uniwigs.humanhair
_ _ _ _ _ _ _ _ _ _ _ _ _ _ _ _ _ _ _ _ _ _ _ _ _
Business Inquiries
PO Box
Katrina West
PO Box 5625
Alexandra Hills
QLD 4161
Australia
Guys welcome back to my channel. Thank you so much for tuning back in today. I'M doing something a little different and I am going to show you guys how I style my new Morgan, Remy, human hair lace, wig from uni wigs, but this little package, the other day is part of their new celebrity collection, and it is so beautiful. I have already tried it on, but I really wanted to show you guys how I style it and how to actually wear a week and make it look real. When you order from uni weeks, you will not only receive the wig but you're going to receive blue hair brush brush your wig with the wig itself. Mine had a lace front to begin with, and I've just cut it. So I've cut just along the hairline. It'S not hard, but you'll want to make sure that you do that before you do anything else, so you get your beautiful wig. You also get some hair nets, so I've got two of those lucky me got a little Christmas card because it was around Christmastime. When I got it - and you also get some spare elastic just so on the back, if you need and also some spare clips all right, so this is Morgan, isn't she beautiful so long and thick the complete opposite of my hair? It is short and thin. It'S got some beautiful blonde highlights, especially throughout the front, and it's really natural-looking. It'S currently got a side part, that's how it was styled, but you can change it if you'd like to, but it might just require some training. She is a 100 % virgin remy human hair lace, wig made with superior French lace, as you can see up close. It'S all weft through this lace here and the superior French lace actually achieves breathability, which is really great because you never really want to be sweating up in here when you've got a gorgeous human hair lights week on so, as mentioned earlier, I have already cut my Life, which is what quite thinner up here it did have that much on top of it. So I just simply followed the hair line. It does differ a little bit because you know there's areas that are closer to the ear line and stuff. So you do have to be careful, something that helps me to cut your lace, especially if it is a blonde color and it's quite hard to see where it's been threaded through. What you want to do is you want to put your hand over the lace there's, and that way you can see just where it's poking through otherwise, if you're doing it like in the air trying to cut along that way, you're never going to see where it's Coming out of so without further ado, I am going to show you guys how I put on my wig and how I style it so. Firstly, I take my cap, I'm going to take the skin color one this time it's open on both ends. It'S not like a normal one that goes around the whole way because you actually end up having a lots of bumps everywhere. If you do it that way, this way is actually so much smoother. So what I do is, I put it on like a headband, I'm going to pop it around my neck and then you want to get the elastic, that's on one end and get that towards the top of your head and the other end towards the back. Just like that, next, what you're going to do is you're going to pull this one back as far as you can the very top and then you're going to take the bottom and you're going to flip. It flip all of your hair into it. How'S that don't even need and bobby pins any braids and buns nothing. This is the easiest way to do it so simple and really comfortable as well. So once you've got that sorted, you do just want to adjust it a little bit so that it does sit where you want it to sit, and it's quite comfortable and you want it behind your ears. This I am going to put forward a bit so on the inside of the weave. You'Ve got a bunch of clips to help secure it even better as well as if it is a little too large. You can always click this little clip into a closer knotch, and that way it will be tighter and if you do need it larger, then perhaps just get an different sized wig. If you still don't think that it's secure enough, what you can do is you can grab the piece of elastic that they have given you and what you do. Is you sew it from one end of the underneath part of the wig, so the back you want to hand sew it or stitch it on the machine, whatever you like, and you can actually sew it onto one end and pop the other end of the elastic On the other end - and you can pop it underneath your wig as if it's like a headband for underneath, so it just makes it a little more secure. It keeps it on, especially if you're going to be doing some whipping your hair back and forth might be here need to put one of these on okay, so essentially how I popped my wig on is really easy. I flip my head over and I just hold the front and I hold it back and I just place it on and then pull link it back up, making sure that you're holding it off so back here the front Pina, I'm just gon na pop I hit Into it then flip it back, not hard, looks awful right now, but once you're adjusted a bit, it's gon na look way better. So it is a side part, so I'm going to move it over there. I'M also going to clip in those clips up on the sides, one three now what you want to do is you want to try and line up the lace with the edge of your hair, and then it still looks quite natural okay. So this is how it's looking right now, however, as you can tell, it's been a little bit folded and it's been sitting in the box for a little while, so it's not entirely looking its best just yet lucky for us it is human hair. So we are allowed to pull it straighten it do whatever you like. So, firstly, I'm going to take the hair brush and I'm going to brush through my wig, I'm only going to apply a light pressure so that I don't ruin the wig but lucky for us. It'S not not it, so it's not too much of an issue. So now it's brushed. I have decided I'm going to curl it rather than straighten it just because I think it's got a lot of beautiful volume in it and I think, because of the blond highlights the different tones in the hair. It'S going to look really pretty when it's curled it'll still look really pretty when it's straightened, but I find that curling always brings out the different tones in your hair. So I'm going to do that. So, firstly, I'm just going to section my hair, so I'm just gon na do like light waves rather than like full-on ringlets, so I'll just take a hair clip. I'Ve just got my curling on here. It'S just the h2 dx-5 and it is my go-to. So I am just going to take medium sized pieces, I guess and that it's not to reality and I'm just going to curl lightly. I'Ve only got it on 160 degrees. I usually cut my hair like 200, so I'm just being careful with it, because you just never know when something could go wrong with your wig and then this front piece, because it is the one that really shapes the face. I am just going to curl it just a little bit lower than the others, so the red stuff is doing quite close to the roots and this one that I'm going to do - maybe just right here like that. Okay. So this is how we're looking freshly cold. What I'm going to do is I am going to take my brush again and I'm just going to run it through the hair really lightly just to brush out the curls a bit. So it makes it a little more of a way for more natural. Looking all righty so, as you can tell I curled mine backwards away from the face on either side, so I technically did them in different directions, rather than going one of each type thing around or curling in on the face, just because it doesn't do a whole Lot for your face, what you want to do is you want to blow it outwards that way it shows your face. It also shapes the face really nicely rather than coating in on it. But yes, so this is it once it's curled and brushed. So what you can also do, if it's not actually blending in very well around your part area, if your hair color is naturally too dark or too light, and it's showing what you can do is you can take a powder I'm going to take this banana powder Because it's somewhat similar to my skin tone and what I'm going to do, is I'm just going to press it in the front of the part just so that it gives it more of a natural look by giving it more skin color around this front. Part here, because, obviously we don't all just have this straight line across here of darkness - it's natural. What you can also do to make it look quite natural. It is pluck out a few of the little hairs, but I really don't mind where these ones have been placed. I think it is quite natural looking as an ears, so what I am going to do is just going with the banana powder and I'm just going to fix up the roots here. So it's only really social, but it is enough just to give it a little more of natural effect, something else you can do, especially if it is a dark rooted week and you have darker hair is you can pull out your little baby hairs from underneath I've? Pretty much left mine for now there briefly there, but I'm really happy with where they're at, and I think, because it's quite a beautiful soft wig. I really don't want to ruin it with the whole baby hair effect. But I know that a lot of people aren't really into it, so it is something else that you can do if you do want to make it more natural, so styling wise, you can literally do anything with this wig. However, if you are going to be pulling at the sides here, you want to make sure that you're sticking these down, because otherwise you're just going to be exposing yourself and showing everybody that you're lying to them, because you can see your hair there and that this Is lace right here, so you want to make sure that if you are going, if you don't have anything to stick it down, you want to at least keep a piece at the front here and pull the rest back. But this piece at the front will hide the edge there, the hairline and then it's also going to keep it a little heavy. So it stays in place. I am really loving, just the curls as they are. I was thinking of doing a half up. Half down. Look but I really like how it's sitting at the moment. I really so I might leave that for another video I'll show you different hairstyles that I could do and I might pop that one on my Instagram. So thanks so much for tuning, in guys hope you enjoy the rest of your week and you enjoyed this video. Make sure you like it if you enjoyed it subscribe to my channel. If you haven't already and make sure you hit the bell for notifications for every time i post i'm putting the link to this beautiful wig down in the description box below make sure you get it. Oh, my god, i'm gon na pop my little code down there as well, because i can't actually remember what it is right now they are all so beautiful. You can get all different. Colors shapes cuts, lasers. You can get hair choppers, you can get extensions, senior ariana grande, embrace her achieve her with your new wigs. So thanks so much for watching guys - and I will see you next week - bye


Comments
annie20alpha: So gorgeous. You're making me wanna get this piece!
Sondra Lynn: Can't get over how real that looks.
Malena's Creations: I really enjoyed this video! That wigs is beautiful! I must have one ;) Newbie subber here!
Bianca Cordova: Bleaching the knots from under the wig will help look more real. Just a suggestions :)
11: Amazing wig
Kendall Kaye: I just went through chemo meaning I lost all my hair so I’ve been trying to find a wig and I most definitely didn’t think I was going to have to spend over a thousand dollars for one…
Tina Barnes: Great video girl!
ImaginationCreations: You should use heat protectant on it as you would your own hair. I really like the way this wig looks though
Rachael Teague: Is there a way I can get this cheaper
Tonya B: There is a company that stole this video on fb trying to suggest this is a $60 wig It's called discount. I'll send you the screen shot if you weren't aware.
Leighann McGowan: Looks great so expensive tho...lol
Kimberly Japrilia: Hai i am from indonesia i would love to have this wig can you please let me know where i can buy it, thank you
A *: $1500+??
SUPARNA DEBNATH: Is ths a wig.. My gudness nevr cld think its sooo real n natural.. Wht a bouncy natural luk..grt..