Cutting Too Much Lace Off Your Frontal Wig!! Showing You How I Install It Properly!!
- Posted on 09 December, 2021
- Lace Frontal
- By Anonymous
#humanhairwigs #frontallacewig
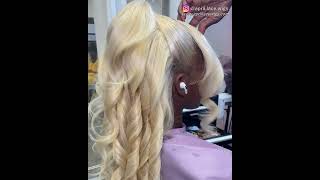
Hello Family. I created this tutorial to help you install you wig after cutting off your lace to close to the hair line. I hope this tutorial helps anyone who thinks they can’t wear their wig unit because they cut too much lace off.
If you enjoy this video please give it a thumbs up and don't forget to subscribe!
UC05nYiqsZHRED7Vpl5I0djw
FOLLOW ME ON:
INSTAGRAM: https://www.instagram.com/naturallyyol...
TWITTER: @NaturallyYole
SNAPCHAT: Naturallyyolette
FACEBOOK: Naturallyyolette
TIKTOK: Naturallyyolette
FOR ALL BUSINESS, SPONSORSHIP OR FEATURED PRODUCT ENQUIRERS PLEASE CONTACT ME AT: [email protected] or send products at the following address: 5257 Buckeystown Pike, 204 Frederick, MD 21704
PRODUCTS:
BESHE Silk Lace Brazilian Virgin Remi 100% Human Hair. Product purchase at local beauty supply store.
Lenaqueen Lace Wig Grip Cap 2-in-1 Adjustable Velvet Lace Wigs Cap for Lace Frontals and Wigs by HAIRLINE and PART Seamless Transitions (Dark Brown)https://amzn.to/3EJE1Wd
Camera: Canon T6i
Editing Software: Wondershare Filmora
Using Acer laptop purchased from https://www.affinityiq.com
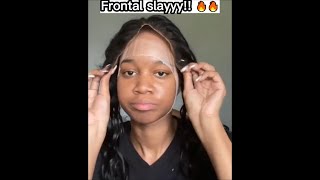
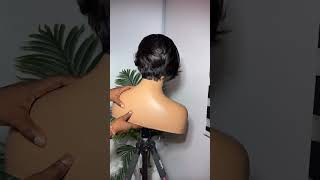
Oh, i actually lay this wig after i cut most of the lace off, stick around and we'll go ahead and do it together, hello, family, welcome back to my channel, if you're stopping by for the very first time, i'm your lad of. Naturally, a lot welcome to my channel if you're returning or welcome back and guys. Thank you so much for your support and while we're at it don't forget to like don't forget to subscribe, don't forget to share this video with everyone and join the naturalette family. Okay, guys, let's get into it, so i can't remember the last time i did a wig review. This actually is an actual 100 human hair, and i have been wearing this for a while. I want to show you guys how i got this wig to lay the way i wanted it, but because i cut the lace too short - and i was like oh my gosh - did - i really cut the lace too short, so i did do a video actually installing It cutting it, but i decided you know what i'll just show you guys, how i actually put it on and how i actually glue it down and what i do to get these awesome curls. So what type of hair it is this hair is it's from bg. It'S silk lace: brazilian virgin, remy 100, human hair. I purchased this from my local beauty. Supply wigs have really changed. So if you want to slay your wig, if you want to color your wig, if you wanted to do anything with this wig, you can so this wig is unprocessed. It'S not dye, it's not bleach, it's not perm and it's a hundred percent remy human hair. If you guys are interested in seeing how i actually lay this wig after i cut most of the lace off, stick around and we'll go ahead and do it together? Are you guys ready, let's get started? I actually started out with just my hair braided in nine cornrows, so i've been using my of the wig cap, which has the grip around the side, and then it has the mesh in the front like right in between and then it also has the it's secure In the back, so my hair is already lay flat. Take my wig cap grip, make sure i put it in the middle and bring it all the way down and just take my own hair and then just kind of even it out and then just just grip. It and then just put my hair back, and here we go save my hair because my hair is covered in the the combs and anything else doesn't damage my hair. So i like the fact that it's fully covered and then has a grip in the front. So my part is in the middle and let me show you the wig. I did make some modification to the wig, not a lot. I when i cut the wig it came with lace, see it came with. You can see the kind of like the glue, so it came with just this frontal and it has two combs on the side and it has one comb on the back and it did have two clips little the little small, tiny clips. So what i did i went ahead and the they broke, so i went ahead and just added my own band to keep the hair in place. This hair is 100 human hair. It was in the lighter shade, so i decided to color it. I did not bleach the knots i did not see. I did not bleach the knot, but because i colored it a little bit darker, so this wig cap does have the lace that's a little bit lighter. I said i cut too much lace, as you can see. It'S just a little bit of lace. I did pluck it a little bit in the front. The only thing about this wig, the density is very light. When i was coloring the hair, i did notice that they cut a few of the hair out. So you have a row, that's like! Oh that's cut out because of the density i was like. You know. Why did i cut the hair like that? And this hair does get not too full, depending on how you curl it, but it's a really nice texture - and this is this - is a wig that i will definitely be wearing um when i went to purchase my wig individual that sold me. This unit said you know if you do purchase a wig and they tell you it's a hundred percent and you're paying under under two or three hundred dollars for a wig is not 100 human hair. It'S a mixture of synthetic and in human hair, but if you're, if you're purchasing a wig, that is a little bit pricey, you are getting 100 human hair, anything cheaper, you're, not getting 100 human hair. So this is 100 human hair. It'S from bishi! I will try to find this hair in lincoln in the description box below, so what i've been doing. I went ahead and i added this band myself and it still has a comb in the back and it just does have the lace in the back so like. If you wanted to put your hair up, but because i cut too much of the lace, so i'm going to show you guys what i've been doing and how i'm maintaining my edges, you guys know, i'm very particular about my edges, so make sure that the all My hair is underneath, and the wig is perfect, i'm going to take the band and i'm going to add the band first, take it and then just put it in the back and you can see the back of the. The band is like right here eve and then also with the hair grip. This hair is not going anywhere, so you want to position your wig in the middle and, of course my wig cap is like right here, then you can see the knot and you can see where the knot ends and you can see the lighting. You don't really have to put any concealer in the hair, so we're gon na and clip it. So i'm gon na show you guys what i did to actually lay this wig down, because even with the wig grip there's time, i don't even wear it with any any glue. But i wanted to show you guys you have the option of actually putting some glue. I'M gon na do this side first, so i'm gon na take my god to be ultra glue, invisible, styling gel. So i'm going to take a little bit of glue and i'm just going to add a little bit in my hand, and i pull this part here and just add some glue down here - i'm not adding too much glue on my hair. My hairline is not touching. It'S not touching my hairline and i'm adding a little bit to the front right here. I'M adding it to the side, all the way down, um and make sure that i just add it around the perimeter, not on my hair. It will touch my hair a little bit, but so i'm going to take this and i'm going to just turn it down to cool and then i'm going to take it, i'm going to move it over and just kind of hold it down. Just hold it down from here to here and as you can see, it's it's hold it's there and i'm just gon na make sure that let's see how the clip i'm going to make sure that the sides are glued down, just add a little bit more and Then just pull this piece and then just lay it down and hold it. We'Re going to do this side, take the hair and then just bring it down, put a little bit of spray and just a little bit glue. Okay, all right! So here we are, it's all make sure it's even you want to make sure that it's lined up and if it's not i'm going to show you a quick, easy way to just line it up which mine is so. I use. I use my comb to see whether or not it's lined up, so it looks like it's lined up, and here we go. Your hairline is right here. If you need more glue, you just add a little bit more and then just push it down and that's what i've been doing. I just been to keep my hair from blowing like when it blows back. You don't want to see your hair, showing you want to see the wig. You want to see hair like it's a little bit too close to the front, but what i'm going to do is push this part a little bit and i'm gon na take some just a little bit of alcohol and i'm gon na clean it up. And then you add a little bit more glue just a tad. What i normally would do is just add some right in the front and then just even it out right here: okay and then you just comb it out and if you have glue, that's showing you just take a little bit of alcohol and then you just clean Around the perimeter to remove the glue but you're going to make sure that your the glue is the sides are connected and even it out there i think they're all con. It'S not going anywhere look and okay, so i think it looks pretty good. I think it's even and then what i normally would do is just take. I take my curling iron and i just take this part of the front and just bend it i'll. Take this piece, okay. So this is this side, and if you want, you can also curl curl these curl this down, just like bring it and curl it down and continue curling it if you want to - or you can just curl the front and then just keep curling it. Okay, like i said these are in layers, so you can take the layers and just keep curling it, so i'm gon na go ahead and curl this side. So after i put the curls in, i just use my finger and adding the the band in the back. The band is actually holding this wig together in the wig grip cap is really awesome. So what i do is i'll just take my curling iron and just flatten it up and, and you just add, a little bit of spray, you might need a little bit more. You don't want to put it on the hair. You want to put it in your hand, because that way, you control, how much you put on top of your hair and you can comb it out, but here it is hope you guys like it. Let me know what you think um. I wish i had a better curling eye, all right guys, so we are done and here's my curls there, the hair um the front is perfect. Like i said, i don't normally would put a put baby here and because i cut too much lace, i figure you know what i can actually glue. The hair um just glue the front right here and make sure i don't touch my hair. I just put. I use that got to be glue and my got to be glue. My got to be glue, blasting spray. These are the only two things that i use and then i just use my curling iron and curl it. So i added the glue to hold the sides and also the band which really helps so here is the hair. It turned out um. It looks really good. I have been rocking it. If you have followed me on my instagram, you do, you will see it, but i just wanted to come and show you guys how i actually wear my wig. I i use glue, then again i don't use glue like with the wig cap. You really don't need to put glue. I just wanted to show you guys an option of whether or not you wanted to add glue or not add glue. You have that option, but - and i just put it like around the perimeter and yeah here we go. Let me know what you think: do you like it, and here we are all right guys. Thank you so much. I hope you enjoyed this video. I will definitely put all everything that i use in the description box below don't forget to follow me on naturally, and also guys don't forget to subscribe. If you made it this far and you're watching this video, so don't forget to subscribe to the channel and don't forget to share this video with everyone and also don't forget to give it a thumbs up and i'll also hit that notification bell. It is a cool fall evening where i am so. I want to say good evening and maybe morning where you are good morning, it may be afternoon where you are good afternoon and guys have a beautiful i'm talking about a beautiful and blessed evening morning afternoon and guys be blessed peace. So you

Comments
Forget This: Thank you!!
Howard R. Lee: Terrific video. Thank you