Lace Closure Install Closer Look #Salonwork #Inthesalon #Laceclosuresewin
- Posted on 07 July, 2018
- Lace Frontal
- By Anonymous
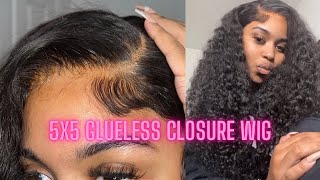
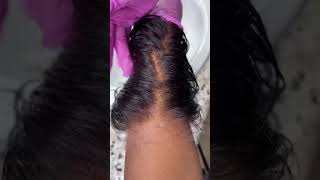
Hey guys and welcome back to another video, this is a lace closure install that I'm gon na be showing you guys today, I'm actually just showing the lace closure part more up close. I want you to notice the two front braids that I have, because that's the part I'm gon na focus on this lace. Closure is a three-part lace, closure that the client purchased, but I wasn't able to get a good shot on this side of how I install the first side, but I'm pretty much lining the middle closure. I'M sorry, the middle part of the closure up with her middle part and I'll show you on this high side. How I pretty much stitch it down now you'll see that those two front braids are loose. That'S for me to be able to go back and see about halfway through her install and retighten it. I'M able to take those braids completely down cuz they're, just stitched down on the front of her next to the front of her anchor braid, and I can take those down. Let'S, ditch your hair unbreak, those wash it and put it back up and I'm able to get fresh braids and a fresh new install on the closure. So this is why I leave those out and I pretty much go back at the end and sew them down tightly. And it also acts as kind of like the elastic band method, to bring bring the corners of the closure as tight as possible across the front of her hair lines. Now she has a widow's peak, so I'll leave left just a little bit out right in front of her widow's peak to actually conceal it a little bit more. So that's what you'll see kind of hang in for it. I don't really use those baby hairs that you see I'll incorporate those into the style, so the rest of this is pretty much redundant and I'll come back a little later and let you guys know a couple more things I thought really quickly. I just wanted to let you guys know that I used three four bundles 22, 20 and 18 inches body wavier, the first two bundles. I use right below her temples so that I could leave enough room for the third bundle. I see I double track. The first two bundles and I used to flip over method two, so those this very first one. I want to try to get all end up under her ears and then the next one go right. On top of that which will leave room for the third one. Again, I use the flip over method and I'm just going to make sure everything is nice and tight and those bundles are double tracked in the back, so she pretty much wanted to just with a natural way of her hair. So I only added a little bit of mousse and water so that it can be kinda wavy. You guys know how body wave hair is when you first take it out. The pack is really pretty so I just wanted to keep it like that. As long as it'll stay, I'm going in now and plucking out some of her closure and because I was able to line it up pretty good with her natural part, I'm pretty much opening up the front portion so they're. The opening of the closure matches better to the opening of her natural hair line. She has a widow's peak, so I had to leave a little bit of her hair out right in front of the closure and kind of blended with the closure, so that her widow's peak was actually less visible. So I'm just pretty much again plucking and making sure that the part is not soaked in, but not too wide either so again because she's wearing it, you know more babies that are a natural style. I'M not gon na use any heat heat tools to to finish her. Look. I'M just gon na use a little bit of foam wrapper I'll put her under the dryer. So then it lays nice and flat and leave her for about 10 minutes. If you were going to flat on a straight or even curl it, you could use the flat irons or even a straightening comb to achieve a flat look on the closure. But I just chose to use foam so that the waves could stay present and that's pretty much the finish.


Comments
ŁąŁą'ś Life: Awesome job
La La: What kind of hair did you use ?