How To Customise A Lace Frontal Natural, Realistic Hair Line : Diy Tutorial
- Posted on 14 April, 2016
- Lace Frontal
- By Anonymous
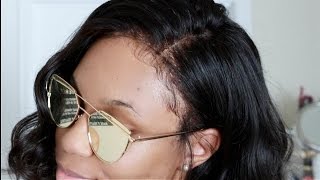
Hey dolls so I'm am back with another DIY Tutorial showing you how to customise a lace frontal. This was the customised lace frontal from my last video. this was my first lace frontal customisation so I wanted to give the hair line a natural realistic look.
CLOSURE DETAILS
http://www.aliexpress.com/store/170238...
RATE ✨COMMENT ✨SUBSCRIBE
LOVING MY VIDEO QUALITY AT THE MOMENT...I HOPE YOU ARE TOO!!
❤CONNECT WITH ME ❤
Snapchat TracyCouture1
http://instagram.com/ExquisiteFacesOff...
All Enquiries Email [email protected]
Music By No Copy Right Sounds Check Out Their Channel
Hey dolls. Welcome back so today I'm going to be showing you how to customize a lace frontal - and this is just my way of customizing my own. I know there's lots of videos on YouTube. You guys so this is just me showing you the way how I customized mine for my recent u-part wig, that I you saw me make, and the first thing I did was I parted out an inch from the front of the closure and I began to thin Out the closure, by using a tweezer to pluck out the hairs, and the reason you want to do this - you guys, is to give the frontal a more realistic look and by tweezing the hairs you kind of thin it out. So it doesn't look as puffy and it just gives for a more natural finish. You guys and you just want to use your tweezer and just continue to keep tweezing out those hairs. You guys. The next thing I did was. I got a scissors type of it's like a scissors, but it's got like comb sort of thing and I kind of used that to trim the baby s since I didn't want the baby has to be really long, so I tried to trim them down so here I am again I'm just making sure that I'm thinning out that the closure and, as you can see you guys, the closure is not bleached. The closure was actually more of like a brownish color, but you can see that the nuts are not beached at all and I zoomed in there. So you could get a better view and I decided that I wasn't going to bleach the closure you guys so again. I'M just parting out about an inch from the front and then going in with the tweezer and just making sure that I'm making that as flat as I can get it. So it's not kind of puffy and it's just gon na lie really natural and using a tweezer. You guys takes a really long period of time. So, as the time passed you guys, I began to get really frustrated, so I decided to use my fingers instead and when you pluck you guys, you want to really not pluck with a lot of force, because what can happen is you can actually damage the frontal And so you want to really do it as gentle as possible, but still pluck enough so that you can get the hairs out. You guys and I'm just repeating the process here, tweezing and then I'm just gon na go in with my fingers and kind of pluck out some of the hairs. Now I'm just going to cut the clothes you guys and I'm cutting the closure in sort of like groups, so wherever the closure kind of goes in or comes out. I kind of just follow the pattern of the closure and I did measure the closure on my hairline. I keep saying closure, I didn't mean it. I didn't measure the Front's all you guys on my hairline and made sure that it matched up and it matched up pretty well. My hairline is pretty kind of box shape, so I did try and cut in as many like grooves as I can so here. I'M just going in with a foundation, and this is the alternative to bleach in the closure. You guys - and this is just going to sort of die the closure to match your natural hairline, so that that way it just looks more natural and you're not causing any damage to the lace frontal. Okay, so you want to apply this as close as possible to the edge of the frontal, and I must say that this is a very messy method. However, it does work, you just want to continue applying that and all the way across do you get to the end of the frontal and I'm not taking it down to the back, since the front of the frontal is mainly where I want to blend in with My hairline, you can kind of see the unnoticed, which is a bit blur, but you can see that it's kind of gone, a more natural looking color and here oh I've already made the wig and I fitted it, and you can see that it kind of just Blends in with my natural skin tone - and it just doesn't look unnatural - I still needed to do a lot more tweezing and plucking to get the hairline to look a little bit more realistic. You guys, so I hope you enjoyed this video. If you did, then please feel free to thumbs up

Comments
Artisbeauty716: do you find it difficult when wearing your hair in a top knot that the lace shows if its not an exact match to your skin tone around the perimeter? my difficulty comes from the lace whether to light or dark seems nice in pictures but in person im always fidgeting because I can see that line of demarcation