How To Melt A Synthetic Lace Front Wig
- Posted on 02 January, 2021
- Lace Frontal
- By Anonymous
Hey Lovely's
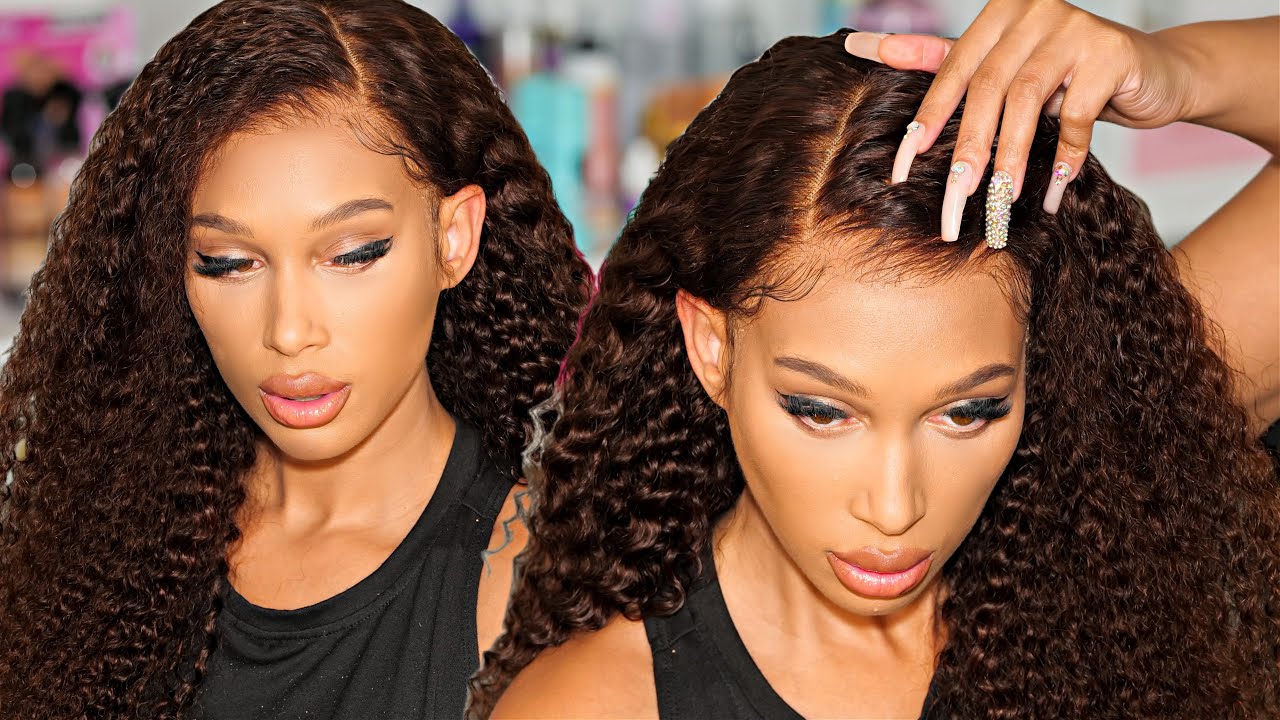
This unit is from Janet Collections. It is the MELT HD PART LACE BELLA WIG in the color 2. Links to this wig down below!
♡ P R O D U C T S ♡
Wig links ~ https://c.pgo.me/22itfe9sbmu7tkw5
https://www.manegang.com/catalog/produ...
https://www.hairstopandshop.com/shop/p...
------------------------------------------------------------------------------------------------
Business email: [email protected]
STALK ME ON SOCIAL MEDIA !! ⇣
◦ Instagram: https://www.instagram.com/kinleebrooke...
◦ Snapchat: mckinlee123
◦ Tiktok: kinleebrooke3
◦ Poshmark: https://poshmark.com/closet/mckinlee12...
CLICK HERE TO SUBSCRIBE TO MY CHANNEL !! https://www.youtube.com/channel/UCeBHd...
WATCH ALL OF MY WIG VIDEOS ~https://www.youtube.com/playlist?list=...
What'S up lovelies welcome back to my channel okay. So, as you see by the title, you know what type of video we're doing today, i feel really far away from you guys, but i hope you guys can hear me, but today i have a video brought to you by janet collection. They actually reached out to me, and they sent me this super super super duper cute wig. So if you're interested in all the details about this wig and how i applied it just stay tuned. If you don't know who i am and make a book, i like fashion vlogs here if you need that type of content, so if you're interested in that type of content, definitely just stay tuned. Don'T forget to like comment and subscribe and let's just get into this video, let me get you the details and everything about this unit. Okay, so, first of all, this is a synthetic unit. I know right, it's so cute. It moves so well, it's like literally no tangles in it. This unit is the jenna collection melt and it is the transparent hairline with extended part lace. So this is like a teapart wig, so it's just. It only has this lace part and it has lace and it's a full frontal. Basically, so this wig is pre-plucked and i did not do any plucking on this wig at all. I just plucked a little bit from my baby hairs. It is 100 hand tight with soft swiss lace. This lace is bomb.com girl. You will see in the video. I know it's going to look kind of white in the beginning, like my lace but like as you can see now it's not white at all, like it looks it blends in with my hair really well, but that's just because i have this new camera and i Really need to focus and work on the settings on it because i don't really know the settings that much so please please just bear with me. I'M sorry that the camera and the settings are all very, very new to me. So please just bear with me. I will definitely have a link down below, of course, so you can just go pick this up. This is in a color two, so it's not one. So it's not jet black and it's the bella wig. So, if you're interested in that just click the link below and enough rambling, if you want to see how i installed this wig just stay tuned, let's just get right into the video all right joe. So, as you guys can see, i'm just applying the wig - and i already did my ball cap method off of camera. But now i'm just using my elf foundation palette to just bronze out the um wig cap. Basically all right! So now i'm just repositioning the wig making sure it looks good and everything and i'm gon na start the process i don't use glue. I only use um got to be glue spray, so yeah. This is basically like a glueless method. If you will - and now i'm just coming in with my hair dryer - and this is my blow dryer or whatever and just blow drying, so it can become tacky. But i'm sure you guys have watched plenty of videos like this. So i'm not gon na over explain anything, but i'm just reapplying a second layer and i'm just using my finger to just make sure everything is staying and all the spray and stuff and just keep touching it to make sure that it's not tacky or to make Sure that it is tacky and that it is not too too dry, because then the wig won't stick to anything all right. Now i'm just pushing in the lace on the got to be glue spray and making sure that it is sticking and just using my fingers, like heat or whatever, just to make sure everything is sticking to the applied section that i have now. I'M adding more gatsby glue spray on top of the lace, just to add a little bit more security and just to make sure that the wig won't lift or anything. And i'm just going back in with my blow dryer to make sure everything is tacky and in place after i have finished applying the wig. Now i'm just using a scarf, and i wish i had a um elastic band, but i don't so i'm just using a scarf to tie down and melt my lace alright. So, as you can see, i have taken off my scarf and you can see that there is a little bit of white residue like i said in the beginning of the video, but i promise it will go. But eventually, just let me work and i'm just using this um small razor that you can use for your eyebrows, but i just use it for my lace and i'm just cutting off of the excess lace as close as possible to where the hairline starts. Now i'm going to be taking my witch hazel and just wiping off the excess got to be glue spray. That is on my on my skin off, because that just really looks really crusty um, as you can see, and i'm just going to be wiping a little bit on the lace just to clear up some of that, like white shadow that you see. But when i wipe it on the lace, it definitely does help with the shadow a little bit and it's just my lighting because, like i said this, camera is new, so i don't know all of the logistics on how to get the perfect lighting and everything. So it's definitely coming up a bit cast white on there, but i promise it'll get better and now i'm just going back in with the elf powder that i had in the beginning, to just kind of you know: try to get that white cast a little bit Off and but it really didn't help a lot as you can tell, it looks basically the same and you can tell that one side is a little bit better than the other. So now that's what i'm kind of trying to fix and everything and i'm just taking out some of my baby hairs. So i can start the baby hair process here, i'm coming in with some mousse and i'm going to start my baby hair process. I can't really talk you through this process because i don't even really know it, but i'm just seeing that the baby has a little bit too long. So now i'm just going to start cutting it with the same razor that i cut my lace off with with, but now i'm just going to start the baby process and use a whole bunch of mousse. So i can just really maneuver the baby hairs. Honestly, i just suggest you play around with the baby hairs until you find the exact way that you like and for me, i play around with them a lot and i use a lot of mousse and i just kept swooping until i got the desired. Look that i want all right lovelies. I hope you enjoyed this video, like always don't forget to like comment and subscribe. Let me know down in the comments while the type of videos you want me to do, and if you did like this, if you did like this wig, definitely just check down in the description box, because this wig definitely will be linked. Let me know how i did give me some tips and other jazz, but also, if you have any tips for how to like the settings for the g7x canon. Just let me know, because i would greatly greatly appreciate it. Okay lovelies. Thank you guys, so so much for watching and i'll see you love these in the next video bye. You


Comments
nmblackrose: Hey girl! Thank you so much for the video. It was a huge help. ❤️ I was wondering, where did you get your edge brush? It’s so cute!
summer walker: lashes bomb purrr
claricedgaf💕: We miss your aliexpress try on haul videos