#2 Styling & Install Butterfly + Heart Braid Design On Frontal Ft Recool Hair
- Posted on 08 February, 2022
- Lace Frontal
- By Anonymous
Hi guys, welcome back to my channel! If you guys would like to see how I prepared this wig to install watch the previous video I uploaded. All wig details are also in the previous video
Thanks for watchinggggg! :)
Instagram:
Business acct | https://www.instagram.com/slayedbyduca...
Person acct | https://www.instagram.com/felicia.duca...
CLICK THE LINK BELOW TO WATCH MY LATEST VIDEOS & OTHER VIDEOS YOU MAY LOVE!⬇️⬇️⬇️
https://m.youtube.com/channel/UCRH3BNw...
Email: [email protected]
LIKE, COMMENT, & SUBSCRIBE!
Comment below videos you’d like to see next!
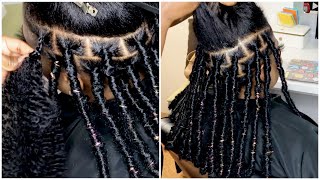
Welcome back to my youtube channel today, i'll be showing you guys how i installed the wig that i plucked in my previous video before applying glue to your client's, hairline you're, going to make a dotted line using makeup. Just so. You know where to lay the glue once you've applied the line. You'Re gon na pull the wig back and clean your client's forehead off when you're spreading the glue across your client's forehead make sure that you're spreading it evenly so loop can dry fast. I was blocking the camera when i was applying the front part of the lace, but when i'm applying the lace, i stretch it and place it right into the glue, so it won't have any rolls in it when you're finished, applying the lace on one side have Your client hold the ear tab, because that can be the easiest part to lift up. I use a small scissor and cut in a zig zag line to cut off all the lace that i won't be using. If you didn't put enough glue on your client's, hairline or your hairline, you can always lift the lace up and apply more glue, like you see me doing when you're cutting off the lace that covers your client air, make sure that you're leaving enough lace to reach Close to their ear, so it can cover the braids. So when i'm cutting the baby hairs, i always cut it diagonally, so it can be like from shortest to longest. You now, i'm using my got to be glue gel and my creme nature, mousse and swooping. The baby hairs in place for this hairstyle we decided to do some simple baby hairs, since we're already gon na have a lot going on with the actual style when you're finished doing your baby, hairs tie them down with four to five wrap strips, and i use A band just to keep it secured more, while the baby hairs are drying, i did go ahead and wet the hair, and this is the difference between it being wet and dried. This is what the baby hairs look like after they've, completely dried, and now i'm just going to use my bio silk and hot comb to hack on the hairline. Hmm. Now i'm going to get started with the actual style of the hairstyle, i'm going to have a heart on one side, with some straight backs, and now i'm just starting to part the heart. The first step you should do before parting. The heart is making sure that you have hair at the back. That'S covering the tracks. Hmm after you've got the shape of your heart you're, going to part it straight down the middle and then take one side and part that in half i did use a little bit of gel just to have the braids look, neater, hmm! So so now, you're going to do the same thing to the other side. Hmm once you're finished with the second braid you're, going to unbraid the first spray, the ends of it and connect the braids together. So since the heart has a v shape at the top, i parted um a line straight across to make a triangle, and then i braided that triangle going towards the other braids that i'm about to braid now for the rest of the half of my clients. Here i'm going to do three cornrows going straight back, but the triangle that i braided before this i'm going to connect it to the second braid. So, hmm, now for the next half of the hairstyle i'll be doing a butterfly and then two corners going straight back i'll, be adding a picture of what the end result of the butterfly will look like just so you guys can know what i'm talking about when I'M telling you guys how to part it, so the first step of the butterfly would be to make a part going straight down the middle, then you're going to make a triangle part for the top of the butterfly and that'll, be a cornrow going towards the middle. I'M gon na do the same thing on this side. When i was braiding my cornrow, i didn't connect the ends together, but to make it easier, you guys should do that. Just like the heart on the other side. Do me now, for the next part of the butterfly you're, going to take one half and part that in the middle on the top half of the butterfly you're going to make a part diagonally and then start your cornrow from the inside hmm. Now, i'm just doing the same thing to the bottom: half of the butterfly hmm, once you're finished with this braid you're going to do the same thing to the top left corner of the butterfly, and this will be your outcome now for the last part of the Styling i'll be doing two cornrows going straight back. So hmm me now, i'm using my angled brush and the makeup closest to my client skin complexion and just outlining all the parts so - and this is the finished look hope you guys enjoyed watching this video remember to like comment and subscribe continue watching for more videos Of the finished look, and let me know what you guys would like to see next in the comments, so you
Comments
Bri Unique: This was the best hair video I’ve ever seen. From install to braids. This was amazing.
therealmill: omgg you did so good the thumbnail made me think it was scalp braids
Recool Hair: Thank you,honey,so beautiful Heart Braid!
KiaraJanae Edouard: wow ya talent is INSANE this looks AMAZING!
crownedbycori: I definitely would’ve thought this was just her hair what do you do when the knots don’t bleach?
Aries Asata: If I saw her out somewhere; even standing in line next to her? You could NOT tell me that hair in the front was NOT growing from her scalp. W-O-W #Top10InstallsIveEVERSeen
Jdore Rose Hair: I’d love to take your class and have you do my hair one day you are amazing!
Alondra Queen: Yes you really did that
Diana emprezz: Beyond talented! You braiding her dam scalp!
Incolorwig: Woww love,this hair is so pretyyyyyyy on you!
Elizabeth: Amazing love it :)
Nana: You bodied that
ELIZABETH B: You’re amazing
Quoia Renae: Different type of talent
Naudi Girl: RAW TALENT ❤️ What kind of gel are you using?
SashaDonyae: so curious on how much you charge. your work is magic ,, literally!
Kemo Bennett: Your skills are unmatched.....
Ashley Anderson: Yes you made ❤️❤️
Daija: The girls wanna know where’d you get your canvas on the wall
Trinity Metler: From a little black girl who was raised by white people, thank you!!!! <3
JA: How long does the baby hair take to dry?
Jacquelyn Mason: You are the best love your hair dos
Therealdropsss: it’s nice
Tashema Stephens: Just stopped by to say I love your contents... #New subscriber
Dontae LaFrance:
Obasogie Lilian: Try as much as possible not to block d camera...great job yu did there
Naiya:
brielle gales:
Glamourgirldavi Doll: Beast
Fasi Flair: New Sub ❤️
Devin Zortman: Can you do glueless frontal using just mouse and do baby hair tutorial on it
MarMar Bowen: I can’t wait till you meet a MILLY
makka chano:
Sasha Richards: Where is the link to the actual Hair?
S Smith: Are you located in NY please say yes
Sha Tee: Please tell me you’re in Atlanta, GA
michelle k_: literally scalp
T P: Where are you located