Diy Knotless Frontal Braided French Curls Wig |How To Ventilate Frontal For A Knotless Box Braid Wig
- Posted on 28 April, 2022
- Lace Frontal
- By Anonymous
Thanks for watching guys Do give the video a thumbs up and subscribe if you haven’t
https://youtube.com/c/CatherineOHillar...
Contact me: [email protected]
Below are links to some hairstyle tutorial video
DIY: BEST FULANI BRAIDS AND CURLS | CROCHET CURLS | TRENDING HAIRSTYLE | PROTECTIVE STYLE
HOW TO; NATURAL BRIDAL HAIRSTYLE ON NATURAL HAIR| |2022 BRIDE| |PROTECTIVE HAIRSTYLE|
HOW TO; 2 PONYTAIL BUNS KNOT |WAVY STYLE BUN KNOT|
How To; VERSATILE CROCHET SHORT CURLY TWIST |❌ NO RUBBER BANDS|
HOW TO: EAZY CROCHET BOX BRAIDS |❌NO RUBBER BANDS| DIY
DIY: CRISS-CROSS CURLY CROCHET HAIR /TRENDING CRISS CROSS HAIRSTYLE
How To: DIY DISTRESS FAUX LOCS | |BUTTERFLY LOCS| |Crochet method
EASIEST DIY BOX BRAIDS |step by step|
Jumbo knotless box braids |DIY BRAIDS| |Coileraybraids|
DIY EASY PASSION TWIST |NO CROCHET|
I Tried 2 Feed-in Braids On My Hair Without Mirror |Epic
Do go through my channel, you will find videos that will interest
FAQ
Camera?
Canon EOS 250D
Light?
Natural sunlight
See you in my next video loves
Music used;
Track: Lost Identities x Robbie Rosen - Moments [NCS Release]
Music provided by NoCopyrightSounds.
Watch: https://YouTu.be/14CjyUYO8IE
Free download / Stream: https://ncs.oi/LlxRRMoments
Music used;
Track: Diviners & Azertion (ft. Dayce Williams) - Reality [NCS Release]
Music provided by NoCopyrightSounds.
Watch: https://YouTu.be/f_zLB1CTXIQ
Free download / Stream: https://ncs.oi/DAReality
#diyknotlessbraidwigs #frontalventilation #ventilator #hairventilation #wigmaking #braidedwigs hair ventilating tutorial, hair ventilating tools, #hairventilatingtutorial, #hairventilatingtools #hairventilatingmachine #ventilatingbabyhair #ventilatinghumanhair #ventilatingwithbraidinghair #ventilatingclass
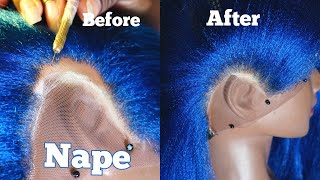
Hey, hey guys, welcome and welcome back to the channel. My name is catherine, and today i'm going to be doing something different, something i've never done on this channel. So i'm going to be showing you all how i achieved this beauty right here from scratch like i will show you guys how i you know, prep the wake up, how i ventilated the wig and down to how i braided this. So if that sounds like something, you would like, then keep on watching you're going to be needing a dome cap, a swiss lace, a ventilating needle some purple, pins french coils extension and any attachment of your choice. I didn't mention mannequin, head and tripod and the measuring tape earlier, because those are basics when it comes to wigging any hair at all. As you can see, i already have my dunk cap on the mannequin. Now i want to measure and cut out the frontal make sure the swiss lace is placed vertically on the mannequin head for easy ventilating. I measured setting inches horizontally that is ear to ear, then 6 inches vertically, that is from the line of the wig cap at the front. As you can see to the point i pinned at the middle using a 6 inches measurement and after that i use my pencil to cover the line which you saw me did earlier then, as soon as i was done, carving out the line, i took it off. The mannequin head and cut with a scissors, if you want to see a well detailed video about how to prep your wig cap, please let me know in the comment section so i can make a well detailed video on that. Okay, you guys. I also want to mention up this. Pin that i'm using here is a no no. When it comes to making wake up. I didn't have the pearl bob pin that i showed you guys earlier at the time i was making this wig cap. I later got the purple pin, but at the point i was making this um wake up. I didn't have that so, as you guys can see right now, i am sewing the lace onto the dome cap. I don't know if you guys are noticing how i am folding. I will sew to a point then fold some of the lace before sewing. Again, i don't know if you guys are saying that that is because, since the lace is a curved one, you all know how frontals are they are usually called. It cannot be. Well, i don't know how to set it. There is no way it can just be straight throughout okay, so that is the reason why i am folding then sewing when it is necessary, because i do not fold all round just when it is necessary, i'm just so as soon as i'm done sewing the lace Onto the dome cap, i'll go ahead and start folding these parts - this is the esses um from the dumb cup, because i made a measurement i'm working with measurements. I measured the size of my head. I measured around. I measured um from my forehead to the back of my head, so the asset is what i'm folding and after i'm done, folding and pinning down. I will go ahead and sew it down. Like i said ella. If you want a detailed video of how to prep your wig cap before um, ventilating or wiggin, let me know in the comment section because i can't you know, show everything in this video it's gon na be way too too long. So let me know, leave a comment below now: i'm cutting out the ss cap underneath the lace which brings us to this, and here we go with our prepped wig cap, ready to be worked on. These are the french coils i'll be using for this style. I got a total of 10 packs, but i use 9 packs. I don't think this is the standard size of these, because the last time i used this french cois, i used five packs and that was way more expensive than these. So this is not the standard measurement or the standard packaging yeah. This is a small size, crochet pin. This is not the regular on vlc all the time. This is a small size, but you can get it anywhere. I got it from a nearby beauty supply store. So i just inserted it or i passed it through my dome cap and then put the lobe of these um french coins. I, which i sectioned, that earlier put it onto the hook of the um of the coachette, pin then put another one. Just like i'm doing. I know i can't explain this right now, just watch what i'm doing you will understand way more better. I feel like i've been talking throughout this video. I haven't given myself a break. I haven't, you know, allowed you all to watch and see what i'm doing for yourself but you're, not in my reality, for this places is a bridge between the lace and the wig cap. We'Re going to be covering everything up like all rounds or the we're going to cover the whole sewing up. Nothing is going to show so that is what i'm doing now we just be following everything up like we are not spacing anything on this line, and you guys i space. I leave some space at the back like a lot of space at the back, because i was scared that the extension wouldn't be um wouldn't be enough for it. I wanted to be done with this part with this line and then with the front before i will. Finally, use the left over for the back i left behind for the back. I left empty yeah. This part, okay, i didn't do anything there, because i was scared which, at the end of the day, even i even had a leftover extension. So it didn't even matter at the end of the day, but yeah keep on watching guys now is the fun part. The ventilating part so get ready, oh my god, so this is the extension i'll be using i'll just be using a very tiny bit from this i'll cut out. You know a very small inches, let's say like three to four inches and then start. You know stretching after that. I'Ll come about and set aside then start measuring the um lace. Okay, so since the front is um 13 inches, meaning one side will be like six and half inches okay, so i am measuring one inch on each line. I don't know how to say this. I am like measuring one each for it for each line, but since it is like one side of this cup, one side of this head is um scissor and the half, and not six meaning measuring everything like one one inch will have half left. So i kind of incorporated the half in between two lines. I don't know if you guys get me yeah just i just have to do that. I just have to incorporate, and after that i said you know, you know using my eyeball measuring with my eyeball and you know using my pencil like i i didn't mention. I am using my eyebrow pencil to measure these. They have a pen for these, but i don't have that yet at this point, so i'm using my eyebrow pen, so i bought them and you know mark at a line. But you guys i later altered this line, because i realized that it is. You know way too big and later altered. It just keep on watching we'll talk more of that later. So here i have ventilated quite some. This is my first time ever ventilating a week, so it was kind of a learning process. For me, this part i didn't like they are not as neat as i'd wanted them to be. So i learned - and i made my mistake and i corrected them, so i have to just abandon that side and move on to this side. Where i have perfected my ventilating already so what i'm doing here is, i picked a few strands of stretched. Extension from elia then bend it over forming this more and, with the other hand, i'll pass my ventilating needle through one hole on the lace. Pick three strands of extension with the needle pull out from the same hole then tie a knot using the needle then pull the needle with the three strands out facing down. Okay: let's do that one more time! This time i won't be talking just watch and see for yourself and take note you guys i am leaving a hole before ventilating the nest hole like i'm, not ventilating back to back every hole. I will ventilate a particular hood, then leave the nest who ventilates um the one after leave the next whole, ventilated one after this is how i'm doing it. Okay and i am ventilating to line on each side. This is like a um square, so i'm ventilating two lines on each side. I this is the second line on this side. Okay, i have ventilated two line on this on front part like facing the forehead. So next i will ventilate to line on. How am i gon na say this? Okay, on the remaining two side, i will ventilate two line: each okay. I have ventilated one on this one, so i'll start ventilating. The second one hope you guys are understanding me. I know i know this: is this is kind of complex, but just take it slowly be patient you're gon na you're gon na follow through yeah. So as soon as i'm done, i will you know braid that and set it aside. While i move on to the next one, so what i usually do before i move on to any other balls before i move on to the next boss, i usually lift two lines like any balls at all. Before i move on to the next balls, i will leave two lines then move on to the next balls lift two lines yeah just like that. I remember telling you guys earlier that i altered the sizes of each boss, because i realized that they were too big. Yes, yo, i uttered the bosses so this time around, i instead of four, which was the size i marked at earlier. I you know, i ventilated five okay, i altered the size and i invented it in five. Instead of four bosses and like i said, i usually leave two lines on each of the four sides which formed a bus before i start the next one. I don't swear, i'm making sense with this, but you for the second line, i'm ventilating. Now i left a line after the first one after the first line i ventilated and we are done with the ventilating. I don't know if you guys notice that the bosses are like smaller than the um the lines i created for it. Like i told you, oh when i was marking out the line that i realized, it was big and i had to reduce it so yeah. It is now way smaller. Now it's time to begin the knotless braid i'll go ahead and section out um five strands of braiding hair that i will be using okay, but i don't think i use the whole of five strand. I think i ended up using just four. So, let's start i went ahead and apply um edge, control, shine and shine and jam on the tip of these um strands of this ventilated strand and yeah. Let'S do the not let's read just keep watching and you will follow through with what i am doing here. So so because this is a french course, we don't break to detail. Okay, you just read to where the umbrella became waiting for you with open arms. Maybe tell me what you want to know you are. Are we back so after i was done braiding all? I realized that one needed a correction and i decided to take it down, and that is what i am doing now. I am re rebranding this one. Okay, maybe tell me, i don't wan na. Let you go here. We go guys. I am done with this pad. Oh, my god, this took like forever. I was super excited when i was done with this side, although i started um filling in that part i left empty earlier on, because i was scared of the extension not being enough, so i started filling it in along the line i misplaced my crotchet pin. So i had to stop and the next day i continued and finished it up and after i was done with it, i went ahead and started ventilating the baby hairs at the front like this, i just ventilated few so that it would be. You know overcrowded or a lot. Finally, you guys this is it. This is the final look after i installed it um, i'm sorry, i didn't show the process of installation. It was pretty much easy because i measured my head um before i measured the dome cap. It'S customized okay, so there was not a lot of gluing and all that since eat my head size, so your autumn. What eating you can definitely tell that. I'M feeling myself right now, i'm so proud of myself like this is my first time trying out ventilation. Talk more of the frontal ventilation, and i outdid myself, you can't tell me nothing: okay, there's this thing, i'm seeing dangling at the back of my hair, like a brown, is a wig cap that i used to secure my hair before before. Putting on my wig cap is annoying just ignore it: okay, so um. If you have watched this video to this point and you still haven't, subscribed baby, what are you waiting for? Please do me a favor. Do that right away and don't forget to give this video a thumbs up if you found it helpful, share this video? If you can and see you in my next one bye,


Comments
Catherine O Hillary: This is the 2nd time I’m posting this video this week cos the 1st one was mistakenly deleted. Pls support me by liking the video
Zara Nwanma: Well done ma’am. You outdid yourself it’s the lining for me, so neat and beautiful
Katherine Useh: You did such a good job mama, this is beautiful
Idle head & Oluchi: I haven’t actually seen the making process of a braid wig before. And this jsut set the bar! Such a beauty. So wow. New sub here.
Ezinne's Lifestyle: The wig is so beautiful and neat,the ventilating is a lot of work Weldone Catherine,you finish work
Mandyfrizz: Omg !!!! And the video was doing soo well , I pray it goes viral. This is such a good tutorial and the wig came out looking soo neat
Zainab Iye: You are so good at this . Absolutely beautiful
Cadmus World: Amazing talent you got. Very neat and beautiful
Michael Shane: This is beautiful
Praise Uche TV: This is so neat, natural and beautiful . Weldone girl.
Okere light Chinonso: Wow that's awesome
Divine Okonkwo: This seems a lot of work ooooooo especially when you were doing the ventilating stuff wow you did beautifully well so sorry about the last video me wondering how long this took you
Nelly's corner: So neat and flat on your head.. very great talent I must commend
Kids Friends PonyRang TV 포니랑 TV 波尼朗: Wow... !!! My best friend, Great Good... !!! I wish you every day of your development.
Sweet Moxy: Sorry dear!! Chai… I pray this one does well ooo mistakes do happen. Ndo
Clara Linda Thomas: Hello! Will you be able to make one for me please? I will pay for it
Baby Jhon: The best
Clara Linda Thomas: Do you have a business page I can follow