Best Full Lace Wig Install | Hd Scalp Beginner Friendly
- Posted on 20 October, 2022
- Lace Frontal
- By Anonymous
#lacewig #install #baldcap #pumpitup
▼▼▼HAIR DETAILS & COUPON CODE▼▼▼
Wig in the video: https://bit.ly/3xZkMpv
Coupon Code: FOREVER to save money.
Melting Band ( no free gifts): https://bit.ly/39XeqyV
Swiss Lace Full Lace Wig Collection: https://bit.ly/3A7U00K
Delicate Hairline Skin Melt Wig Collection: https://bit.ly/2WQ7Hjy
Share looks on facebook, instagram , youtube and tag @ # afsisterwig, customers will get 15 dollar for next order.
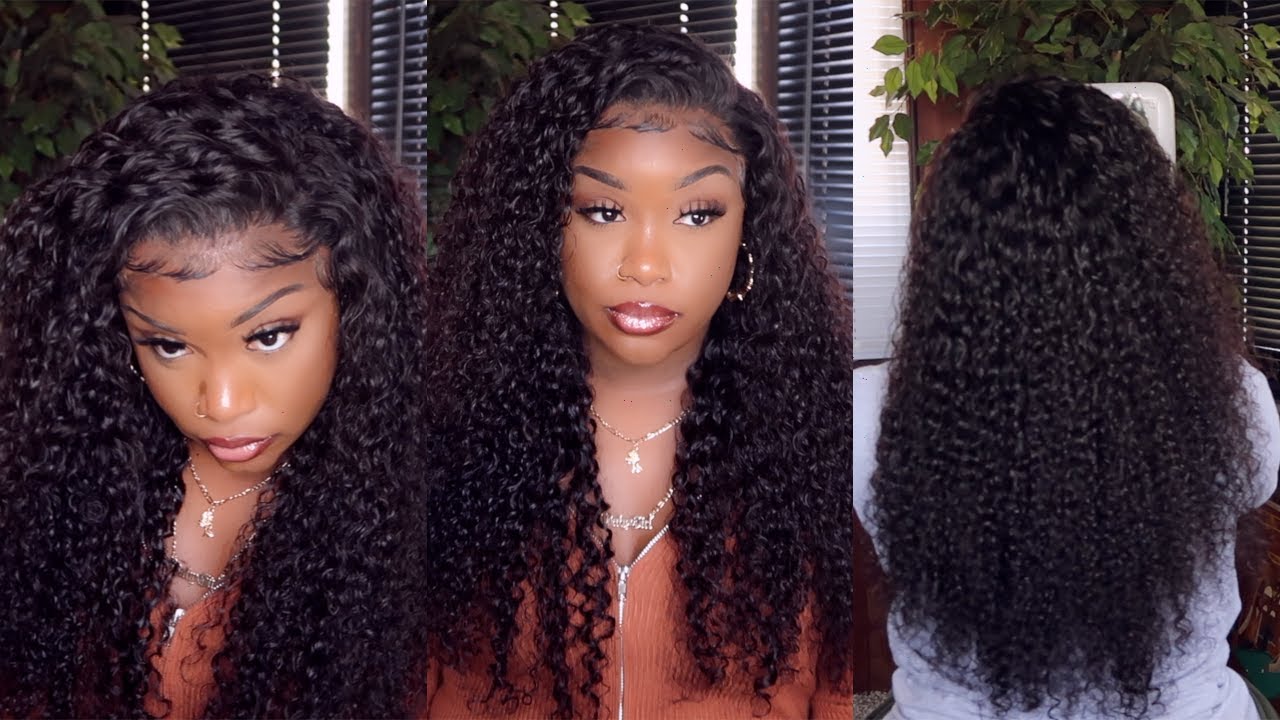
Afsisterwig’s *NEW* Delicate Hairline Skin Melt Lace Wig
♥ All hand tied hairline, clean, delicate and natural, giving real SCALP vibe!
♥ No extra plucking needed, totally beginner friendly!
♥ Upgraded real skin melt swiss lace well blended with different skin tone!
MESSAGE FROM THE BRAND:
The Skin Melt Wig is totally beginner-friendly, in the past three months, we have been making our best efforts to adding more density options, perfecting the plucking the hairline, adding the removable elastic band and optimizing the bleach technique to provide the perfect products.
We upgrade our lace into Raschel net and bobbinet made of polyamide.The reason why we choose high-end swiss lace is that even with much higher price, it can be more invisible and undetectable especially when melting with glue. No matter what skin color you have, this skin melt lace will definitely match.
Wig SKU: AF0124
Hair length: 24"
Hair density: 150%
Cap size: Medium 22.5
Cap construction: full lace
Contact Us:
➞ website: https://afsisterwig.com/
➞Email: [email protected]
Follow US:
➞Instagram: afsisterwig
➞Youtube: https://goo.gl/fvBMPA
▬▬▬▬ ForeverCryssy's Social Media ▬▬▬▬
@ForeverCryssy
INSTAGRAM: https://www.instagram.com/forevercryss...
TWITTER: https://twitter.com/forevercryssy?lang...
TIKTOK: https://www.tiktok.com/@forevercryssy?...
TRILLER: https://triller.co/@forevercryssy
▬▬▬▬ Shop HERE ▬▬▬▬
♥ Business Inquires: [email protected]
♥Website: https://www.forevercryssy.com
♥Amazon Store: https://www.amazon.com/shop/forevercry...
▬▬▬▬ MUST WATCH ▬▬▬▬
1. PLUCK LIKE A PRO: https://youtu.be/ouFJOAfWqWE
2. BLEACH KNOTS: https://youtu.be/nHxDaQWG9Tk
3. DETAILED INSTALL: https://youtu.be/583UXwGE4Hs
4. WAVY BOB: https://youtu.be/NRrgdRvpXTQ
5. SIDE PART BOB: https://youtu.be/XI_ZDURLc5o
▬▬▬▬ PROTECTIVE STYLES ▬▬▬▬
MY FAVS:
1. PASSION TWIST: https://youtu.be/7wMA_Qv2zjg
2. CURLY FRO: https://youtu.be/j8xHgc3ibys
3. NATURAL SIDE PART QUICKWEAVE: https://youtu.be/DIVAPv5YFX0
4. V PART + LAYERS : https://youtu.be/RYjHnb7-CBo
5. VERSATILE WEAVE: https://youtu.be/sRG_dfskG_4
6. KNOTLESS BOX BRAIDS NO BABY HAIR: https://youtu.be/vD14SlCCEuQ
7. BANTU KNOTS: https://youtu.be/JAbafgqWAUs
FAQS:
Location: Atlanta, Ga
Height: 5'2
Main Camera: Canon T7I
Vlog Camera: Canon g7x Mark III
Thank so much for watching my glasses try on haul. #haul
Thank you jumping right into this video. You guys can see I'm actually wearing double wig caps. I already have it kind of like sprayed down with some pump it up, and I have taken the time to now straighten um and pretty much prep the wig. The unit did already come, pre-plugged pre-bleached, all that good stuff. I did not have to do anything to this outside of just kind of like getting it ready to put on my head, and you guys can see. This is a full lace. Wig, if you guys did not know full lace, wigs were kind of like a thing that people were doing, I'm gon na, say probably before the pandemic. Once a headband, wigs and the closures kind of came back. I think people forgot about it, but you guys can see you get a ton of flexibility with The Parting space and you guys can see that the HD lace is super freaking transparent. You also get an adjustable band. So if you are one of those people that don't actually want to install this using glue, you don't have to. I have plenty of video showing you how to correctly install that. But I have actually Came Upon This like wearing the double cap method just recently, and it's only because for some reason, whenever I just use the one, they tend to kind of slip back as I'm wearing the install. So I was going to be going out of town and I really wanted to make sure that my wig was going to last and stand the test of time without doing too too much, especially with that glueless method. I wanted to be able to kind of tie this down at night, wake up and go so I did not cut off the edges like in any weird way. You guys can play that back as many times. If you have to you guys can see where some of the cap is kind of lifting up, that just comes from not properly applying the hairspray, um and so yeah. If you are a beginner, this is beginner friendly. I did go ahead and take some lace glue. You guys know everybody who is using a bold hold. I did go ahead and just kind of allow that to get a little bit, tacky mostly clear, and then I took some of my Foundation just to go over it and really kind of cover everything. So you don't actually have to do that double cap method, but I just like it. I feel, like it kind of protects, my hair more and I'm able to really oil, my scalp beforehand, um and then yeah. So I'm just gon na go ahead and put the wig on you guys can see see. I have it adjusted and it's really easy to just kind of slip on tuck the comb up underneath now. Obviously it does come with more Combs on the inside. If you're doing this glueless, yes definitely use those Combs, but if not keep them there. Just in case you decide to install this with glue or differently in the future. Y'All get what I'm saying so I did want to go ahead and just double check. The ear flaps first of all, look at how transparent this lace is y'all, so anyway, uh when you first get your unit, you definitely want to make sure that everything is kind of fitting nice and snug. Obviously, do this before actually styling cutting off any lace, because if, for any reason you have issues with it, you want to be able to take it back or send it back to the shipper of course. So all the details will be listed down below and if there are any coupon codes I'll be sure to give that to you and so yeah. First things. First, I like to go ahead and kind of pull the hair back. I have already kind of pre-styled this. So, typically in the pre-styling, what I will do is go ahead and just kind of flat iron. It kind of do a nice little press with my hot comb, just to kind of get all the flyaways out of the way and then yeah go ahead to install. It makes it easier when actually trying to uh put this on your head, because sometimes it's just a lot to manage, especially the back, and if you are not one of those people that are super good at like straightening your hair, and you really want to make Sure that you don't miss any pieces, I highly suggest putting this on a mannequin head and kind of getting that full gist of what it looks like from behind before actually in applying it, I'm actually just going to go in with a little bit more glue. When I say a little bit, it looks like a lot, so I actually ended up doing two layers. I kind of hit it with the blow dryer just to allow it to get a little tacky, mostly clear, and then of course I went ahead and just pulled down the wig. Now, if you guys are needing an even more detailed tutorial, please go through my playlist. I have a ton of wig installation videos, both glueless and with glue, because we really want to make sure that we're protecting our edges. You guys do not put this glue directly over your hairline for me. Obviously I have a larger forehead, so it is a little bit easier for me to answer. Install these wigs and then a tip that I like to use is once I have it pulled over. I do like to kind of run it back with the comb and really make sure that everything's set or kind of just like adjust it into place, and we don't have any smushed areas. I go ahead and take a little elastic band and tie it down and then continue to style. So I did notice that the hair - it was still kind of like sitting bulky on my head, which makes sense, because obviously I did this on a mannequin cap and the way that it's going to sit on me is a little bit different, so um yeah. I wanted to kind of go back through I'm actually just showing you the parting space. If you guys want to do, I see all kind of funky styles from the twist to the braids at the root. Half up half down you guys can see just how thick and full this hair is and how you are literally able to maneuver whatever style. It is that you desire. So I am going to show you in a little bit just how you're able to actually pull this up into a ponytail, but first things. First: okay: let's go ahead and just kind of get this hairline uh up to part, because we want to be able to cut off the lace and all that I do find that whenever you're using your hot comb, you definitely want to turn it all. The way up, if you need any type of wax stick, my favorite is the caracare and then, of course, once you are happy with kind of like that, beginning hairline, you have all the flyaways out of the way go ahead and just start to cut off the Actual lace: this is where you really get a feel for where you're missing some glue, where you need to add a little bit more if you want to go in with hairspray instead, you can - and I do like to kind of sit this probably about an inch To two inches in front of my actual hairline number one: it's gon na slip back because the natural oils from your face are going to affect the glue so you'll start to notice. I grew my wig. It'S slipping back, that's normal, but it should not be happening within the first couple of days. So definitely make sure that you're layering up the glue, the hairspray all that good stuff. And then, if you are not one of those people that, like the baby hair, look then definitely skip this step. But for me I just like that it kind of adds a little bit of fun and playfulness to the actual unit, um and so yeah. Let'S go ahead and just kind of chop this up I like to use my razor comb, which you can find pretty much anywhere check out my Amazon store. If you need to and then the caracara wax stick I'll go ahead and add that to the store as well just in case you have any issues finding it. I know everybody's not in like the same local areas where certain things are available, so um. What I like to do, which is my little trick - I go in with the wax, stick just at the root, and then I go ahead and just hit it with the hot comb, and you guys can see just how quickly it takes the bulkiness out of the Unit I mean almost instantly that heat and that pressure so much different from just flat ironing, it's only so straight that you'll be able to get it. Obviously, the hair is going to be straight, but in terms of being able to lay this down like it's scalp like it's, your real thing, you are going to need a little bit more elbow grease. Okay, so definitely take your time. Obviously, if you want the volume - and you don't mind - it then definitely keep it, but you guys can see what I mean. Nobody wants a big wig, okay, nobody so definitely make sure that you go through and kind of lay this down um. Now, if you're doing some curls, I even recommend hitting the roots of your unit with the hot comb and that wax stick as well, because it allows everything to just look. Super polished fresh out of the salon. So I really really love that you guys this hair was super soft. I did end up doing like a mini trim at just the bottom, just to get rid of some of the wispy ends, and I like to use a little bit of Pump It Up. Just to kind of help lay the edges a little tiny bit when I say the smallest amount, I literally apply it to my Edge brush spray it on there and then I actually kind of like Smooth down my edges, but doing the same thing that I did On the left side to the right side, right side left side, you get it and you guys can see here. Everything is just laying smoothly. I was super happy with the way that everything looked so far um. I didn't end up curling this. That was the interesting thing y'all. This is bone straight hair freaking bone straight, and it's super thick. Whenever I get a unit that is sitting the way I want it to sit, the hair is beautifully textured. I literally wore this for a week straight. You know how you'll kind of get those like tangles in the back every so often just because it gets kind of hot back there right. You should be able to still detangle your hair with just using your fingers a paddle brush whatever, and I did not have any issues with this unit, so no tangling, at least for my experience and then the shedding I did get some shedding. I'M gon na assume that that came from when I cut off the sides of the actual unit um and then probably just with my own tugging and pulling, but it was not anything excessive. I was super happy with everything and the way that it laid, and then I also just want to show you how you can quickly like pull this up. So whether you want to do like a half down, half up or you're, wanting to just do like a cute little ponytail style, you definitely can. You should feel super confident with this unit because they did add a few baby hairs at the uh bottom, which was just like some straggly hairs right, but there's lace all the way around this full lace wig. So I want you to just really take in the density. Of course, all the details to the exact unit that I have will be down below, just so that you, you guys, aren't ordering something different than what it is that I have. Definitely let me know how you guys feel about this. I love you so much stay pretty and I will see you in my next video bye babies. Thank you.


Comments
Candi's Life: This is pretty as sh$t! Thank you for reviewing this unit!
Natasha R.: Gorgeous ❤
Jasmine Price: You ever do/use a panty house ( pack or individual kind) instead of a wig cap??