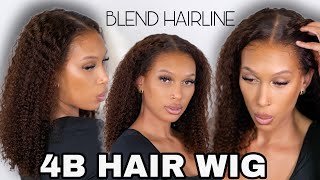
* Detailed* Walk-Through Closure Wig Bleaching, Plucking, Install, & Curl Defining! Ft Ali Pearl
- Posted on 24 October, 2022
- Lace Frontal
- By Anonymous
Hello my beautiful subscribers (and non subs) ☺️
Wig sales page - @CAwigss
Personal instagram- @holaa_caro
EMAIL- [email protected]
Shop Now➤https://bit.ly/3dST87I
Hair Info: 16'' Kinky curly bob 5*5 hd lace closure wig, 250%density
❤#AlipearlHair Official Store:➤https://bit.ly/3BVtKGa
Up To 50% Off, Lace Frontal Wigs!➤https://bit.ly/3CjlMrR
In FB Group, EXCLUSIVE DISCOUNT! ➤https://bit.ly/3O1I8ku
1. 24h Flash Sale!
2. Free Hair and Cash Back!
3. Unlimited Coupons!
#alipearlhairwig #alipearldeepwavehair #alipearlhdlacewig
Instagram @alipearl_hair: https://bit.ly/34I3Oyd
Youtube @Ali Pearl Hair: http://bit.ly/2H0Gmmc
WhatsApp: +86 15890076489 E-mail: [email protected]
Oh, my God, that's my baby, camera, hello, hello, everyone! What'S good! What'S Poppin, It's Your Girl, Caroline and I'm back again with another detailed sturty, finish: in-depth real-time journey of a wig customization video. So today we're gon na be working with this beautiful and, I would say beautiful. I mean beautiful, kinky, curly wig from Ali Pearl. This is a 5x5 HD closure in this video. I'M going to show you guys everything I did from right out of the pack to getting it to looking like it's coming right out of my scalp, you already know I like to just show you guys exactly what goes into these customization processes, because a lot of The times how the wig is looking on, my head is definitely not how it looks like out of the box, but, with that said, sit down, relax, get you a snack, because, as always, it's a long one and let's get right into today's video starting from the Top here's how the wig was looking right out of the box. It is a kinky curly wig. I have the fullest density 250 density and this is a closure five by five, but my opinion I feel like I was getting more like four to 4.5, but we're going to talk about that. So the first step on my customization checklist is to bleach the knots for my beginners out there. If you can see right at the root as the wig those little black dots. Those are the knots from the hair being tied into the lace that I'm going to be using bleach to turn into a blonde color. So it looks more like it's coming out of your scalp. It just makes those black knots at the bottom of your lace, less noticeable, giving a more scalp like parents, so to bleach the knots I'm going to be using this blonde brilliance, bleaching powder. I used to use the standard BW like regular bleaching powder, but I recently invested into this one just free formula and something about this. It doesn't like start to bleed too much into the hair about two little spoons of it to mix it, I'm using a 20 volume developer and the reason why I'm using 20 volume is because this brand specifically tells you to use nothing more than 25. It says: like 15 to 25, I tried using a higher volume developer and it did not work that well. I feel like, if you're using regular, like not this one like a standard powder, I suggest using 30 as a beginner, but I do have other videos where I use the regular type of bleaching powders. If you want more specifics on that anyways and I'm just going to start pouring in my bleach and my thing with pouring in Bleach, is you don't wan na not the bleach pouring in the developer? I'Ve already made sure I'm not pouring it in it too much because the consistency of your bleaching solution really matters, because you want to be liquidy enough for it to like hit those knots. But at the same time, I want it too liquidy, where it's like running into the hairline this. This texture, like it's a little bit too thick for me, like you, don't want it to be cakey and chalky, and I feel comfortable making this more like on the liquidy side, not liquidy, but more yeah, more liquidy than I'd normally do, because this, like, I was Saying this bleach itself, it doesn't like bleed that much incredible as you can see right like it's spreadable. At the same time, when I flip my brush over, it's not dripping, but also it's still creamy enough, where it's not dragging through before I apply the bleach, I'm going to put some hairspray in the front of the hairline, and this is just to help me push Back the hair, because I don't want to mistakenly get bleach onto the actual hair, do you like, when you have one of those wigs that have the baby hairs in the front, push that hairline and look okay, cool, find it easier for me to just have my Wigs laying face down you know as up just like this to apply my bleach, I'm using a wooden popsicle. Stick. You can use anything you want to help, you apply just make sure it is plastic wooden and not metal, because metal does react with the you know. The bleaching process so yeah, I'm just gon na, go in and start playing that bleach. I go with a light hand at first when I'm doing this, but at the same time I still put a little bit pressure because I need this bleach to cover those knots. Not just sit on top of it before I used to just like let it sit on top, but I realized to really get those knots, especially their big knots. You got to push it in just a little bit, which is why it's important to make sure your solution is not too runny. So, even though you're pushing the bleaching a little bit, it's not going to start dripping into the hair and don't be afraid to take a stop moment. Real quick before you go too far, flip the wig over and just make sure you're not pushing way too much. Okay, good, but you see how like the bleach is properly covering those knots like it's not just sitting like I can see the bleaches cover the knots, that's what I want now. I have them flipping the wig over. You can see. Y'All see how y'all can still see like those little dots a little bit on the base versus right here, where those dots are completely covered. So I'm about to go back in and push the bleach more because I really got ta make sure it's covering up those knots like not just down there but like it's swallowing the knots up. That'S how, if you feel like your knots, don't be bleaching, it looks. It looks the same. That'S probably because you're not putting enough pressure to push to cover up the knots. As you can see now everything is very much covered. You see that that's what we want get some foil paper and I place that under and this kind of just helps like fasten up the processing time. Oh before I put the foil over, I just I never give specific times, because every Wig It bleached differently. So I always say like just put a 10 minute timer and keep checking the hair every 10 minutes to see how it's doing, because you just want these black knots at the base like at the root to go from black to, I would say like for me. I like to go for a very like, yellow blonde color, a blonde color. If it starts to look orange, let it go a little longer. You want to go from black to Orange to blonde a 10 minute timer and I'm gon na come back and show you how it looks like in 10 minutes: okay y'all! So it's been about mmm 15-ish minutes the knots like the bottom right there, it's more like an orange color and if you're kind of scared, you can go ahead and wash it out now. But I like it to get to more of a yellowy blonde color, not like a penny orange I'll, come back in another 10 minutes or so to check on it again and now it's been like. Let'S say it's been a good 30 minutes and I don't like to do past 30 minutes, because if it's not bleached after 30 minutes just go ahead and do it again because I'm always so scared to damage the hair. Because that's how you get all that extra shedding in your frontal ends, give me your lace and stuff. But this is pretty good for me. So I'm gon na go ahead and wash this out now and you know you're not to bleach for sure when you turn the wig over and it's like. You know it looks like this: it's no longer dark. It'S it's getting bleached so to wash out the bleach. I like using this neutralizing shampoo, I like to get a neutralizing one, because it has basically this like active. Basically, it has this like active ingredient in it. So whenever I have washed out all the bleach - and I know I've washed it all out - it goes from a pink foam to a white foam. I'Ll show what I mean, because you really got to make sure you're washing out all the bleach like. I realized the reason why I was getting so much shedding from my wig. Sometimes is because I wasn't really properly washing out all the bleach like I thought I was so just going with a little bit of that. Neutralizing shampoo scrub scrub scrub and I also make sure now, I'm washing through the hair, because I used to just like wash the lace out of bleach, but not realizing that the bleach is done running into the hair too, when I'm washing it. So I make sure I'm washing the hair through as well, because that too can lead to shedding foreign. That'S how I know I mean I know: y'all can see it, but that's literally, all the pink all the bleach, that's in the hair. Now so after I completely wash the bleach out of the hair, meaning the foam was turning white. That'S how I know it's been gone: here's how the lace was looking as you can see. Those pots are bleached. Okay, black dots, where I feel like my bleaching skills have really improved, because I focus a lot now on pushing the bleach through the knots after you bleach your knots you're, going to probably have to use a tinted shampoo to help just cancel out the orange and Yellow colors that are left from the bleaching process I like to use either blue or purple shampoo, sometimes both just kind of depends on how the lace is looking. I'M going with the blue shampoo first, because blue helps cancel out orange on the color wheel and I use a good amount of it because I only want to get that pigment all of the knots I really scrub it into it. I leave the shampoo on for about five minutes. I don't like to leave it on too long, because sometimes it can give the lace a bit of a tip if I'm not like you know properly washing it out. If I leave it on for too long after I washed out the blue shampoo, I look at the lace and it was having. I could see now a little bit of a yellow tint as well, when I'm talking about the tint, it's kind of just like where those like the color that's coming off at the base of the hair, because it's no longer black, so it looked kind of yellowish. Now so I went in with the purple shampoo, which canceled out the yellow color, but that's it for another five-ish minutes and just washed everything out and make sure again, I'm thoroughly washing the hair as well out. I'Ve recently got some questions asking if it's necessary to do this step after you bleach your wig, the knots in the wig, and I feel like yes and no. No, because you can still go ahead and install the wig without doing this step. But it's going to have like a very orangey yellowish overtone and your scalp is more of a neutral color, so you have to probably use concealer or something to cancel that out. I just like doing these steps and canceling out that orange, yellow color. You get kind of just makes it look more realistic in the long term, so you don't need to do it if you don't have these shampoos around, but it is going to help the wig look more realistic if that makes sense after thoroughly washing out all the Shampoo from the hair, I'm just going ahead and adding some conditioner just to help add some moisture back to the hair, because I just use a three very stripping drying shampoos on it, so adding a little bit of conditioner after you, shampoo, your hair really goes a Long way in the quality of the hair, after all, I let the shampoo I mean the conditioner sit for probably up to an hour. Sometimes I can let my conditioner sit overnight. If I have the time, let that sit washed it out and we are ready to pluck the wig okay here she is on the mannequin head, ready to be put. As you can see the hairline right. It'S like it's got a little bit of pre-plucking going on, as in like you see how it's like nice and thin a little bit up here and it gets thicker. It goes back in. But for the look I like to go for I like a more plucked. Look so I'm going to be plucking it, and normally I like to pluck my hair when it's dry not wet, but there's you can do both ways. The pro to plucking, your hair, when it's wet, is that the knots come out a lot easier, but at the same time it comes out a little bit too easy. You can definitely over pluck, and you just can't tell how thick your hair is when it's wet, but I'm being really lazy and I'm not trying to wait, because I want to finish this installer one day. So I'm going to go ahead and just pluck it wet. Luckily, for me, the wig is already parted in the middle I like to always have my hair parted out in the middle when I'm plucking. This just kind of helps me one not prevent plucking the middle part once you plug the middle part, something about the wig. It just doesn't look right or the same, so I always make sure to know where the middle is so do not pluck directly in the middle. Unless I'm trying to like you know, make it thicker. I mean space it out and second just to help me work in sections. So what I'm doing right now, I'm just pushing the hairline at back my hot comb to help me see the knots and just see exactly what I'm working with and since it's a little bit pre-plucked, I'm gon na pull out to the most thickest part of the Hairline, where it starts to get thick, which is like a little bit up here, I never plug in the big. I never pluck in front of the hairline, and that's just for a couple reasons. One to help me not overplay, get an over plucked look and two also to help me preserve my baby hairs, because sometimes I pluck way too much, and I realize I don't even have any baby hairs to work with when I'm trying to install the hair going In with my slant, tip tweezer, this is my Revlon Diamond Series. I only use these tweezers they're, my favorite, I like to get a good amount of tension, so I'm pulling the hair back with one hand and pulling it forward. It'S just got everything nice and pulled out, so I can really see those hairline Strokes. I want to create because it's like a slant tip the tip, pointing I guess forward. I just start - and I just do it like in a pulling back motion freezer and pull the hair out from the root pluck skip, pluck skip like I'm skipping, a gap of hair in between where I work my way down the line when I'm plucking, I'm not. I'M making sure I'm not plucking in the same area like I just went all the way down and plugged this row. So now I'm taking my tweezer higher up and plucking the hair in between this row and I'm trying to see like pluck skip a line pluck skip a line pluck skip a line as I'm making my way down. Plucking, the same spot is how you get bald spots and remember to pull the hair out from the roots. That'S how you get a clean, looking pluck if you're leaving those little knots behind like the hairline, just looks really fuzzy, and you can't even tell it you plug the hair. You know you're doing it right when you see the little blonde knots that you bleach coming out. There'S no blonde knots coming out, then you're not pulling it or your tweezers is not sharp enough, and I just like to work my way back like about. I don't know an inch and a half up into the hair. You don't have to go all the way back into the hairline. Sometimes when the hair is wet. I can't tell if I've plucked too much or not even enough, but that's okay. It'S always better to under pluck before you install the wig and then once you pluck it, you can tweak the hairline some more like you, don't have to cheat for a perfect pluck before even putting the wig on, because you can never put the hair back once You take it out, so it's better to under pluck and then do some more tweaking once you've, you know, install the wig anyways, not just brushing everything back forward, repress the hairline back, all right cushion the hairline back and for the front, depending on how pre-plugged it Is I go in and do the littlest honestly that's a lie? I I feel like I still be over plucking the front, so I'm not going to touch the front. What I want to do is go in between these gaps up here, not down here up here and just kind of like create a little more gabbage like it's looking a little too dense for my liking, so not down here. Preserving those going up here and just creating a little gappage little small spaces to give that look that I'm going for I'm gon na. So you can see it's looking quite pretty plucked to me, but then again it might be not even that plug. Once I install it, but I feel like the hair, because the hot comb is like fairly dry, so this should be true enough density, I'm just trying to see where else needs a little bit of a space created. But let me stop before I start doing too much but yeah, and that is there you go and that literally just took me like 15 minutes. This is why I love me a good closure. It'S so fast. 30 minutes tops when you're done now. I'M gon na do the other side, foreign. Now that I'm done plucking for closures. What I have to make sure I do is this last piece of hair before the track starts like the track is right here I like to just part that hair out and press it downwards to make sure it covers up that track, especially since I think I Want to do a flip over kind of look, that kind of just helps to give more of a frontal illusion, so I'm just pushing this down everything else. I push upward with this part. Make sure I push it down so yeah, but um here is our fully plucked wig y'all understand how pumped I am the fact that it's still day one and I'm about to install this wig like this - is why curly clothes away is my favorite closures, love them They'Re easy to work with curly hair. You don't have to style it like you feel me so now before I put the wig on I'm going to tint the lace, even though this is an HD lace and then like it should like melt into your skin. A lot easier than regular lace. I still always find it necessary for me to tint the lace unless, like the company is like specifying this is like a specially colored lace. That'S for my skin tone a couple of times. It still just needs a little tinting, I'm using my Maybelline Fit Me Foundation in the shade of 356 One coconut. This is my exact shade match. I either will use a shade, lighter or darker if it's like a lace, usually like I'll go with a shade, lighter. If it's a lace, that's really dark, because the light the the light Foundation shade can help lighten it up, but with HD lays typically, it doesn't really have much of a tone to it and if it's transparent lace, I'll use a shade a little bit darker because Transparently tends to have like a white cast on it. Transparent lace is honestly best for those like, like really light skin Fair tone, almost Caucasian knee toned skin. Don'T take that personal I feel like, but everybody all skin tones, HD lace is the way to go cure. My little straps in the back, it's just to make sure it fits in my head the right way. I'M gon na put on a wig cap and the wig cap. It'S just to honestly protect these braids to keep them fresh longer because it's always getting caught on the clips. So I just like to have it like pushed back like behind my hairline. So that way, it's not like showing right directly under the wig all right make sure you got all your Clips on the wig secure. This one has a clip in the back. I don't really clip my sides with closures so that way it doesn't like fit weird, because sometimes depending on the size of the closure, I can feel like it's a hairline, weird, here's how the closure is sitting on my head kind of assuming you guys are always Wondering what do I do about the sides of the wig? It is sitting pretty decently. It fits around my ear. This is a medium cap size. If you feel like the wig is like fitting kind of funny on your head. Then maybe the cap is just not the right size for you before I lay down my lace. I always like to make sure I cut off the little thick pieces of lace on the side of the closures - those pieces - I don't know what they're there for, but I know I definitely do not lay those down because they do not lay down to lay down. My lace, I'm using my ebony lace, spray love, her she's, the goat, and this is like more of a glueless hole. It'S not a glue. It'S like literally just a hairspray, with a stronger hold. I like to use this or the Bed Head hairspray and for I guess, let me ask you some quick questions about it. I'Ve been getting um. No, you cannot do this on vacation like, like you, wear this on a yacht or you jump into water with this she's gone the way guys left you in the back question number two: how many days does this last? I know if I'm really like doing like my maintenance and being very cautious of how I'm washing my face and all that extra stuff. This I can get about like two, maybe three days, depending everybody's different, like depending how sweaty how oily your head is and how it works. For me, two days honestly, the most threes like I, I don't know how I got three, I probably wasn't like working out or anything. This does last up in a sweaty club, though, like I wear this out to the club at night, it's hot as sweaty as packed, I feel like my wig is sliding off and she don't move. She don't move. This is this is water. This is a water-soluble product and it comes off of water actual glue. You have to use alcohol to get it off. So with that said, if it touches water, it's going to start it's going to start melting apart. Okay, so I got ta say so. It'S more of a temporary hold, I'm a girl who likes - I don't sleep in my wigs. I take them off at night because I don't know my head gets hot. I get hot but at the same time, I guess for those y'all asking how I really thought my wigs since I'm taking it off at night and I'm not sleeping in it the shape and the form of the wig is maintained, especially with a closure. It'S so easy to put it back on like I'll. Just put it back spray, and you know it's good, so I feel like I don't - have a hassle putting my wig on every day and I honestly don't wear my wigs every day unless I'm filming going somewhere. Most of the time I'm either wearing my real hair or I'm just wearing a hat, but yeah, that's my little Spiel on it. It has they have. They have different versions of this. I have tried the black one. I feel like I'm, not a fan of the black one too much. It has too much of a residue in my opinion, but it's probably kind of know how to work with it that well, I just like to use this one she's great, but apparently the black one is supposed to be like waterproof. I doubt that because it's still a soluble product, but it's supposed to have stronger, hold so try out the water, try the black one if you're looking for a stronger hold but yeah. I hope that answered your questions. If you have more, of course, comment down below, but let's get into this stuff, so what I'm gon na do? I'M just gon na cut the lace. I'M gon na use my brow razor to cut the lace. I feel like using a razor to cuff your lace versus anything else. Razors are the best thing to cut it off. Only problem is that I'm a klutz and I always cut like my head and stuff, so I sometimes will just cheat and use cuticle scissors, but still nothing beats a good razor cut and that's because the razor, basically it cuts the hairline and a jagged type of Motion like it gets like a jagged raw Edge to it, which just really like lets the lace lay so naturally on your head, so I'm just going in and trying to cut off as much lace as possible. If you're wondering how do you cut your lace off exactly y'all know, I got y'all. I have a very my concert's gon na fall out. I have a very detailed lace. Cutting tutorial, so y'all should definitely check it out, but yeah. I just try my best to follow all right. Cool cuckoo come see, it's already melted into our hairline. I love that for her and now as far as laying it down, I'm just gon na go in and spray as close to the edge of the hairline as possible with this product. It'S best to spray focus more on spraying on the hair than I mean on the lace than the hair. So I spray and I use my fingers just like you - know - gently tap and distribute the product out now. The piece there is a Stones is this blow? Dryer and wrap tail comb combination. This is what I feel like gets it to like, really lock and melt onto your hairline, like I see people who, just like spray it and like put elastic band on and let it like air dry, no babes. I feel like you, got ta use a blow dryer and let it just set you know and of course this is to help push and flatten out the lace to make sure everything is like laying flat to your skin. I use the hot setting, but the lower power, so not not this, but this and I just be pushing it in and now just to make sure I got all the edges. I just like to spray the end of the comb like that and just tap the edge once more just to make sure I didn't like miss this spot. I don't want no lift in that he's melting into my my head, I'll bring it now. Let'S make some baby hairs, I don't like to stress myself out my baby hairs. I do the same thing every time and I like it like that because I feel like sometimes you can have a good install and the baby hair is just mess it up. So I like to just do a minimal amount, I'm gon na just pluck these baby pluck the hair out down just a little bit because y'all remember, I purposely did not pluck the front of the hairline, because I wanted to preserve enough baby hairs for myself. So I'm just going to lightly pluck through these just to thin it out. First, I'm going to spray it down with this same oven, spray just to help them lay downwards, and then I'm going to just cut them down. I usually like to just start like right at my eyebrow and I cut it down in a diagonal motion yeah, because I almost just cut off my brows just curl her with my little mini flat irons. I got from Amazon and I like to just make sure. I'M doing a nice tight curl out without burning my forehead off. I'M gon na try using mousse today to lay my baby hairs. Normally I like to use Eco styler, but I don't feel like picking it up and I kind of just want to go. Try something different today, I don't mind using mousse. I just sometimes have a hard time getting the baby hairs to lay down with moves, but I'm just going to try it out for today. I don't know how people curl their baby hairs, so tight and Tiny without burning themselves, like maybe I'm just missing something like I need a tutorial on that. Like that's what I mean, because I can't even I need to get make My Curls tighter, but I'm always burning my head, so I just like do like a weak little curl like if y'all know how to do that. Tell me or maybe I'm just clumsy. I don't know make sure you're swooping your baby hairs, no way where it it swoops over track right here, just to help cover it up and stuff. My baby hair is my first attempt always has to be like the rough draft. Sometimes I got ta like Let Them Sit and sit a certain way and then like re-sook them. Okay, this is good for now, I'll probably go in once the baby hairs are set to tweak them some more, but for now this is good. I'M gon na go in my elastic band to hold everything down now, to Define My Curls, I'm gon na be going in with a spray bottle of literally just water y'all. I promise you a lot of times. You don't even need that much product to get really nice juicy curls. You just need water and it's about your technique of brushing because y'all, I was asking me Caroline. What are you using curly hair to get your curls like that? If I brush my hair, it makes a big difference like it literally can make the curl pattern look a whole different way. First, I'm just trying to make sure I'm cutting the hair, even in my water bottle, saturate the hair up so make sure it's nice and wet. Once I do that, get my brush, I'm using a paddle brush. Oh, that's what and I'm brushing - and I just keep brushing until I see the curls start to Clump together and form little ringlets like you got, ta, be brushing for a minute and the way I brush. I make sure I'm scooping the hair through the brush. They can all, like you know, form up. You see that yeah and I keep rushing to the whole section is looking like that. Okay and then I scrunch the hair to help really promote those ringlets. You see y'all see that period, sometimes depending on the kind of hair. The ends are really like. The ends won't curl up the way you want it and you just got ta go in and chop those scraggly ends off and re-brush, okay and then brush again foreign. There you go now: hey you see that very, very nice, very nice scrunch, and since I want a flip over look, I make sure I'm brushing the hair to the back first and when it dries. That'S when I'll, like flip it over. That'S how I get that look foreign to get the ringlets to form like I don't stop till I see the hair Clump up together and once you get the hair to Clump, you got to make sure you're not running your fingers through it, because now it's gon Na like dry in a frizzy, different type of pattern and y'all saw how these curls - I don't think I remember these. This is not how the curls is looking right at the box like most of the time, the curly hair. That'S not how the curls look at the Box. You got to put that work into it where to get that look. So whenever you guys trying to want to fight me in the comment section, I bought that wig and it looks nothing like that. That could be true, but at the same time maybe it's just the way, you're brushing out your curls all right and now key part. I let the hair air dry just like this. Do not run your hands through it, be careful how you're like sitting, because you really just want the curls to dry in this wet form, but dried that way. It'S defined. You feel me, so I literally just leave it alone like this and I'm going to come back to y'all once it's air, dried okay, so the hair is not fully dried. Yet it's been about two hours now, but it's almost there, but I usually like to do my little tweaking when it's not fully dry. So that way you know I just like to make sure like it's gotten to a good volume and the curls are set. Now. I'M just tweaking the baby hairs a little bit. Okay, now for this rest of the styling yasuki are saying now. I can just like easily push the hair around to get that flip over. Look that I want, and as far as the so I'm gon na this is why I use a mousse Fork just for tweaking, because it's not like it's gon na have the hair will dry faster. So I do water, for the tweaking part like this part, got all fuzzy, since I was moving the hair around. If I use water it'll just take a lot longer for it to form. So I just like to use mousse just to help re-curl certain part and wherever I cut, I add mousse to re-curl the ends. Okay, guys look! So that's how the hair is looking like it's basically fully dry, as you can see, the curls are nice and defined. So I like them - and I just separate them a little bit just know this hair - will get very big if you play with it. Sometimes I best not play with it, but it's so hard. This is a cute and just a really good fun. Look like. I love it yeah, but yeah that was basically it. This was honestly not that bad. It was super easy. All I had to do was Define the curls and, as you can see, I look cute but yeah. That'S really it thank you for following me on another Journey for once this time, guys it's not the game in the morning. It'S actually 11, so progress. But thank you guys again for watching this video. I hope I was able to teach you something help you out on your way installation journey, and I hope you just enjoyed watching me work with this wig, but I'll see you guys another one, like always make sure you like comment and subscribe, and peace out Girl Scouts good bye,


Comments
Jai Mechelle: This is one of the best easy plucking tutorials I’ve seen! Thanks Beautiful
Honey: Your videos have taught me how to bleach my knots pluck my wig melt the lace define curls allat!! Thank you because of you my new water wave wig is about to be popping when I put it on. Got me feeling like arrogant tae lol. Keep shining!
merci greer: I’ve been watching your videos for a week and I can’t wait to practice. You make it look so easy and it’s got me pumped to try. Also you should try doing Asmr , you voice is so soothing to me ( hope I don’t sound weird lol)
chioma Ugochukwu: my installs look so professional cause of you so I want to take this time to say I appreciate you
Tori time: This install was beautiful btw purrr!! Love the hair
Nina Negedu: The curls are popping
Mars Xo: I am loving closures right now
boob!3 subs: Hey Caroline!! I love your tutorials they are sooo helpful! I’m about to bleach my first wig, is it ok if I mix the bleach solution in like a ceramic type bowl?
SidneySavaage: This hair is fireee. I love curly hair and that length is manageable for me.
Precious Raynee: Loved this install
Feminine Attractions: You are on our necks with the updates
Ali Pearl Hair: Pretty! Thank you so much for your sharing!
Asmaa vlog 아스마 브이로그: I feel happy when I get a notification that you have uploaded a new video . Thank you very much for uploading the video. Your videos fill me with so much positive energy ♥️♥️♥️
B N: Love this, does it get big and puffy after a while or it keeps the soft and luscious look?
Hair Junoda: dear, so cute and gorgeous!
De'Shanita Moore: This was easy to follow! What was the purple and blue shampoo brand?
Juliaan Miss: wow, so beuatiful and cute!
Kasha Morgan: Omg. I've been watching for a min. Omfg this the birthday wig Caroline.. Thanks bae❤ 11/16 Scorpio here
Tinashe Ruze: I Just enjoy watching you so much
James: Cute! . Bet it look good on me
Childishgambinaa: If you had a perm before you know allll bout the neutralizing shampoo
Renus Hair: this hair is do cutecould we have a work for our haigh quality with afforable price huamn hair wig?
Kasha Morgan: Plucking ASMR
kialharris: You about to sell this ma’am lol
Crystalprettydiva4💖💖: Cute
Kasha Morgan: & please watch the whole video b4 jumping to said link folks
Tashanda Myers:
renaeè: Where are you from?
Dee Marie: Which curly hair companies in general are too 5?
Tori time: First