Neon Green Skunk Stripe Wig Install // Part 1/2
- Posted on 22 April, 2022
- Lace Frontal
- By Anonymous
Yes I did this look back in January, yes my footage got deleted, NO I did not give up on finding it and reediting the entire video! This still is my fav look to date, and I needed to reedit it for the ppl like me who LOVED IT! Make Sure you go to part 2 to watch the makeup look! https://www.youtube.com/watch?v=fWurlD... I saw @_pink.glam do this look and was OBSESSED she used a pop of blue, but since I did this skunk stripe wig in green, I thought this was the perfect look to do a pop of green
Anyone else obsessed with how this turned out? Im just so proud of myself I can’t dealllll
______________
WATCH PART 2 FOR THE MAKEUP INSTALL: https://www.youtube.com/watch?v=fWurlD...
MAJOR DEETS⤵️
HAIR: Old Wig from @wigencountersofficial I bleached, dyed, & cut!
BW2 Powder & @Clairol Pure Wite 30 Vol Developer
Wax Stick: @slaylikefatima
BONNET & Shampoo + Conditioner : https://www.glamourmeextensions.com/pr... @glamourme_salon
DYE: Adore "Electric Lime" , KISS "Neon Green" , KISS Tintation "Lime Light"
Lace Glue https://shopwigdealer.com/collections/...
Got2B Glue Spray: https://www.amazon.com/Got2b-Glued-Bla...
Sheer Pantyhose (wig cap): https://www.annieinc.com/products/anni...
Lace Tint Spray "Medium Brown": https://www.ebinnewyork.com/collection...
CURLER: https://www.amazon.com/dp/B0047WYSRI/r...
_____________
PLEASE FOLLOW MY SOCIAL MEDIA
https://linktr.ee/Beatsbydeborah
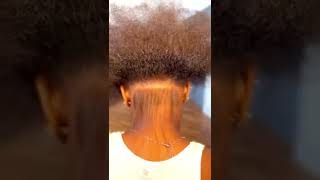
Hello, my loves. Welcome back to the channel, hey, hey! Welcome back to the channel, hey hey! I switched it up anyway. This is just me getting bored first, post of the year like i've been down and out it's time to get it rolling. I took an old wig um. I was like this. Wig is gross and dirty like. Let'S revamp her um, the hairline is really cute, so i was like okay, let's like do something cute with it, so i did, as you can see from the title on the thumbnail. I did the skunk stripe, um trend thing. That'S going on. Finally, i'm a little late to it, but it's okay. I decided to do green because i have never had a green wig before it's not fully green, but you know like even that hint of it as it being the main part of the wig. I thought would be cute: that's where we're at right now. I have not done my makeup in forever um. I washed my face like um. My skin is like doing black right now, but it's okay without further ado guys, let's get right on into the video. I already filmed myself doing the wig, but let's cut to that um me my love process that i did it's not the neatest. I could have done better, but hey it's a learning experience, so you guys go ahead and stay tuned and keep on watching. Okay, y'all. First of all, forgive me please um. I have been sitting on this video for so long because they deleted my fully edited 40 minute long tutorial that was so in-depth, but i decided to re-edit it and everything for y'all, because this is still one of my favorite looks to this date. This was back in january. I took this old doodle wig baby and we re-did her okay, so i'm just gon na have to re-talk through it. Oh my god, i'm sick, but i want y'all to see this process for anybody who hasn't done. The skunk stripe. Uh trend or really want to do it themselves. I did it myself and it turned out fire and it wasn't perfect. So y'all know i like showing my mistakes um for those who are beginners like me, uh, let's get it okay, so i just sectioned off this hair. You see the middle part was already in there. So that was like the perfect guideline. I just took basically about an inch and a half away from that middle portion on both sides of the hair and section that off, because i want that part to stay black. And then we took a good two inch section on both sides of those middle parts, and that is the part that we're going to bleach, and i just took a square section. Um makes making sure not to go all the way to the end of the lace front, because i did want that part to still be black, and then i sectioned everything else away. I'M only bleaching, those two chunks and i'm using um bw2 powder. Whatever. However, you said you know that powder with some bleach it's going to be listed down below baby. I made the bleach um, really not too thin, not too thick um, pretty much what i d a little thinner than what i'd use to bleach. My knots, i've bleached. My knots before on this week, though so you know i didn't need to do that again and it is dirty so, like you know, i will not dirty, but you know i hadn't watched it since the last time, probably like two years ago that i wore this Wig so i was like it is what it is when i wash it i'll wash the glue out and all that, so you know you don't need to the way the hair does not need to be. It cannot be wet, obviously when you're bleaching, so basically what i did was um. I really saturated the hair. Okay like when i say this whole section needs to be bleached like down. You need to saturate the crap out of this hair. You cannot miss the edges or anything, or else it's going to look really patchy and really weird you'll see um. When i get done bleaching how mine was a little patchy like, i could have had it more saturated, i'm so like sensory with things, i do not be wanting to touch the bleach and then my gloves get all bleach filled, and it's just so dirty. It'S like a messy process, but honestly you got to get your hands dirty. You got to get your hands in there, like you know, just like make sure, though you do take small sections like i did and try to get to that root. You want to get all the way to where the lace is, and you want every piece to be: bleached: okay, because it's going to be need to be bright, green and if you miss a spot, then it's going to be black still. And it's going to look crazy, so this was um after i let the bleach process for about. I don't say: 20 minutes um. I went back through those sections and added 40 vowel developer on the one on the places that i had just bleached because i'm like. Okay, i need that to cook a little bit faster. I don't want one side to be brighter than the other or something so i'm like. Okay, you know, after some of it stopped processing. I just took it out of the um, the foil and i just like resaturated it with higher developer. I don't know if that works. I i do have my cost license y'all i swear, but good god almighty. I don't remember these processes. It was a few years ago that i graduated girl. I don't remember okay, but this is how we're looking so far. Obviously you got ta rinse the bleach out. You need to wash it out before you add your color, so you're gon na wash the hair literally twice um, but it's okay, so yeah it. Actually it got up to like a level seven. What is this level? Seven eight. It was pretty good um. I was like oh, this is too dark, but honestly it did really good with the color on top and all the products that i'm using the washing stuff are gon na be down below um yeah. I was excited because i'm like okay, like that's, that's, yellow but the lime green. It should look cute. You know i did green because i never have done green. I don't like the color green. So i was like. Let'S do something that i'm not used to. Okay. We just mixed all these different little dyes. I had seen around the house baby and yeah um. I just pulled it like. I poured it in a bowl. I mixed it up, and i put it on just like that. I didn't have no conditioner or anything like that. I look i didn't know. If i was supposed to okay, we just added the color right to the hair, okay, honey. Um again, we took little sections to make sure everything was super saturated, but by the end of it, like i kind of like again, you do want to be very careful on the root like i went a little below where the blonde was meeting the um knots Of the wig on the lace, as you can see, i like took a comb and i combed it through when i was close to the root of the hair because it made it look super natural. You don't want your knots to be green, because then it's gon na be super hard to like blend into your skin, so make sure you leave a little tiny bit um blonde kind of like. If you were to bleach your knots on a black wig. You want those knots to be blonde because it's gon na you know be able to blend into your skin better same thing with the color, so don't put the green directly on the lace or it will dye it. You know what i'm saying so, whatever color you use, don't put it on the lace baby, give you some room: okay, um yeah, so i'm just making sure everything's super saturated um and i'm just like all right screw it we getting our hands dirty because this knee, I want this all to be like green as heck and, as you can see uh i really was careful around the lace and the knots survived and honestly it was so green. I loved it, but as you can see that little piece on i got right there. That'S one of the pieces that i did not bleach like it did it wasn't saturated enough, so it didn't take the color well. So when you do the the bleach is like the indicator that okay, it's going to be super bright, so you want to make sure that you really bleach it really really good and everything's super, even okay, um it turned out really bright, though like i was shook Because i'm like wait a minute that actually looks crazy and i'm like, if i don't curl this, if i just like flat iron this, it probably would look nuts so the curls made it l, look like really in-depth and, like just gave it some depth, it was Really pretty after i added layers to it and stuff like um. This is me just waxing it down, so i can uh um press it down and make sure it's like really flat. So then, when i curl it it's just gon na be so pretty and honestly, the lace on this wig was everything i believe it was from wild african. Again, it's gon na be down below it's literally it's just from one of the uh various companies. I'Ve used over the years, i believe it's an asian brand. It wasn't a black-owned company that i would have remembered, but yeah um, i'm not sure exactly who, but it's gon na be down below okay and yeah the wig. The wigs lace is really nice, so guys. You'Ve seen what i did this is where we're at right now. I have curled her yesterday um, so the curls didn't fall. Much i'm not gon na lie. They look good. I just um use this uh curling wand, iron, curling iron. It is by conair, and i think you can get this from the beauty supply for real, like i'm pretty sure it's like 20 30 bucks. One inch just make sure you get a one inch barrel. If you want the curls to look like this you'll see when i comb through it, how luscious and pretty it looks but yeah, so i did cut a lot of layers in this hair. As you can see, look how short this is like one of the shortest layers right here so yeah, and then i kept the front um straight for now, because i'm gon na curl it obviously when i put it on. I just want the curls to be fresher and then to fall a certain way, so i'm like i don't know where i'm gon na part this yet so we're gon na wait. For all of that, i don't think i want to do a middle part. I'M going to do a side, part thing, so yeah, let's get right on into this install baby, oh and as i was showing on camera like, like, i said it's not the neatest i could have did i haven't dyed hair in a long time like i'm pretty Much just been buying my wigs as they are so like what i would recommend if you want like a really um bright color. Like this i mean this is neon green. You know you or any color that you're doing, even if it's pink blue orange, whatever you want to make sure that the hair is super saturated when you're bleaching it. Obviously i at the time i thought it was saturated, but i'm like i probably could have, did it better. I know i could have. I could have really worked that bleach all the way through, but i was just being lazy, y'all and it. It came back to bite me because i do have a little couple of patches. I'M gon na be transparent, like it's, not the best dye job but um like, as you can see like these, like yellow kind of spots, are where the bleach didn't take all the way on the hair it didn't process. As long as the other parts - hey look, i'm a cosmetologist but baby. I have not done this in a minute um, so don't be too hard of a critic on me. It'S my first time too y'all i'll be dying here like that. I'D just be throwing wigs on, but yeah, so um, i'm happy with it, though i think it's gon na look really cute, so we'll see at the end, this bonnet by the way is by glamour me and oh there go to logo. I literally love the products. I used their shampoo as well as the conditioner to wash this week, smells so good, it's coconut smelling, so i was excited to use those products, black owned business support, if you can, and after that quick fasting and a hurry, little install baby. We are getting into these curls, so, as you can see, i am curling these curls away from my face, and this was when i was like still testing to see how to do curls, but now i know exactly how to do them literally off of doing this. Wig, okay um! This was back in january again, so you know i was still experimenting. That'S a vertical curl right there. As you can see the wand. The barrel of my curler was vertical to my head. That is a vertical curl. If i wanted to do a horizontal curl, i would have came in and had the barrel horizontal to my head, which is what i'm doing right now, as you can see um, so the curl is completely different. It looks completely different if you do vertical curls the one i did before, they're more like um, like waves, i'd say like but vertical i mean horizontal curls to me, look more like flat iron curls and i really like them way better um and they just look Really big and fluffy, i really really like them and they give you that, like you know in the front of your face, like they shape around your face - and i love them um, so it for this week. I mixed vertical and horizontal curls on accident because i was experimenting and everything was just turning out so good. So i was just going with the flow but yeah um experiment with y'all curls y'all like this. This wine curler had changed my life. I mean it literally. Was just an accident by it was like 30 bucks, i was just buying it to buy it and it's turned out great better than my expensive ones. You know so do what you got to do. Y'All like for real look at that, curl baby don't play with her and when always take your curls and like comb, the boys out with a big tooth comb, baby, ooey, fire, okay, every time so yeah now i know how to curl hair whoo um i've been Curling, my wigs ever since okay um, yes, but uh, curling away from the face always on both sides of my my face because it just looks so pretty frames to face so perfectly and you'll see. When i comb out these curls okay, you can look uh. Do a little uh man like a little manual cool shot to just hold the curl up in your hands while it cools off um. But honestly, i wanted mine to be not too perfect or anything. I wanted them to be like kind of fluffy and stuff. So i just let it be, i let them hang um and yeah. This worked out perfectly guys the the color turned out so fire and i did um like part my hair, pretty far into the green, because i wanted to see the green on both sides of my head so again up to you when you do whatever color you Want to do, but i want to do this again to another wig, because it's just so cool looking again still, my favorite look ever make sure y'all go to part two on my youtube channel to watch me. Do the makeup look um yeah! This was just part. One was the install baby. You want to see the makeup, look because everything just came together so perfect, perfect enough for me to re-upload this, even though my stuff got deleted. I still love this. Look like the best look. I'Ve ever done in my life, um, so yeah make sure y'all go watch part two. Okay, we did add some baby hairs uh and they were green and black. We just did them all. We did. We was like we going bigger or going home, okay, so um. This again so many milestones in this video y'all like that's, why i had to re-upload it because i learned how to do the fluffy baby hairs in this video too. So i was shook um yeah, so the fluffy baby hairs. Actually, since this i've done them over and over again, i have actually learned that y'all might wanna like i took the little baby curly oh wait hold on. Let me just appreciate me combing this out with this big toothed comb. Oh my goodness! Yes, ma'am! Okay! Just yes, just yes to all of this, i love it and even the little yellow pieces that didn't get bleached very well. I thought it just added a little bit of character to the hair. It was so cool okay, so here we are we're doing the baby hairs right. I plucked them a little bit because you know this wig old. I was like. We want to make sure this. This lace is covered up, everything's perfect. So, as you can see, i took my little half inch curlers and i curled them upwards, because that's what i saw like in this little arrogance - hey, video or whatever - but i actually found from this other tutorial. I watched this creator. Talk about is curling them um inwards, instead of like up like that. So like curl, it like a normal curl and you'll, find the um like the fluffiness of them. Look like it's just way easier to comb in so like. I was combing these baby hairs to try to lay them down for so long. You put a little freeze blast, a little bit of got to be like the clear gel on your finger and do it and it like it, turns out pretty cute but like if you curl them under. I mean over it's way easier to get that fluffy. Look like with so much less time. Y'All do all right, y'all hit that description and go to part two now, okay, to see how i got this gorgeous makeup. Look um y'all are gon na want to see how i did this. So, thank you all for watching and let's go to part two


Comments
Beats By Deb: HEYYYY BABIESS! Make sure you change your video quality to 1080p HD to watch with the best quality! Love you, have you watched part 2 of me beating my face?
Kawtar Bouziane: Girl i was there when you had a small following and i knew with ur amazin talent and persona ull make it! Sooooo proud ! I love it
brown_ skin_lover_queen: This beautiful wig came out so cute. Like I love this very much Kim possible energy wig
BARBIE LAND: Great tutorial IM SHOCKED
Kersha Beaver: Tip pair bleach on the piece if foil before you put bleach on the front part
BLLABAE: Oouu you have me excited to try !
🦋 lex LEX lex LEX lex 🦋: “ dark haired bih & she look like Shego ” ✨
Lee Ji-eun 24: You are so beautiful
Lord Key$: Green in the Bible Green symbolizes immortality, eternal life, new growth, renewal, and resurrection since it's the color of vegetation. As Psalms 1:3 puts it, “the leaf shall not wither.”
faith: ok i see that shirt your wearing lol
TechnoGlowStick: You like Kingdom Hearts!
Afiya Gasoline: Yaaay