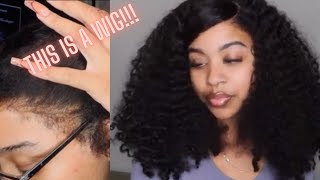
Custom Wig Tutorial And Install Featuring Super Virgin Hair
- Posted on 08 March, 2019
- Lace Frontal
- By Anonymous
http://www.supervirginhair.com/
Hey you guys and welcome back to my channel today, i'm doing a custom lace, frontal wig, i'm making it myself by hand. I was sent this hair by super virgin hair.com. They sent me a 13 by 6 funnel and they sent me some two body wave bundles 18 and 20 inch. They also wrote me a personal handwritten letter. They gave me a dome wig cap, some eyelashes and two really really nice body wave bundles. I mean that hair is so gorgeous and nice anyway, the hair is from the company super virgin hair. So if you are thinking about purchasing her, this is some really good hair. So i'll have the links listed below and you can just run on over there and it should be a discount code there in the description box below so anyway. I'M just using that dome cap that they provided. It was actually a little large. I should have used my own, but they did provide a dome cap for me, so i'm using that and i'm just pinning my tonsil down one in the front and one on the side, one in the back or two or three in the back. I believe so anyway, yeah i'm just pinning it down getting ready to start sewing the wig yeah. This lace, frontal, is super huge. I kind of had a hard time placing it because it took up so much space on that dome cap and that's why you really only need two bundles of hair with this, because the um lace frontal is so large, like it takes up a lot. A lot of space - and you just have to take your time and pin it correctly so it'll be laying flat. So anyway, i'm just braiding um two like two little messy braids, just to get the hair out the way so that i can start sewing the frontal down. Okay guys. So i'm just using a needle and thread to sew this frontal down. And i always start my frontals in the middle and work my way out towards the ears and it just helps the frontal lay flatter than just going sewing from one side to the other. So i always start in the middle, and i sew down toward the ear, and then i start over again in the middle on the other side, and i sew down toward the ear it just gives a flatter foundation for the frontal. To me i mean, if you can, do it the other way you do it the way that you feel comfortable, but this is the way that i feel comfortable doing it. Okay, once you're done sewing the frontal down you're, just going to top your little knots on the end and then start preparing to sew the bundles on the back. So i'm starting off with double bundles. Just so that i can make sure that it's really really full around the bottom, that it's not too thick and that just that the wig looks really full. So i'm just sewing in small stitches and i'm doing that like pool method, loop and pull. I think that's what you call it, i'm not sure what they call it, but anyway, i'm just doing it like that where you just loop it around and then pull and it kind of locks the um stitch. So you don't have to worry about it coming loose or if a part of the thread break, it won't come a loose because it's tied in a knot. So i'm just doing the sewing that way and i'm just going to go from side to side and i'm going to be flipping the tracks over not going to be cutting until i get to the very very last track. So you're just going to see me um sewing and then flipping sewing and flipping you, okay, so i'm not doing anything. Particular here, i'm just sewing and flipping sewing and flipping i'm gon na do that until i complete the whole head, so you just wanna. Just keep sewing and then flipping once you get to the end. So oh and i forgot to say on the second bundle i just did single wefts. I did not double the tracks, so here you'll just see me sewing down single tracks, not doubled, okay. So this is the point where i cut the tracks. I cut the hair where i stopped at the last track and then i'm cutting a track just to cover the band of the frontal. I don't know if that makes any sense, but anyway, i'm just the line around the back part of the frontal. I'M just sewing a single track right up against that line on the back part of the frontal. I hope that makes sense. Okay, so i completed the wig, that is the wig once it's done being sewn, so here i'm just going to remove that excess cap from the lace and i'm just being careful not to cut too close just leaving just a little bit of the cap on there. So that i'm not cutting um too close to the lace, because i don't want to accidentally cut any thread, but do y'all see how big that front wheels. That frontal is huge. It is so much parting space on their frontal, like it's crazy and um. Like i said that dome cap that they gave me, i really appreciate them added it in the uh package, but it was a little big. So i should have used a regular um men's dome cap um and it probably would have fit her head a lot better because it was just like a little bit of extra fabric on that wig, but it still turned out really well so anyway, i'm taking some Ghost bun, i believe, that's the exhale and i just put three layers of the ghost bun exhale y'all seen me: do this a million times? So if you want to see me doing that in specific, just um go back to one of my videos where i'm i'm doing a lace, wig and i will probably link the video below or either i'll put a card on here where you can see it on The screen so anyway, i just put the ghost bun on i'm blow-drying on a like a medium cool setting and just to make sure everything is laid down. So now i'm parting, the back out so that i can sew the back down so that the wig is secure. So i'm taking a needle and thread and you'll see me here so the back portion of the wig down and then i'm going to go across the top part of the head around where the frontal ended it and i'm gon na sew across there too. Oh and i also bleached the knots and pull up this frontal before i put it on her. I have other detail videos with me doing those items, so i just since i made the wig in the video. I did not include those things in there, but it's fine just go back to one of my other videos where i'm either plucking or bleaching or both in the video and then you can see more in depth in detail on another video. But anyway i tied her hair, the frontal down with uh some black wrapping strips and i'm just so in the back and now i'm sewing the top well across her whole head just to make sure that the wig is secured and it's not going to move. So, even if, after a couple of weeks and starts lifting she can just tie it down and go and don't worry about the wig like slipping off her head, it's gon na be there until she comes and get it taken off. Okay time to cut the lace. So i've done this part before too a lot. So what i did was cut a slit in the middle and i cut two slits on the sides near like the end of the eyebrow and um. Now, i'm just parting out the section over the ear. So i can cut that extra laces over the ear off and then i'm gon na proceed to cut the lace out of the front. So i'm just running the blow dryer over there probably lifted it up or something it wasn't completely dry. But that's, okay just run the blow dryer, unlike a medium cool and you'll, be fine, and so anyway, i'm just taking some scissors. You can use the eyebrow orchard or whatever you want to use a razor to cut that extra lace off and just cut it in. Like a zig zag motion so that it's not like straight across and it'll, give it a more like natural appearance, rather than it being straight across so anyway, i trimmed a little bit of baby hair and i'm just kind of like trying to lay the baby hair Right now, i'm still trying to figure out this baby hair thing, because i hate doing the baby hair with setting lotion or foam wrap. I hate for the baby hair to be um wet. I just hate it if i feel like the glue hasn't had time to cure yet and then here i am wetting it with some foam wrap. So right now, i'm using the got to be free spray to like lay the baby hair and i tied it down with another wrap strip again, but i don't know i got to find out something else i got to do so anyway. Here i tied that baby hair down after i got through laying it down and i'm just gon na take my tiny, pressing comb and i'm just gon na, like lay her middle part, just make sure it's really flat and sleek right there. So you can use a pressing comb or you can use a curling iron or a flat iron, whatever you use to get it straight, but usually, if you use a stove like a hair, styling stove to um in a pressing comb, you can get that stuff to Lay down really good, so i just added a little bit of the seven oil that i get from sally's and now i'm just taking my one inch pink iron, because i got a couple about three four pair of iron curls. I don't know why same inch too. So i'm just taking the pink ones and i'm just doing like a big kind of like one curl with the curling iron, so i'm just wrapping it around and i'm gon na do that all the way around the head. Until i get to the front, i'm just going to curl those few curls around the bang area, i'm going to curl those going back so you'll see me doing that so anyway, i'm just doing a like a big one, curl. So, okay, once you're done with all the curls, you just want to cut that black wrapping strip off, and here i'm just taking a little bit of alcohol and just dabbing um. That hair. If i had an extra glue or any whiteness from the got to be free spray, i want to remove that. So i did that with some alcohol and then i just took a little bit of olive oil oil sheet and just sprayed it for a little extra shine to the hair. Now i'm taking my shampoo comb and i'm just combing all the curls back and then pushing them forward and just style it. However, you want to i'm just messing around with the curls trying to get them to. I guess, however, i want them to be to my thought of perfection, just still messing with it so anyway, yeah okay, guys. So this is the finished look. The hair was sent to me by super virgin hair, it's a 13x6 frontal with 18 and 20 inch bundles. If you're here at this part of the video, i imagine you loved it so don't forget to like comment and subscribe click that notification bell so you'll be the first to know whenever i upload a new video, and thank you guys for watching you

Comments
Pretty Official: I cannot wait for you to reach the top honey! You are my inspiration! Keep pushing sis
Missy Grando: This install was perfection
Prettigirlcrazi MeMe Reddgirl: I love your work, you describe every step so right. I most definitely the like the way you talk because give the newbies the steps to take to achieve a good way to do it right; it’s understanding
Lakeisha Griffin: Yes hun you the Queen of hair thanks for sharing
beautifulonekg: Gorgeous
Becky Walker: Like it!
Blair A'dupree: ❤️
Nekisha Davies: do the hair shed at all please let me know if possible love your channel
Ms Hunni: Lawd I wish I was near you. Slayed again
Ms Cabana:
Lady's Boutique: How was the hair I didnt see the info for purchase
Mary Babos: Luv it pretty beautiful but I'm scared of the doll awww pls don't mind me ok.
Lakietha Kelly: Notification gang strong!!