Easy Beginner Wig Install |13X4 Lace Wig Install With Side Part Swoop Bang | Upgradeu Hair
- Posted on 28 October, 2022
- Lace Frontal
- By Anonymous
♡H A I R I N T O D A Y' S V I D E O: Best Affordable 13x6 Lace Front Wig
Shop Now➤Title : Best Affordable 13x6 Lace Front Wig FT Upgradeu Hair
♡H A I R I N T O D A Y' S V I D E O: Best Affordable 13x6 Lace Front Wig
Shop Now➤https://bit.ly/3ET9UP1
Hair Info:Upgradeu Hair
Lace Parting :13x4
Hair Texture :Straight
Hair Inch :26 Inch
Hair Density :180%
Lace Type: Transparent Lace
Use My Special Code : "YTB" Get 15%OFF
Upgradeu Hair Official Website: https://www.upgradeuhair.com/
♡13x6 Lace Front Wig Collection➤:https://bit.ly/3ah6ngd
♡13x4 Lace Front Wig Collection➤: https://bit.ly/3aFuqpp
♡ 4x4 Lace Closure Wig Collection➤:https://bit.ly/3NUk4jw
♡Cool Bob Wig Collection➤:https://bit.ly/3MgwlOn
#upgradeuhair#affordablewig#wigtutorial
Let’s Get Social!
Folllow @upgradeuhair
Instagram : https://bit.ly/3NjiA2H
Facebook : https://bit.ly/3A39IsG
Youtube : https://bit.ly/3NaA4OB
Tik Tok: https://bit.ly/3901kRe
Contact Us : [email protected]
Wholesale Whatsapp:+86 166 9081 1617
Welcome to My Channel
Be sure to SUBSCRIBE & TURN ON YOUR ALERTS
HAIR CHANNEL @iambeautifulhustlertv
——————————————————
MY PERSONAL YOUTUBE CHANNEL : @Life with ShaeTV
https://www.youtube.com/channel/UCB9xX...
——————————————————
Follow My Socials:
PERSONAL
@iambeautifulhustler
BUSINESS
Instagram:_Beautifulhustler
@thebhslay
@girlsniteoutapparel
Twitter:_Beautifulhustl
YouTube :IAmBeautifulHustlerTV
✨For Sponsorships ,Reviews,& Questions
Email:[email protected]
786-571-1313
To Purchase Hair & Products Www.ibhslays.com
Allow 3-14 Business Days For All Orders
#miamihairstylist,#miamihair,
#browardhair,#browardhairstylist, #Atlanta #atlantahair,#atlantahairstylist #reels, #explore #trending #tiktok #viral #miamimakeup #miamimua #miaminails
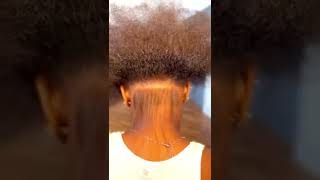
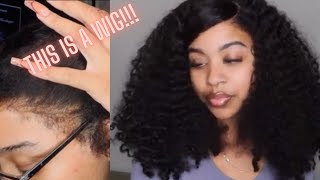
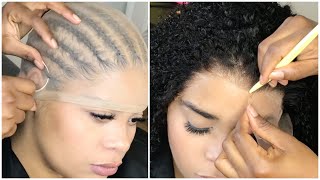
Thank you, my business, hey Beauties and welcome back to. I am beautiful, Hustler TV. Today we are back with a new video collaboration. Today'S hair is provided by upgrade your hair. Now they sent me up a few goodies in this wig. Some lashes elastic band um. You know stuff like that: um and a cap of course, in a clip, and of course they sent me over this 26 inch uh straight wig. This is a 26 inch straight wig. It is a lace front wig. So that means only has like regular parting space. In the middle of four inches and it's about like an inch and a half to two inches on the sides and I'm gon na flip it you know inside out, so you can see The Parting space. Yes, four inches of parking space in the middle, and today I decided to do a just quick, um side, part swoop, look now off camera. I did go ahead and dye my weird jet black, and I also did bleach and pluck the wig, and I also pre-prepped it the night before by flattening the whole wig and pretty much sectioning off where um the hair for my swoop. So the hair is kind of like pre-styled, somewhat like halfway pre-styled, and this is what the wig looks like all around. It was super soft, but y'all know when I go back in and add a little oil and press it out some more. It'S going to get very silky, okay, so, first and foremost, what I'm going to do is take the wig off and take my Ruby, kisses foundation and apply that Foundation all in the inside of the lace. Now this lace is um like more like transparent lace, um. It is a little thicker, but it did blend in good. You know, and also um. I was gon na mention something else. Um the hairline is a little bit thick when you first get it so you're definitely have to do some plucking um. They do have part a partially pre-plucked, but you're definitely gon na need to go back in some more and pluck some more. But once you get that thing all plugged up, your wig is going to be laid okay. So if the wig was also very easy to pluck, even though it had like a thicker hairline, so just take that into consideration when you do purchase this wig you're gon na need to do some plucking and, of course, no bleaching and Knots, and everything like that. But, however, um still turned out to like this wig, it took color really easily um. It took literally like two minutes to dye my wig black, and I love that for me. So um yeah, I decided to do me a light B. Um do some red lips. I was feeling the red lips with the jet black today y'all. It was really just gon na give the whole entire look. So I just you know, went with my red lip for today, but uh nevertheless, um after I apply that Ruby, kisses foundation on this. On the inside of the lace, I'm just taking about two to three layers of my adhesive up and applying it. You know on the cap and on the hairline and smoothing on back and then once that turns clear, we'll be begin to lay down the lace. So now that the adhesive is clear all around we're going to go ahead and begin to place the wig down, I'm right where we need it to sit and then, of course, after placing it down firmly into place, we're going to go in with the blow dryer. On the heat setting blow dry, that lace in some more and then of course secure the hairline with the Melt band foreign we're going to go ahead and remove it and begin to raise off the extra lays now um like I mentioned, y'all um, I'm not going To cut too much off too much of the hairline off today, like it pretty much worked out of my favor, so just very very little of their hairline is going to get cut off when I um raise off the extra lace but um for the most part. I was able to keep most of that lace on there, which is really good because the wig kind of matched my hairline more perfectly than most wigs do so. I didn't really have to cut too much off and um. I'M gon na work with one side at a time so after I finish, cutting all the extra lace off around on this side. Here I'm going to go ahead and take the glue and place it under those areas and then um I'm going to um. You know attack it down and then do the other side as well, so raise up that lace. Attack down one side and y'all know I'm going to go ahead and Tuck down the other side. And then I'm going to ask um, also add more Foundation to the hairline to cover up that lace, because sometimes you know um, depending on what lace you have. You might have to go in with more than one coat of foundation to really get your blend. But it's okay! If you, you know, put the foundation the first time you still have a lighter cast. Once you finish taking down your wig completely, you can always go back in and add more Foundation to blending your lace, foreign foreign foreign, more glue here on the right side of my head. Under those little areas where the glue is still um, the lace is still lifting just place the glue and slide it right up under those cracks, um and just tap all of that down and then, like I mentioned, I will go ahead and go in with the Foundation add more foundation and then, of course, pull down a section for the baby hairs foreign foreign from the thumbnail in the beginning, video this will be a side part um, look, um and y'all know. Like I mentioned, this is a regular lace front. So I'm not able to do a deep side, part like how I normally would so my style problems a little higher up, but, however, I was still I'm able to to achieve the swoop. Look that I wanted. So what I'm doing right now is pulling out my baby hair section. I do one near the temple area and, of course, yeah. I know we get that Sideburn together and I noticed I had a little more lace around the ear. So I just went ahead and clipped that off and I'm going to plant my Sideburn area off on this side and on the other side as well. But for the other side, where the swoop is actually going to be, I'm just going to do the Sideburn area only because the temple will be covered with the scoop on the opposite side, foreign and now, I'm just taking that even holding spray and just happening across The hairline I'm trying to go ahead and tie that hairline down once again and y'all know already at it more Foundation to the hairline for a better blend and we're just going to smooth that one back and then tie that down with that meltdown. And let that dry completely before we come on and style the baby hairs foreign we're going to go ahead and cut curl and swoop them pretty simple, pretty easy. I cut them longer this time, just to make sure that I didn't do them too short and I get them to my liking and if you always wanted to be shorter, then you could go ahead and cut it shorter, but always go longer. First, that's the best device. I can give to you Beauties because once you cut that hair it's gone and it is a wrap okay, but if you cut it longer and then you can work your way gradually to cut it short if you would like and for the baby hair today, I Will be mixing the even holding spray, and I also use my beautiful Hustler mousse as well from the BH slay. I forgot we changed our name to you know. I didn't even tell y'all my little announcement y'all how everything that, like everything like my whole brand, is trademarked. Oh, my god, I didn't even share that news with y'all, but I'm gon na talk about that whole process. In another video but uh nevertheless, so yes um, I'm just doing my baby hairs, I will be using holding spray and mousse as well to really get my secure. Look that I'm looking for um - and I just did it with the Holy Spirit in the Sideburn, but with this one here around the temple area, I will go in with moose and holding spray um to just get the soft looking baby hair that I want, but Also kind of firm as well so just going in with my mousse, applying it on that baby hair right there in that area, I'm pre-smoothing it and then I will go in with the holding spray. For my final look, foreign foreign, okay, but I finally got it um how I wanted it to look for the most part, I'm just pretty decent. It could be better. It could be better, but you know it's five minutes stopping so um. Now that I got that done, I just went in with the hot comb and just kind of smooth the area out a little bit more but um. I'M gon na go ahead and do the other baby hair on this opposite side on my temple area and then we'll go ahead and get into the swoop foreign foreign really quickly and just hot combing out those roots or whatever. And then I'm gon na go ahead and begin to um do my swoop just by parting, through sections adding wax flat, ironing it and hot combing it, and you know all that, so it's nice and smooth and then we're gon na just swoop it. Thank you. So, as I mentioned, I took the hair out the clip and now I'm just flat ironing the whole thing as like one big group and I'm using the my favorite flat iron from the mommy hair stylist down here that I mentioned in my last tutorial. The enhancer flat iron, okay and I just took the whole thing out of the clip it was sitting. You know overnight, so I had to really go in and I'm just going to party section by section and go on with the wax stick: hot comb, The Roots out flat iron. It out - and you know just prep it to be nice flat and neat for my swoop, so I'm just going to go on that wax. Stick hot combat, you know, press it and then once I get it, how I want it, I will apply a little holding spray to the top, get the swoop in position and show you guys how I secure my swoop in the back foreign foreign foreign and now I'M going in with that holding spray. If you notice, I took my hair and I put it in a ponytail and then I also clipped it up, but I left like a single piece out, I'm going to take my sweet piece and now one piece that I do have hanging down. I'M going to um basically tie those two pieces together and secure with that rubber band, so I'm kind of placing my swoop where I want it and I'm gon na just go back in or, as you can see, I'm using my finger to kind of lower it Down some more because I really like my swoop to kind of cross my eyebrow, I really don't like it above the eyebrow, like it really has to curve across my eyebrow. That'S just how I like it to frame my face, but to each his own, whether you like it above your eyebrows or you know on it. You know um just get it to how you want it. Um place it. How you want it make sure it's nice and smooth, and I'm just showing you the back right here, I'm taking that swoop piece and that little thin piece that I left hanging on the bottom side and I'm just securing it together by Rubber betting together at the Bottom of my wig, you can do it across in the middle of your wig, but I just choose to do it at the bottom, because it's the easiest to hide and all of your hair lays on top of that section anyway. So once I do that, I will go ahead and just flat iron and smooth out some other parts of the style Sleek it play with my soup, a little bit more make sure it's nice and neat, and then all we will do after this is just you Know flat ironing some more add a little heat protectant and I'm also going to um cut my ends even block my ends and bump it up lightly. Foreign foreign just combing the hair over this hook to make it more neater, and I already went off camera and just made my ends blunt even on the wig, because I just preferred a blunt even cut now versus just leaving it long and straggly um. I just think it looks more cleaner um when you even at the end, so I'm just taking a flat iron, giving it just like a light bump. I don't want to bump too hard just to give it like a look, and I'm just going to pretend to flat iron through the hair, some more just to give a little bit. You know get a little more straighter and I'm going to add some bio Silk Therapy to the wig, just for a nice little shine or whatever, and then I'm just going to go in with my concealer and conceal up my part, and I will pretty much some Of this look so here I am going in now with the concealer to just round my part out a little bit more and clean it up and after I do this, like I said, add that oil add a little shine to it and we will be done So stay tuned for the grand finale foreign looks like after adding the oil cutting the ends, even I'm making it nice and sleek, and I'm going to give you guys a nice little 360. So you can see - and like I mentioned when you put the rubber band at the back, you can't even tell that it is under there. It is nice and secured and ready to go. Your swoop is not going to move a muscle, okay y'all, the best freaking hack in the world, for your swoops. But thank you guys for watching. I hope you enjoyed this tutorial and here's another look of the final look and, let's get into it, but don't forget to like comment subscribe to this video. You guys um thumbs up, comment, section y'all know all the good stuff. Thank you all for watching and stay tuned for more videos.

Comments
lneal2800: It's the consistency for me! You look beautiful sis!
Niecey McFadden: Please do a 360 installment. I love your products!!!!! ❤
Lillian Powell: Beautiful 500k shouldn't be a problem getting there. Get going u will get there love ❤
L. B: Lookin damn good love
Sammy Da Goat: Bomb Hair Lovely Red Lipstick
Shannon Thornton: Love Love Love❤️
Edna Williams:
modelchiic17: ❤️❤️❤️❤️❤️❤️❤️❤️❤️❤️❤️❤️goat !!!!! Period !!!!!!!!