Install This Honey Blonde Highlighted Wig W Me | Ft Tinashe Hair
- Posted on 05 December, 2022
- Lace Frontal
- By Anonymous
●▬▬▬▬▬▬※ Tinashe Hair ※▬▬▬▬▬▬●
I’M WEARING Honey Blonde Highlight Lace Frontal Wig 22 Inch: https://bit.ly/3OXrBQB
♀️TinasheHair Official Store: https://bit.ly/3UTw60r
Use Code "TS" to get 18% off!
1.Join in FB Group, Win Free Hair➤ https://bit.ly/3cZdiMD
2.Buy 1 Get 1 Free➤ https://bit.ly/3irrSio
3.Undetectable HD Lace Wigs➤ https://bit.ly/3FX0N0u
4.Colored Wig for Fall➤ https://bit.ly/3WFbMkW
#lacefrontwig #gluelesswig #coloredwig
Instagram @tinashehair: http://bit.ly/2Isud9X
Facebook@Tinashe Hair: http://bit.ly/34FxUAm
Tiktok @Tinashe_Hair: https://bit.ly/3zeeRPs
WhatsApp: +86 16649781957 Wholesale: +86 17537405381
Email: [email protected]
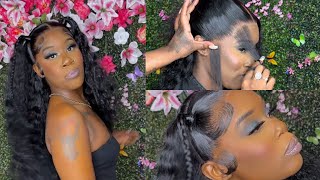
Hi guys it's Zoe and welcome back welcome to my channel, I hope you're all doing amazing. Today, I'm going to show you guys how I installed this unreal highlighted wig from Tinashe hair. I'Ve seen this with before, like on Tick Tock and there's just like brown caramelly, like highlighted vibe, that everyone's got going on, and I wanted to try it for myself, like. I just think this color is so flattering for darker skin tones lighter skin tones. Like you can't go wrong with this color, especially since it has a black root um, I think that's my favorite part about it. It'S like the right balance between light and dark. I added some bouncy waves to this because I wanted it to look a bit like blue dry tea waves to this, because I wanted it to look a bit like blue dry like a fresh bouncy blow dry and the hair is super flowy, as you can tell, And I love the end of this wig as well. It'S not like scraggly. I find that a lot of wigs come with like scraggly ends, if that makes sense um. But this is like it's almost like a steam cut, which I really like, because it adds a lot more body to the hair yeah guys. If you want to see how I cook, I got full look and you want to know my thoughts on this wig sure you stay tuned and we'll get into all the ins and outs of this unit. See you in a sec. Are you ready so jumping right into the unboxing like I said this hair is from tanashe hair and I feel like they always have beautiful packaging. I'Ve tried a few of their wigs before and they never disappoint. Um. I got this wig in 22 inches, but we'll get into that in a sec. This wig also comes with a little satin storage bag and inside the storage bag were a few goodies. I got a satin Bonnet, which you can never have too many bonnets guys. Mine was looking crusty, so I'm glad they gave me. This got a wig caps on the eyelashes, a edge brush, a headband and some boyfriends and some hair grips um. So yeah you get quite a lot. These are all like little useful, knickknacks. So very happy with that um Inside the Box there's a little hair care instruction flirt. You know in case this is your first time trying a wig um. So that's always helpful um and then, let's get into this beautiful highlighted wig guys. I'M sorry. It also came pretty cold and I find that normally, when wigs come, pre-cold, they're always crunchy and crusty, because they throw it with loads of hairspray. But I don't know what colors these look used for this wig, but it is it's given um. This wig is a 13 by 4 22 inch honey blonde highlighted wig um. I believe this hair has been dyed from 1B hair, which is why it's still so silky and has a lot of movement, and that was very important for me when trying this wigs I've tried some highlighted wigs in the past and they're, always like they're, not as Soft as they could be for like because this lift isn't as high and because it's been lifted from 1B hair, it's a lot softer now for prep on the hair. I did go ahead and bleach the knots as you can see. The knots were quite thick. The hairline isn't as thin as I like my wigs to be, but it was nothing we couldn't work with um. I, as usual, use my Jerome Russell B blonde and 30 volume developer. I mix it up into a bowl until it's about a toothpaste, consistency and then apply onto the wig and leave it on for about 45 minutes. Once I bleach the knots, I just wash all the bleach out - and this is what the hair looked like when it was drying. This has a slight natural wave in the texture, so I do believe this is a natural body wave texture. While the wig is drying. I just went ahead and plucked the wig. This is what the hairline look like before I plucked it, and this is a little close-up of what the bleach knot look. Knots look like as well. It is Beach or not sky as well. Not always if you have a black wig, please bleach or not, because it will make such a difference on how the wig looks and plucks as well, and this is what the wig looked like once I plucked once side, I finished plucking, all the hair. I went ahead and just dried the rest of it because I wanted to straighten it on the mannequin head. I do have a video coming up or already uploaded on how I do all my prep on my mannequin head, but essentially I'm just quickly. Straightening all the hair and hot combing the party, so that it's completely ready to install leaving less work for me to do later, you can see the hair is super silky once straight, it is so soft, and this is the finished look of all the plucking bleaching, Etc that we did it looks so sleek and so neat and again. This is why it's important to style your wigs on your mannequin head, because you can really see what you're working with moving on to installing the wig here's another quick look at how it looks. I'M just obsessed with this color guys. I love a good honey blonde um anyways, I'm going to start by tinting the lace. The lace on this wig is a nice beige color, which is perfect if you're medium skin to dark skinned. It tints a lot nicer than completely transparent white lace. I did really like that about this. I'M grabbing an old crusty, looking Foundation, don't watch that guys, um and I'm just tinting the lace. This is just my Mac Pro longwear, something waterproof in nc50, just whatever matches your skin guys and I'm using a thick, dense, brush and blending that into the lace, and this is what you should have as you can see. It now matches my skin tone a lot better than before. I'M going to go ahead and pop my wig on and adjust it to my head size head size, adjust it to my hairline um and make sure everything is aligned perfectly before clipping all the hair up. My face and focusing on cutting off these little ear, tabs first um. I did find with this wig. This always happens for me for some reason. Sometimes wigs don't fit the shape of my hairline properly. So I have to really work and adjust and move the wig around, so I did actually have that with this. I don't know if I ordered the wrong cap size, I'm usually a medium. I can't remember if I got a medium or a small but yeah. That'S just one little thing that I wanted to know a few little tabs into the lace and then grab my butter them out with glue. As always. What else would I use the best glue ever and I'm grabbing a white liner, pencil and just drawing down where I want my glue to lay once I do that I'm just grabbing my glue and I'm just placing it over the top of that liner pencil that I drew on um and I just start gluing the wig down guys um again, as always, work in super thin layers work in small sections. This is the reason I cut these little tabs into the lace because it allows me to work section by section and really pay attention to each little bit that I'm doing once I've. Let the glue dry, completely clear, I'm pressing down onto the lace and then grabbing. My comb and really working that glue into the lace um to make sure it's properly adhered to my skin and the wig. I'M going to repeat this on either side of my head as well, so this is done. I'M grabbing my got to be hairspray um and I'm just going to spray it on just the side parts of my hairline. For some reason. This always always lifts, and I hate it. So I have to have some extra security to make sure it stays down for as long as possible once I've, let that dry with my hair dryer, I'm grabbing two wig bands and really securing that into place. While the glue sets underneath the headbands, I'm just gon na, add a few little face framing layers, as always, especially with this length Fair 22 inch, I like a good bouncy layered look, so I'm just aimlessly cutting until I'm satisfied with how it looks after about 10-15 Minutes I'm taking off the headbands and then moving on to cutting off the lace, I'm going to be using my eyebrow razor for this um and I'm just going to cut the lace as always making sure to go as close to the hairline as possible. I'M also ensuring that I'm super careful. While I do this because I do not want the glue to lift so I'm just going to keep cutting and go all the way around my hairline until there's no more lace left to cut once I'm done, cutting the lace. I'M grabbing my foundation brush, I'm just going over the hairline a little bit just anywhere that I can still see the lace poking for a bit, and this is what it looks like so far and to be honest, if you don't like baby hairs, you could leave It like this guys, really and truly um, but I decided to take it further. I wanted a side part I did like the middle, but I feel, like the side really brought out the colors a lot more and I low-key wish. I left it straight like just look at this guys. It just looks so like this is me on the phone to my MCM. I literally had to call him and show him my hair, because I looked good okay. I looked so good, anyways um, but yeah. This is, I guess, another look at what the hair could look like if it was completely straight moving on, I'm now grabbing my hot comb and just combing my part to the side um and laying it down exactly where I want it to lay. I love a good side part I used to do them all the time. I don't know why I stopped doing them because they're so flattering and really just soften your face, shape a lot more as well. Once I've hooked in the hair, I'm just going to go ahead and start the curling process, so I'm clipping off the top half of my hair and grabbing my one and a half inch curler from Mueller bells and curling section by section. I do about three three curls per side and then I clip it up with these Random clips. I have lying around and yeah, I'm just gon na repeat this all throughout the head. Until I have my beautiful little curls, if you don't have access to these clips or you just like, don't want to use Clips, I would recommend just making sure that when you do drop the curl you hold it in your hand, until it's completely really called um Before letting go, this is going to ensure that your curls last as long as possible spraying the hair with a little bit of hairspray, I'm now going to start taking out the curls after letting them cool for about 10 minutes, and this is what it looks like. As you can see, super bouncy super flowy um, we'll get back to sorting these colors out in a set, but before that, I'm going to add a few baby hairs, because I just can't help myself. I love a good baby hair. While adult hairs are some of you may call them, because I do I've been going a bit Ham on them, but yeah, I'm gon na add some baby hairs and section them off from either side of my head grabbing, my eyebrow razor and cutting them and curling Them inwards, my mini hair straighteners, once the baby has a cold, I'm grabbing a light hold hairspray. This is the same one I used to set my colors and I'm going to use that to mold and shape my baby hairs. How I want them to be, as you can see, I'm just sweeping and using my finger to guide the direction I want. My baby has to lie in I've always said baby hairs are such personal preference. You can do as little or as many as you want get creative with it and play around with what you like once I've done, the baby hairs I'm going to shake my head and really fluff up these cards because, like I said, I'm trying to go for A bouncy blow dryer look and I feel, like we have achieved that guys. Look at this beautiful, beautiful hair. It is so cute. It'S honestly just unreal shout out to tanashe hair because they really did their thing with this wig. I hope you guys enjoyed this video. I'M going to leave all the pros cons and links to this wig down below make sure you give me a like comment and a subscribe, and I will see you in my next video bye, guys.

Comments
Tinashe Hair: Enjoy your install