Grwm Part 1 : Braided Hairstyle 13X6 Lace Frontal Wig Ft. Afsisterwig Wig Install || Ariana.Ava
- Posted on 02 December, 2022
- Lace Frontal
- By Anonymous
BE SURE TO SHARE THIS VIDEO WITH SOMEONE THAT YOU THINK WOULD LOVE THIS WIG LIKE, COMMENT + SUBSCRIBE
▼▼▼HAIR DETAILS & COUPON CODE▼▼▼
Wig in the Video: https://bit.ly/3dgBnOI
Coupon Code: AVA to save money.
Melting Band ( no free gifts): https://bit.ly/39XeqyV
Swiss Lace Full Lace Wig Collection: https://bit.ly/3A7U00K
Delicate Hairline Skin Melt Wig Collection: https://bit.ly/2WQ7Hjy
Share looks on facebook, instagram , youtube and tag @ # afsisterwig, customers will get 15 dollar for next order.
Afsisterwig’s *NEW* Delicate Hairline Skin Melt Lace Wig
♥ All hand tied hairline, clean, delicate and natural, giving real SCALP vibe!
♥ No extra plucking needed, totally beginner friendly!
♥ Upgraded real skin melt swiss lace well blended with different skin tone!
The Skin Melt Wig is totally beginner-friendly, in the past three months, we have been making our best efforts to adding more density options, perfecting the plucking the hairline, adding the removable elastic band and optimizing the bleach technique to provide the perfect products.
INVISIBLE SWISS LACE: We upgrade our lace into Raschel net and bobbinet made of polyamide.The reason why we choose high-end swiss lace is that even with much higher price, it can be more invisible and undetectable especially when melting with glue. No matter what skin color you have, this skin melt lace will definitely match.
Wig SKU: AF0106
Hair length: 22"
Hair density: 150%
Cap size: Medium 22.5
Cap construction: 3D 13X6 Lace FULL Front
Contact Us:
➞ website: https://afsisterwig.com/
➞Email: [email protected]
Follow US:
➞Instagram: afsisterwig
➞Youtube: https://goo.gl/fvBMPA
✨✨✨✨✨✨✨✨✨✨✨✨✨✨✨
STAY CONNECTED WITH ME : @_ariana.ava
https://instagram.com/_ariana.ava
[ FOLLOW MY NEW IG :: MY LAST IG GOT HACKED AND DELETED ]
SHOP MY WIGS :: https://www.instagram.com/ariana.ava.w...
MESSAGE ME TO ORDER VIA IG
LET ME KNOW YOU CAME FROM YOUTUBE FOR $15 OFF ANY WIG
FOLLOW MY BRAND PAGE :: https://instagram.com/ariana.ava.ny?ut...
SHOP MY KEYCHAIN ACCESSORY COLLECTION :: https://www.arianaavanewyork.com/
••• SHOP MY DEPOP ✨••••
**PROMO CODES**
SHOP SHEIN: http://bit.ly/2M7ZcH0
USE CODE : Q3arianaava
SHOP ZAFUL :: https://zaful.app.link/jg2yLYD9dib
USE CODE :: AVA22
TO SAVE AN EXTRA 18% OFF
SHOP LOVELYWHOLESALE : http://bit.ly/2UxZA4e
USE CODE : ARIANA10
FOR 10% OFF
SHOP CBD PRODUCTS : https://oncali.com/shop/
USE CODE: “CALI20”
••••• SHOP WAKE UP & MAKEUP [MAGNETIC EYELASHES] :: https://bellechloe.com/ ••••••
USE CODE :: “ARIANII”
to save $$$ at checkout
2DADOLL COLORED CONTACTS: https://2dadoll.com?aff=164
USE CODE "Ariana“
FOR 20% OFF
I DO NOT OWN THE RIGHTS TO THE MUSIC USED IN THIS
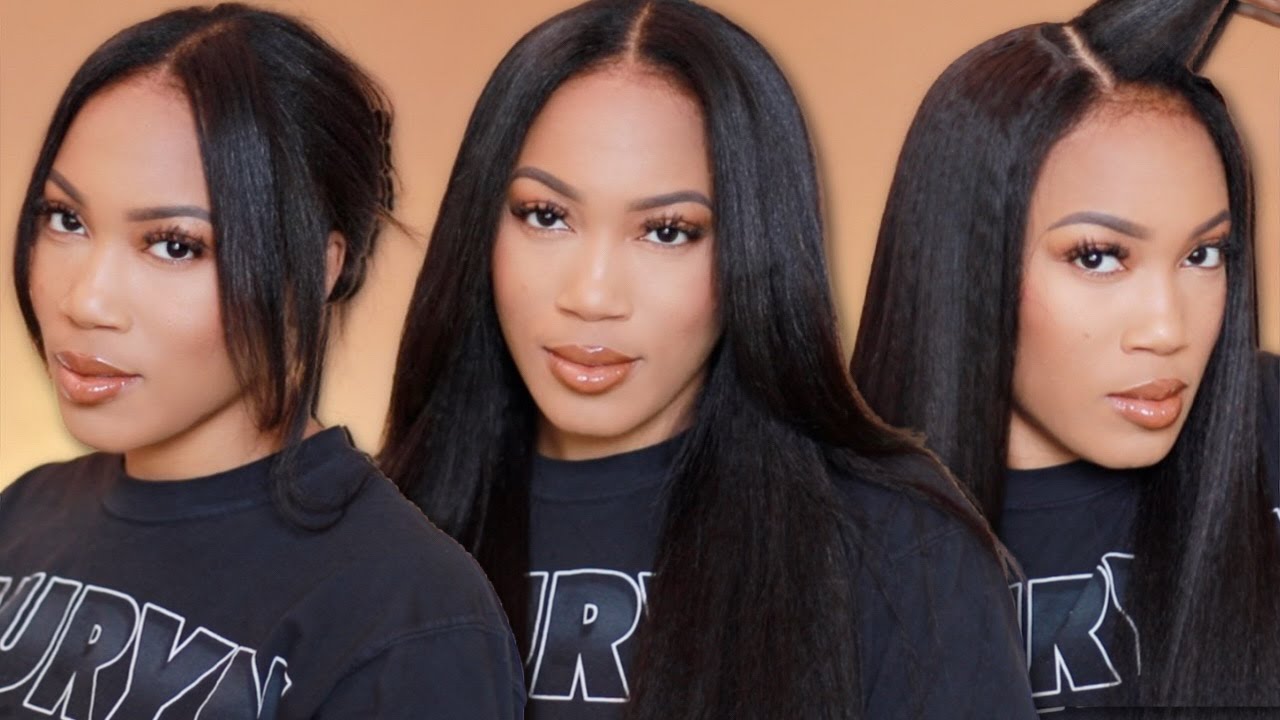
Oh, my God, hi loves what is up. Welcome back to my channel, as you guys can see and tell by the title. I have some new hair to share with you guys today in today's video I'm going to be showing you guys how I created this braided Style with this 13x6 Swiss lace, frontal wig from AF sister wigs. This is a 24 inch loose wave texture and it is super super beautiful. I will have everything linked down below, as always so definitely check the description box, but we're gon na go ahead and just jump right into the unboxing, and I'm going to show you guys how I got this look be sure to subscribe and give this video a Thumbs up the wig came to me in this black box right here with blue ribbon on it. It has their logo on the front again, this wig is from AF sister wig. The wig came with a hair net around it as well as tissue paper inside and, like I mentioned, this is a 13 by 6 lace, frontal wig. So there isn't really many tracks only just on the back and middle part of this wig, but the entire top half is basically a lace front. So you have a lot of room to work with. They also sent over a wig cap, an eyelash or eyebrow brush. Some bobby pins and a wig clip as well. This is what the wig looked like straight out of the box and, as you guys can see, the hairline is extremely natural. It'S already pre-plugged and, and the lace on the frontal is very fine and thin. However, you can see the knots, so I did want to go ahead and actually bleach the knots just so that when I created a style it Blended a little bit better and I didn't have to do too much work later. But again, I just want to show you the natural texture of this wig. It'S in this beautiful, loose, wave texture, as you guys can see here, I'm going ahead and taking some bw2 powder and some 40 volume developer, and I just mixed a bit of this together until it was a nice thick consistency. I used to be really scared to bleach my knots because I would always over bleach them and honestly this time I feel like in some areas it was slightly over bleached, but because I left my bleach very thick, it doesn't really run through as much to the Hair, so, as you guys can see, I just slathered that all over the lace - I left it for about 10 to 15 minutes, and once I rinsed it off. This is what I was left with, as you guys can see. I just parted the hair just to show you guys what the lace was looking like after I bleached the knots, and I think it looks a lot better. You still can see some of the black knots in certain areas, but it definitely looked a lot more natural. Already so again, I just went ahead and just parted the hair. I'M sorry. I didn't really get a good angle of this, but I'll show you the end result in a little bit more of the process, but I parted the hair in four sections, I'm just using some water, that's what's in that spray bottle and I'm using a comb to Just section off the hair - and I just created some honestly more like some loose french braids, it was kind of hard for me to even braid the hair because, as you guys can see, the wig was moving all around. I don't really have a proper wig stand. So it was really hard, but this is what I came up with. This was just the style on half of the hair. I left like one piece out in the front and I did two braids. I actually left more hair out on the sides because I felt like this frontal was really long from ear to ear and I had a feeling I was going to end up cutting it. So I didn't want to pre-style the hair and then it didn't really work or fit to my head shape. So I went ahead and just did four braids in total kind of like on the top, as you guys can see - and I thought this was really cute and came out really cute. I was actually proud of myself because you guys know. Usually I get on here and literally just glue a wig down. I don't do really any styling to it or anything, but because this is such a customizable wig being that you have so much room to work with with the lace. I definitely wanted to challenge myself to create something a bit different and I honestly found that it was super easy, so definitely try it out at home. Try different hairstyles with your wigs and have fun with it right here. I'M just pushing the hair back around the hairline and I'm not using a hot comb, I'm just using a curling wand to actually flatten out that hairline just so that when I actually glue down the wig, it's a bit easier for me and I didn't have flyaways All in my face and making it a bit harder to glue down this is literally the wig guys up against my hand and, as you guys can see, that lace just melts right into the skin again. This is Swiss HD lace. It is so fine and transparent, and it Blends in super super well, which makes it really easy to install again I'm no hair stylist. I just come on here and try out wigs, just like you guys with the wig look like on my head. Just on the bald cap, I did do the ball cap method, underneath just so that everything was a bit more seamless but right here, I'm just trying the wig on and sizing it up and, as you guys can see, the frontal is pretty long. So I went ahead and just parted the hair around my ear and I'm just clipping off the excess lace. Don'T be scared to do this just go ahead and part it and just cut that lace right off, because this makes such a difference guys when you actually finish the hair, it looks like it fits your face, guys, I'm just absolutely in love with this wig. I literally did not pluck this hairline at all. I did not customize this wig. Yes, I bleached the knots. Yes, I added some braids and that's it guys. Look how natural this hairline and wig is looking straight out of the box. This is super super beautiful and it made it so easy to install, and I was just really really excited again. This is the natural texture of the hair. It'S in a loose wave texture, so a bit of a looser texture than a deep curl, but it has a very beautiful wave to it and for this install I actually just used this Wonder: lace Bond adhesive spray. I literally swear by this stuff, guys I usually use the yellow and the red can, but for this install I just used the yellow. Can I am going ahead and applying three layers of this directly to my hairline right at the edge of that bald cap and I'm just using a rat tail comb to just smooth it all in because it will tend to run a little bit. So I just use the rad tail comb to kind of catch it and then I'd set everything in with a blow dryer. Once I applied three layers, I went ahead and pulled the lace down and held it really taunt in that top area, because I really really wanted it to set right there, I'm going ahead and pushing the hair back along the sides, but I actually didn't spray. A third layer on the sides, so I'm going ahead and actually spraying that third layer directly on top of the lace right there, as you guys, can see and using the comb on both ends to just really blend that in and push that lace into my scalp And help it melt and I'm using the rat tail comb as well as holding down that lace into place and using a blow dryer really to set everything guys. I used to honestly be so intimidated by installing wigs with all of the glue and just the mess you have to be really precise, but when you use a lace, adhesive spray like this one, it makes it so much easier. So, even if you want to try a different one, I definitely recommend to try a lace adhesive spray, because it makes it a lot easier to get a seamless install. I went ahead and repeated this on both sides and again guys. Look at this hairline, like I'm honestly, not gon na get over this, because I'm someone who I do not like to sit there and customize the wig and do all the extra work. But obviously I still want that. Look. So I love love that this wig comes ready to go. I am going to go ahead and set everything with a wig band, don't mind my crusty little wig band, but I went ahead and left that on for a while and then I'm going ahead and taking some of this Africa's best herbal oil and I'm actually just Applying this to the ends of the hair, I didn't want to actually go in with like a curl cream or mousse, because I really like the loose natural texture of the hair and I feel like it really wasn't too frizzy or anything, I'm just showing you what The top of the hair looks like with the braids going back, but I really love how this texture looks just with some oil added and once I went ahead and let that set for a while. I went ahead and took a little razor and cut off the lace. Be careful when you do this guys, because I literally think I cut myself on my forehead and, as you guys can see, there is like a white little Edge left when I did this. So again, I'm just taking one more layer of that spray, applying that to my edges, setting everything in with a comb and then using the blow dryer, but yeah guys be careful with those little razors, because I literally think I cut my hairline. You guys can see it right now. On my forehead, I have like little caps on the side, which literally hurt, but I am going to go ahead as always and add some baby hairs. You guys know the drill. No look is complete without baby hairs. For me, and I always do use - got to be glue, you can go ahead and use mousse or edge control whatever you prefer. This is just what I use, and this is how it came out and I am gon na go ahead and just curl those front pieces. Obviously they have the natural curl of the hair, but I went ahead and just took my little wand and bumped them under and added some curls, so it just added. I feel like a little bit of a cuter touch to this style and let me know what you guys think down below. I definitely try to challenge myself with this style and try something new, I'm actually really happy with how it came out. But honestly, that's all the credit to AF sister wigs with this one, because this wig came ready to go so natural and just looks so so good leave a comment down below and let me know what you guys think in the comments. Let me know if you try out this wig, I will have everything linked Down Below in the description box, so definitely be sure to check the description box as as well, and as you guys can see, this hair is thick. It is full, it has movement, it is off, it is just giving everything that it needs to give like. This is like book a flight to the islands vacation me please, because it is getting cold in New York, but this hairstyle is giving tropical Vibes and, as you guys can see, the ends are beautiful and curly as well so yeah. I will have everything linked down below definitely check it out. I have a coupon code as well, so you guys can save some money. Definitely let me know if you guys try out this wig tag me or send me photos if you style it in a different way or even in the same way, and definitely follow me on Instagram, so we can stay connected a little bit more. I did do a part two as well, or maybe it's the part, one where I show you guys how I got this makeup. Look. So if you guys want to see how I got the makeup. Look in this video final, get ready with me I'll! Have that video linked down below as well? I absolutely love this wig shout out to af's Sister wigs. They definitely did it with this one. This wig is beautiful thick, the hair is soft, it has a beautiful texture, and this lace and hairline line is absolutely everything. I definitely recommend this wig. I cannot say enough good things about it. If you made it to the end of the video, I love you so much. Thank you so much for watching, and I will see you in my next one
Comments
Denise Oates: Wow, you do such a good job at applying your hair. I liked how you added some humf by braiding the front portion of the wig. Other than the whole bleaching of the lace it looks like with that spray glue for those that have woren one of these before will really appreciate a more simple option to application with such great results. I myself don't have a history of wearing wigs but I have done a ponytail or a ball when I was transitioning to natural hair. But since I don't know how to conrow/french braid my own hair the option of wearing wigs without noticable hump (that what is looks like when I tried one on) that make the base look to weird, I giving up as that being a option for a hair protective style. Countdown toward baby first Christmas, don't overdo it because all they going to play with is the box. lol If you celebrate have you started decorating yet? Coureous with you black/white theme of dressing what would this look like for Christmas decor. Thanks for sharing and blessing to you and all in the days to come.
GYPSY SOUL🪐: ❤❤❤❤ LOVE IT
𝗣𝗔𝗦𝟯𝟲.𝗙𝗨𝗡: - FIND YOUR LOVE HERE d