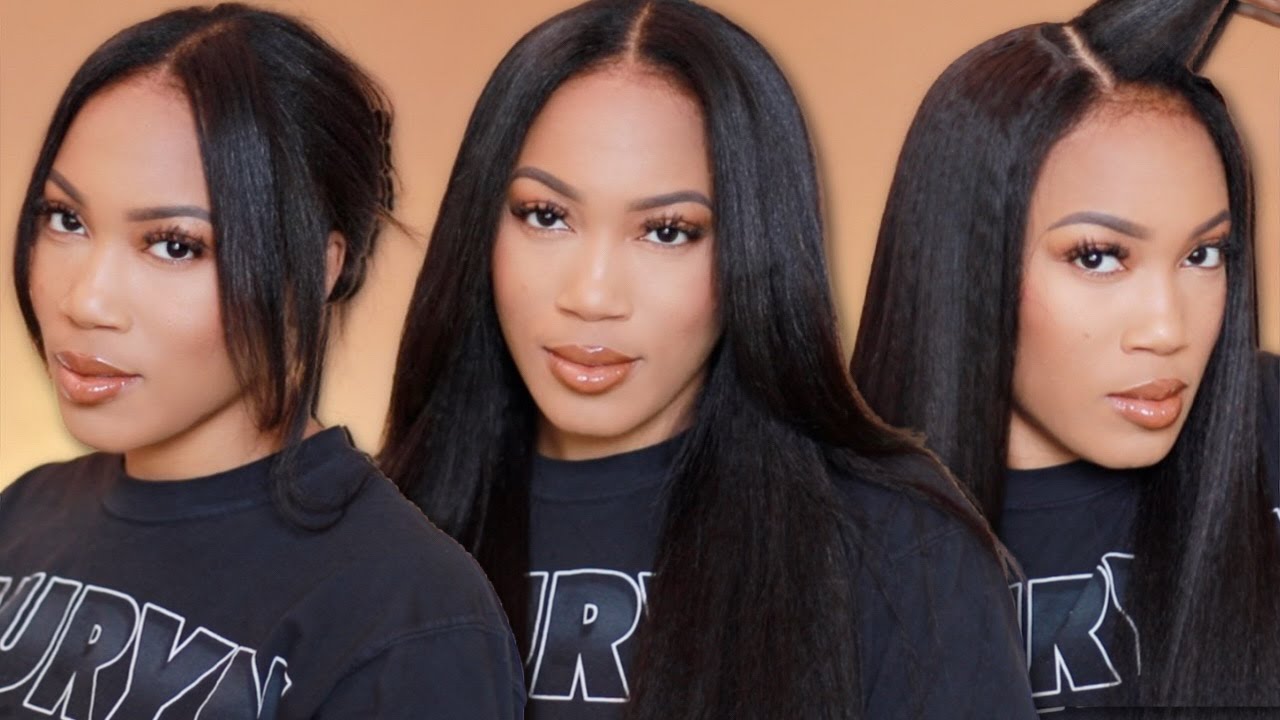
Ultimate Melt From Start To Finish | Frontal Wig Install & Wave Crimping Tutorial Ft Wiggins Hair
- Posted on 01 December, 2022
- Lace Frontal
- By Anonymous
Hair details: 26inch body wave 13*4 HD lace frontal wig 250 density
Direct Link➤https://bit.ly/3EejwDj
#WigginsHair Official Store:➤https://bit.ly/3TkpJSz
BLACK FRIDAY DISCOUNTS ❗❗
1. FREE WIGGiveaway! Code: Wig
2. $30 No-Threshold Off *Limitted Offer*
3. Up to Extra $100 Off⚡
#wigginsloosedeepwave #wigginscoloredwigs #wigginshdlacewig
Follow Wiggins Hair On Social Medias:
Instagram @wigginshair ➤https://bit.ly/3ILWwdL
Tiktok @wigginshairbest ➤https://bit.ly/38krOfq
Facebook @wigginshair ➤https://bit.ly/3xBqvmj
Wholesale WhatsApp: +86 18339906150 Email: [email protected]
Say you guys this is glamazante and I'm back with another video, and this is the hairstyle I'm going to be showing you guys how to achieve - and this is also going to be a very, very, very detailed way of how to install your wigs. It'S my new routine, so this wig is actually from Wiggins hair and it's a 26 inch body. Wave 13x4 HD lace, frontal wig. It'S got 250 density, but I'll get into that a little bit later on. So first things. First, to start out, I will be using my bw2 powder and my developer. That is 30 volume, and I would just be mixing this together until it gives me like a very thick thick cake based consistency. Now with me, I know, bw2 is very old school. Everybody used to use it back in the day, but honestly, I feel like. If it ain't broke, don't fix it and I've been using it for a while it I still continuously use use it. Now. I'Ve even tried to use like kaleidoscope and a couple other brands, but they just never did it for me. So next I'm going to just go ahead and actually take this cake battery thick thick mix and I'm gon na hold it up just to see how it drips and if it doesn't drip, then I know it's actually ready to be put onto the wig. So I'm just going to go ahead and smear that across the wig make sure I'm not pushing it all the way through, but just kind of coating it because all we're trying to do is pretty much bleach the knot. So I just take my time and be very, very gentle with brushing it onto the wig now this is exactly what it should look like afterwards, and I mean you don't you can see it on the other side, but it's not like pushing through it's just like A slight little Glide, all we're trying to do is bleach. The knots I feel like I love the bleach nozzle because number one it's really really blonde and then, when you do it, it just looks like more scalp and it makes it look more realistic. So I actually am a big big fan of it. Now, with doing this, I do leave it on for possibly about um. I think I leave it on for maybe like I'm not gon na hold it maybe like 15 to 20 minutes, but I am continuously watching it. While I'm doing that and then I just go through - and I kind of rinse it but to be able to gauge whether it's ready or not, I just kind of peel a little bit of the white back to see. If any of the edges I mean any of the knots have turned blonde and that's pretty much how I know if it's ready or not - and I'm just going to make sure I rinse everything, because if not the product will continue to bleach, but once it hits Water soap and all that kind of stuff it pretty much stops like it doesn't once it hits water pretty much. It stops all together anyway, and then I'm just going to wash this out really really good. I use my kitchen sink as you guys know, and I just scrub it make sure it's really really good. Now. Another thing you can do if you want to get rid of some of the yellowness is you can use Shimmer like shampoo and that's a purple shampoo that tones it and give it more of a cooler tone. But with me personally, I just like the way it looked in a way that it bleached. So I didn't really exactly need to do anything else to it, except for just wash it. But I have used Shimmer light shampoo on the knots before when I felt like it was a little too orangey or a little too brassy, but yeah and look at the luster of this hair. Oh my God, I love it. It was so nice so pretty it held the water really really good and, as I said, this is a 26 inch body. Wave 13x4 HD lace, frontal wig and I did get 250 percent density now. This is another way that I've actually started doing. My wigs is I've noticed when I seen the like, um drag queens do their wigs, they pretty much would put down the lace and then I would see well the wig makers of the the drag wigs. They were pretty much use this little elastic band. So I'm like what is that for and now I know it's they use that so that they can hold the lace down and not rip it. So when you're pulling it sometimes this lace can actually you know, rip or pull or put holes in it. But when you use it with the elastic like this, it doesn't leave any room for it to rip or put little holes in it or none of that at all. It literally just pretty much does what it's supposed to do of holding the wig in place. Now, with this wig it did come a little pre-plugged, but of course you guys know I'm gon na go in and pluck it. So I'm just gon na go ahead and plug, maybe part back about uh half an inch. If I can say, and then I'm just gon na, pluck it now with my hands, I cannot pluck using tweezers like that, because I used to make my hands act up so one day I decided to use my pliers. I just wanted to use my pliers and this method actually worked. It was a lot quicker and helped. It look a lot better to me. It was a lot more gradient um. The only thing is when you're doing this method, you cannot just pull and rip hard as you can, because you're going to put a hole in a wig, it's almost like I'm pulling little pieces, but I'm being very quick with it and I'm not like tough on It if I'm pulling - and it's not coming I'll, just let it go, but if it comes a little bit here at a time it works for me Nana also, you definitely have to make sure you wet it up. You have to use mousse because the mousse help it helps the little hair strands to loosen up and not be so strict and tough. So when you're actually pulling it, they pull and slip out a lot better. But yes y'all. I use pliers to plug my wig. I'Ve been doing this for like a while now and I never wanted to tell nobody. I was like I know they're gon na come for me talking about. Why is you plucking this wig with pliers, but I promise you, it works for me and it works so fast and it's just easier to handle, because when I would do tweezers, it would take me so long and my freaking fingers would be hurting like I just Was over it, I ain't gon na hold you. I was just like ciao and I want to do this no more like get somebody else to do it. So, yes, I plugged with pliers. I don't know if anybody else is like this. Let me know, but with this you see that I'm kind of barely grabbing like I'm not pulling, I'm not ripping my legs. Like I and then y'all know I do my wig cells and stuff. So I was like I could not have my lace out here, ripped with holes in it and stuff, but so me using elastic method, to hold this and also using the little pliers and just letting it go pretty loose seat, um or pretty loose. It really really worked for me. It was just nice I liked it. It was. It was about so next I'm just going to actually comb this part back and then once I see if it's gradient or if it's going to like mesh well, my hairline, I just kind of work on that a little bit and then also I don't know if I told you guys before, but one time I had cut one of my wigs on my old um. I used the old wig and that was perfect for my hairline put it on my wig head and actually outlined it, and that's how I know the style and size of my wig. So when I do a style, I know exactly how much hair needs to be down how much hair needs to be up because a lot of time, these frontals are a little bit bigger on my head, so that just helps me to make sure everything is precise And I keep it looking the way it's supposed to look because girl. I need my wigs to be laying, and this is very essential, even when doing a updo. So definitely if you can do that, go ahead and do that so you see me cutting the ear tabs and that's basically to you know, make sure I'm cutting everything off I'll need all the little access child. So I'm gon na go ahead and do that part now this gets to the fun part. This is the fun part that I love now with me. I haven't done crimps in a long time, but I was like okay. I want to try to do some more creams, because I think the girls love the cramps. Now I'm going to be using my chi silk Fusion. That'S like one of my favorite serums to pretty much press my hair out. It gives a shine. It gives it the luster that I love. It also makes sure that it does not weigh the hair down. You can use quite a bit of serum and your hair is not going to get stringy um. So it's not like a grease, but it is a very fine oil and I love it and then I want to do the Crimson. I knew this was long, so I'll do it would be such a hit would be really pretty. I actually did not cut no layers in this wig at all either. It'S just letting you guys know. So this is my EAP, wave, crimper or whatever. I have to link that below. I don't have the proper pronunciation, but I've had it for about a year and I wasn't able to use it, but I used it today and now with this, I put it on the highest degree level, which was 450.. I went ahead and clamped it and it has a lock button and unlock. I click the lock, so basically it will hold the crimp I don't have to physically. I don't physically have to hold it clamped down. I can just kind of lock it. I clamp it lock it and put it in and then you guys see. I just follow the grooves with each one with this hairstyle. It took me about an hour and 30 minutes to crimp all this hair, so make sure you plan accordingly, because I was extremely rushing so bad because I literally had to get my crimps done, but they look really pretty and over time they actually start to look A little bit more like deep, wave or like a curly, deep, wet wig, I don't know I like the vibe of it, though very pretty very cute, and it looks extremely good and then another thing that I noticed that helps my crimps. The last and My Curls is I spray it while I'm doing it so you see, I crimped the first one and then I sprayed it and then I crimped the second one. Then I kind of sprayed it. So it's almost like I'm locking it in and it's a lot better than what it was giving before watch out. So this is my new little wig stall and wig install routine. I told you guys, I would do it. So all you need is like some knee-highs or some pantyhose. I will have them linked Below in my Amazon store, but the reason I like to use knee highs now is because they are way thinner than wig caps and I'm going to be using my Sally Hansen, leg spray and a color beige glow. I had tan glow and I thought it was a might be a sad darker, but I was like, let me try beige glow and I used it and it honestly gave me a very Caucasian woman tease, but the problem was, it was a little. It was light. It ended up working but because I know how to finesse stuff but moving forward, I will be going back. The tan glow - or I would just have to look for something online because it wasn't supposed to give so I'm going to go ahead and cut out the ear tabs. Y'All. Remember that one time y'all, I came up with this method in the beginning and I don't think nobody knows which is actually pretty funny. I just randomly did it I'm pretty sure somebody else probably did it before they just never posted on YouTube but yeah. I never would have known about it so now, I'm just gon na cut my ear tabs out and I do the ear tab. I slit it right behind my ear. That way. My whole entire ear can fit inside of the hole and then basically it's not stretching it, because I want to keep the tab in the front kind of flat to my head. That way that when I got to put the glue on it, it's going to stay, and then this is me using my spray and I'm going to go ahead and spread it inside of my wig just to make sure that everything is, you know, lining up making Sure it's where it's supposed to be at now. This is one of my favorite glues. I love to use, is Bowl hole and they have boho active. I love the bow hold. It works really good for me um and I don't really sweat too much, but when I was working out it still held for me as well. So I'm just going to go ahead and use my arrogante method and pretty much. He puts one layer and then he goes heads and you know spread it out now. One thing I do want y'all to also notice is that I did spray my wig cap before I actually went ahead and put the glue on because the old routine is. I used to put the wig cap on put the glue on cut it off, then spray it and I'm like. Okay, that's making it really icky really messy, and I don't really feel like it's a hearing the best way. So my new method is to spray the wig cap and then go ahead and put the glue over top of that. And then you just see a difference in how much it's already laid and slate. So I'm just going to cut the little ear tab, ports out and then I'm going to cut in the middle and then when I'm doing it, I'm going to actually go ahead and take the cap and pull it back a little bit past, where the sticky is That way, when I'm cutting it's already sticking, so you have to pull back and pull up a little bit just so you can get all the pieces that aren't really in the front. You don't really want those because you're going to see them and my whole purpose was like child. I don't need to be seeing nothing. I need to get my weeks later, so I need to pull this back. So that's what I'm saying you see how the tan! I mean the beige glow looks a little ashy, but it's going to end up working out regardless because I know what I'm doing, but it would take a little time. I need to hold you so then next I'm going to go ahead and put another layer of glue, and this one I mean I buy layers of glue, look pretty thick but they're. Not. I honestly do like thin layers, no matter how many layers you do you want to make sure you do them thin. So this is my second layer and then I'm just going to go ahead and spread out efficiently and then we're going to go ahead and do another layer which is going to be my third layer and then I'm going to actually lay lay my wig with this. Now we're doing the one layer with the stocking cabinet two layers. It will last me this style about two weeks, but typically I'll, never really even leave my hair in that long. So I just go ahead and move on to the next, because y'all anybody got time for that. Now I'm going to take my wig, you know my half done wig and pull it up on the hairline, but put it a little bit before the hairline, because I notice, when you stop right, where the glue is and then you cut it, it just makes it Look a lot more wiggier, so you want to bring the wig a little bit before the hairline so that it is aligning up correctly and on top of that, it just kind of makes it melt a little bigger better. I don't know why, though it just really does, though it makes it melt like so much better. So next, of course, I'm going to use my little Wiggins, my little Wiggins hair band to tie it down and lay it down. I'M probably gon na leave this on. For maybe about five minutes, because I was in an extremely rush, I was in extreme rush, but you know I made it home, no issues, no biggies, no problems, but yeah y'all seen I made it work and now I'm going to go through and crimp a couple. Little pieces of this, but that's the same process of when I crimped it down below or the first, so you see how it looks. Oh, my God, I wanted to keep these, so that's why I said I couldn't be doing too much touching. I already got my little baby hairs laid out and I'm just going to take my little scissors and razor it if you have a razor, definitely use it because you wanted to have Jagged edges and I think, towards the back when I'm cutting it. I was like it was longer in the front of the edge part, but in the back of the edge part, was a little bit smaller and that's how that makes it curly better. So I'm just going to go ahead and curl my little acrylic cues and then I'm going to take my spray and lay them, and this was the final result. It looks so good. I love it. I look Chic pretty very clean and also um they're, going to be doing this huge Black Friday discount free wig giveaway using a code wig. I have everything detailed Below in the description. It is a limited offer, so y'all get on top of it when you can, but I thank you so much for tuning in also make sure you guys follow me on Instagram. If you want to see what my photos is given in my little pictures or whatever and yeah I'll see you guys love you mwah see ya. Oh y'all, see that milk, okay Melody what lays, because I don't see none all right now. I don't know see you guys, I love you.
Comments
Bryanna_95: This look is so classic
Baby Dalite: Have you tried the zig zag scissors??? It really helps the lace melt. (If you don’t know what that is. But it’s a scissor that has a zig zag shape to it. And it helps the lace blend a lot better then using razors or zig zag shape with regular scissors. I cut my lace on the mannequin so it’s closer to the hair and I still do the edges before installing) even if you don’t do a video you should try to see if you like it
PCPDEE: I remember you doing the ear tabs for the bald cap first ❤
LaShan: Hey Tay, you should know your wig installs are always on point ❤
Pretti Rissa: Yes I’m a OG Tay fan! Chileeee listen! I remember you cutting them tabs in the stocking cap! ‼️
Gentle-Storm Wyatt: Ohhhh the pliers I may need to try that ❤❤❤
Ms.Pacheco Speaks: Everytime I see someone cutting their ears out I think of you. To my you're the Original.
Tanzy The Glow Up Guru: GREATEST AND EASIEST tutorial I've ever seen thank YOU!!! AND U EVEN shared ur secrets! I hope u have a merry Christmas and a very happy new year love tanzy
Christy Mac: Just in time!! Doing my wig as we speak!! Thank you !!
luvinmrcoleman: thank u for this video
lneal2800: Hey! TAY!❤️This is really cute! Keep slaying boo HAIRLINE IS flawless!
Joy’s Helping Hands: Tay I love it…you look beautiful! Love the content and looking forward to more❤❤❤
Mia Miaa: Hair ALWAYS come out on point
Wiggins Hair: SUPER GORGEOUS! You are so professional~
Courtney M: The OGs know you did the ear hole thing first bestie!!
BRAVEISBEAUTI: I wish to be THIS consistent on my channel come 2023. LOVE THIS FOR YOU.
My Freqquency: Very pretty❣️
Rodmika D: Hey Tay ❤ another great video. Can I get the link for the crimper? Thanks
Jennifer Wiley: Love the video and the hair is
None: Glamazontay, I watched a video from some ladies(Nic and Carla) and they were reacting to your videos about being flagged. I get home vibes, not wholesomeness, classy, low key. So.your channel is more adult. If you tryin to continue to reach the masses you gonna need to clean up orrrrr go adult only. You have a lot of adult innuendos in your content.
Rethabile Tembo: Love you babes.. love South Africa ❤️
Asha Franklin: And I've been waiting
Shi New: right on time.
CHY: Them pliers really took me OUT