Detailed Soft Fluffy Baby Hair Tutorial Ft Beauty Forever Hair
- Posted on 01 December, 2022
- Lace Frontal
- By Anonymous
●▬▬▬▬❤ #BeautyForeverHair ❤▬▬▬▬●
Buy Now, Pay Later, 4 or 6 Interest-Free Payments
Get $20 Off Use Special Code : beautyytb
☛Link to the wig : http://bit.ly/3OLPnic
Hair Info : 22 Inch Kinky Curly 13*4 Lace Frontal Wig 150% Density
https://www.beautyforever.com/ ►Hot Sale Wigs : http://bit.ly/3FfcxKE
Affordable #VPartWig : http://bit.ly/3ENiRrG
Lace Frontal Wigs : http://bit.ly/3VhKm3C
Invisible HD Lace Series : http://bit.ly/3VBnnjM
Headband Wigs Available : http://bit.ly/3VBal5J
►3 Days Arrive After Shipping & Accept 30 Day No Reason Return & Exchange
►Earn $10 Cash Back : https://bit.ly/3zabeGK
►Super Brand Day : https://bit.ly/3AakWue
The 3rd Friday&Saturday of Each Month EXTRA 15% OFF
#beautyforever #beautyforeverhair #beautyforeverwig #humanhairwigs
Beauty Forever YouTube Channel : https://bit.ly/34a1Y8Y
Aliexpress Beauty Forever Website : http://bit.ly/3ceVkl2
Amazon Beauty Forever Hair : https://amzn.to/3p4FYHL
Instagram@beautyforeverhair : http://bit.ly/IGBeautyForever
Promotion Email : [email protected]
Customer Service Whatsapp:+8613783534924
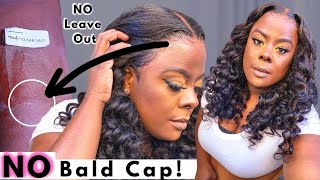
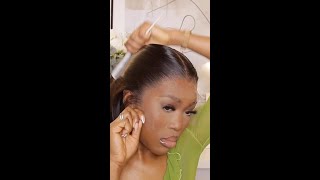
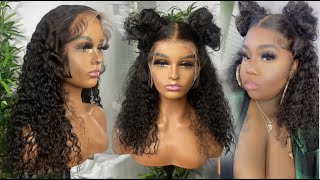
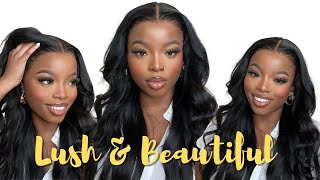
I don't care who's doing better than me, because I'm doing better than I was last year. It'S me against me. Okay, thanks fine as hell dick is full. Oh my God. That'S my baby, hello. Everyone welcome welcome back to my channel in today's video, I'm gon na. Be giving you a deep, detailed, baby hair tutorial. I myself struggle baby. Here'S like trust me, that's why I never give tutorials on them. I'M always just fast forwarding through it because girl I'm struggling too, but it's okay. I was like I'm gon na get my two brain cells together to help my girls out, so the hair I'm gon na be working with for this tutorial is a geeky curly wig from beauty forever hair. I did already pluck and bleach this, so the hair did not come customized and I did do very minimal plucking in the front of the hairline, because for baby hairs like dramatic ones, you need to make sure you do minimal plucking in the front to have enough Baby hairs to play with just felt, and since this is really a dedicated baby hair tutorial, I went ahead and laid down the lace before starting the video officially. But if you're wondering how I lay my lace, don't worry babes. I have lots of just as detailed as this one, even probably more detailed videos on how I do my glueless and dolls do check those out, but okay, now, let's get into the baby hair tutorial. Okay, now that I have a lace, nice and laid the next key step for your baby hairs is to make sure your lace is set and dry, whatever you're using a glueless spray actual spray. So I'm going to go ahead and because you don't want to have any lifting when you're doing all that swooping. So I'm gon na go ahead and put this elastic band on and let the lace sit for a minute just to make sure everything's nice and stuck because you want to know if you do not want any lifting there's a baby hair supply list first course an Edge control brush there's different types. You can use your toothbrush, but I feel like honestly, if you're trying to get some really good edges, you got ta upgrade to the garage control brush. I like this one, it's from the brand red I mean. I don't know if it's kissed by red or red by kiss like this one, because, as you can see, it's a multi one, it's got the brush. I like it, because it has. I like hard brushes like a hard bristle that can really control. That hair is important. I don't like soft flunky brushes and it has. You know these little Combs, which I also use to help like really get very like um, a very detailed swoop, and it has a nice little flat tip, which is also helpful for pushing things down a razor you can use scissors for cutting, but razors are so Much better when it comes to cutting your baby hairs. I feel like if you want a very fluffy look, a razor works or you can use like these cuticle scissors that I use, but just make sure you're cutting a slanted weight. Don'T ever just cut straight across. I would say this is important, but not as important when I started doing my baby hairs. I never use this. I just started using this this year and I feel like this little mini flat. Iron does make a difference and I got it from Amazon. It'S super tiny, the tinier, the better. As far as actually laying the baby hairs, I use Eco Styler gel, sometimes or I like to use mousse as well. I feel like it's easier for me to use Eco Styler because it has more hold, because sometimes it's normal baby hairs is it like is trying to get the hair to lay the way you want it to lay. So I like to use this, but I like this as well, because it's much lighter so it kind of depends on what you're going forward. Okay, now, let's let's get into it. So the way I like to do my baby hairs. I don't really do Center baby hairs. This I used to, but these days I feel like it looks it's just like the lace lays better when you don't do it. That way, that's my opinion. Do what she's like, but whenever I start to pull the ones from the side? I always like go in a diagonal angle and like try to like carve out kind of like a c shape in a way like I don't just pull them out straight across. I, like kind of go like up, and over a little bit, you can always play with different placements, like everyone's head shape is different. Sometimes maybe you need to start a little bit closer to the center. It'S all up to you, and this is what I was saying about, make sure you don't plug too much in the beginning before you install it, because now you see it's like low-key, too thick for my baby ears that I do have, but I can like easily Go in and thin it out with my tweezers now, I'm just going to thin it out. Another thing: I've learned too sometimes like plucking a little bit behind the baby hairs. The hairline's thick kind of also gives it a natural look, not too much now, but plucking. A little bit of space between the baby hairs and when the hairline start, I can give it a bit of a look and to cut it. I always kind of like a diagonal. You know an angle, a downwards angle and I try to use my eyebrows engage. So like no, I don't like to cut nothing shorter than where my eyebrow stops right and I like to cut mines going you just just look. So basically, I'm trying to like do like a tapered look where it's going from short to Long. You know so the hair is up here like up here are shorter and it gets longer going back, really helps give it this, like feathery, look to it right now, let's go off that. I am nice and hot, it's much more easier if you um swoop it in where I like doing it. I like how it curls, or I like how the hair swoops when I do an inward curl. My thing is that it's just so hard, sometimes because you can't burn your head when you're doing it inward then versus flipping. It outward be like, and I'm just gon na get the tight curl, the tighter the better take your time and boom nice and springy, and then what I do next is I'm gon na just try to. I try to like do like a rough form of what I want it to look and I'll brush it out like this, so I can see how it gets. Looking like that and now the key to getting that soft look without it. You know, but still using this is, I only add, the Eco Styler only to the top of the baby hairs like up here, just to like lay the top portion only because I still want the bottom to be. You know soft have a curl. I don't want to like dead the curls okay and then I kind of just use the rest of whatever is left to brush into the hair. There you go and honestly the whole Tech if you've never done edges before the whole technique to it is like you swoop, and you use your finger like to hold the place that you want it to hold. And then I don't explain it like I'm just using the comb detail here to really help me swoop, the baby hair. The way I want it and I'm trying to like let the the curled end stay there. You just got ta keep maneuvering the hair until it's looking like the way you want it to look. Sometimes it comes to my baby hairs. I just kind of like I'll call. My first attempt the rough draft, because sometimes you just got ta, give them a moment to set before trying to get them to conform to the shape that you want this. This side always hits better than that. So, for some reason oh yeah, like I said before, you want to tweeze, I want to tweeze on top first twist the hair down, like I'm saying sometimes facing in between the spaces. Like you know, in between where the baby hair is, I created a little bit of a gap from where the baby hair starts to like where the hairline itself starts. That also looks really control for some reason. I'M just going to tweeze back hair a little bit just a little bit, not too much diagonal cut down with the razor trying to cut off my eyebrows nice tight inward curl. Oh nice do a little comb out and pre-shape the hairs, see what you're going for there and just put it on the top to help you lay down the top flat, don't take it any lower than that. Every time we go on our little I'm using the comb part and we start swooping the hairs I just kind of like to just follow the shape of how the curls are going and even I'm brushing it. I'M kind of like brushing it outward onto my forehead, like you see, like I'm, brushing it like out this way. You know like down, I kind of like go out this way you know like I'm not like. I want to brush it down to show you. I want to ruin baby hairs like I'm, not brushing the baby hairs down, I'm like brushing it out to the side to get that curved shape. I want to take this one out, so not all the baby hairs you pull out have to be the baby hairs. Like if it looks kind of like weird I'll, like just I just like keep like playing with it, I'll bring some in take some out tweeze some hairs. I don't know how to tweeze this one just play with it until it makes sense. It'S not gon na make sense at first, at least not for me what, if, like nice, tight curl, this is about to be messy, because it's kind of wet, especially the hair, is dry, but that's okay, see I like the sideboard the other side. I knew it too. I don't know what it is about this side I just I just always prefer if I can just do this side better. Oh my goodness, her marker yeah, that's good enough. So, like I said for now, it's our giraffe, so I'm gon na go ahead and put the elastic band back on just to let everyone like sit in their position. Make sure you don't put it on too rough because it might like cause it to shift kinky, curly, hair and you're wondering how do you get your curls to look really defined because you have kinky curly hair can get poofy real easily. So what I do is I finger quill them, so I get them nice and saturated. Add a new sweater whatever this is, and I just like we'll wrap it. The ends mainly I like my ends to be defined around my finger. Um yeah and drop it like that and I'll separate it once it's like fully dried. Let'S just do big messy sections. I don't want to look perfect. I just want some corals here and there. Thank you, okay. So here was the final look after the hair had fully air dried, and I wasn't really feeling this final look like in the moment. I was just really tired because y'all not be doing these installs super late. It was 3am. I was like it's cute for now, but I came back the next day and went ahead and just did some tweaking and redid the hair. I added a part in it and at first I wasn't gon na even like poured this part, but I was like nah nah nah. I got ta give y'all the full tea. So really all I did was just just brush the baby hairs on this side out, and I put the inverted swirl right here in the center. I felt a little cuter and I also went ahead and added an actual part to the hair. I just felt like the flip over wasn't giving the way I wanted it to give, but that's really all I did, and I do like this style - a lot better than the other style Minor Details, but still it made a difference for me, like I said my First, attempt of my baby hair is always the rough draft. Every time I reinstall the wig, I'm tweaking something, and I was like it's never done till it's done you just kind of have to be really patient and give attention to details when it comes to baby hairs. Like gray hair, I was just plucking away some hairs that felt like they were like not fitting the vibe or the look. It'S okay to pluck hairs, don't be scared to plug them baby hairs and then I'm just trying to go in and push some back push them to the side. You just got ta mess around with it, and sometimes it helps to have like a inspo photo of the type of baby. Here you want to go for to kind of help. You see how to shape and maneuver everything and much better. Here we are the finished. Look I kind of just like these better than the other one I feel like. I was doing a little bit too much in my opinion. I like this, because I still have my little swirl Cuts with, like the little inverted swirl. I also chopped the hair. A little bit shorter, so it went from being 24 inches and now it's giving maybe like a 20 22 inch. Curly hair can get quite short, especially with these finger coils. But I love this finger quilling hack, because this is the hair fully dry and you know kinky curly hair when it gets fully dry and big. It gets super frizzy and puffy, but doing the coils lets it get dry, but still have a nice defined. Look and have volume at the top with that said. Thank you guys so much for watching. I hope you found this video informative and helpful, be able to drill like comment and subscribe, and peace out Girl Scouts goodbye
Comments
LaTalia Johnson: I love watching your videos soo helpful. After watching your videos I bleached and plucked my first wig and it came out good
Nina Negedu: This install is giving. Looks super good on you babe❤
Curlss: I literally just received this wig a couple days ago after watching a few reviews and I was so disappointed. The wig is very thin and the tracks are visible I requested an exchange and I am hoping it is resolved quickly because it looks so bomb in these reviews
MARY ODE: I was ready for the full video when I saw that tiktok this hair is so beautiful!!!
angelica canty: She stay smoking theses installs!!!!!!!
MsBrittany Janai: Your installs be so bomb ❤❤❤❤❤
Recool Hair: Love your video, you are so gorgeous
mercythedoll: omg i can't belive i'm late! this tut is everything tysmm
Mia: Fav