Chocolate Brown Lace Frontal Install | Warm Colors For Cold Days | Ft. Ali Pearl
- Posted on 10 December, 2020
- Lace Frontal
- By Anonymous
▬▬▬▬▬▬▬▬▬♛#AlipearlHair♛▬▬▬▬▬▬▬▬●
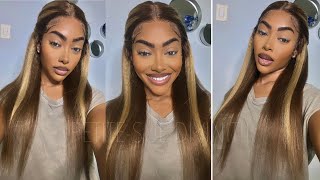
Hair details: 200% density #4 dark brown bodywave lace frontal wig 26 inch
Video Hair Direct Link ➤https://bit.ly/3fgtyWo
★ Alipearl official hair store ➤https://bit.ly/35NHm7S
Easily Installed Headband Wig ➤https://bit.ly/3lNBsc9
U Part Wig Virgin Human Hair ➤https://bit.ly/3kOyzGE
Lace Front Wig 180% Density Deep Wave ➤https://bit.ly/2IRDDwP
$45 Flash Sale Wig, Limited Stock
https://www.alipearlhair.com/promotion...
Follow @"alipearl_hair" on Instagram:http://bit.ly/2TXCQfw
►Use code:“alipearlyoutb”to save $10
Get to know our latest promotion ? http://bit.ly/2H0Gmmc
Follow @"Ali Pearl Hair" on FaceBook:https://goo.gl/GFnwNk
E-mail: [email protected] (Provide Wholesale)
WhatsApp: +8617719937661
#alipearlbodywavewig #bodywave wig #lacefrontalwig
Hey guys and welcome back to my channel so for today's video i am wearing a different color, as you guys can see, and i'm obsessed. I was really nervous about this color because i thought it was going to be darker and wouldn't show up, but it actually looks way better way way better than i thought so. This hair is from ali pearl and this is their number four hair to me. It kind of looks like a number 33 ish in the light like you guys can see, but it is a brown and it is in 24 inches, i believe, 24 inches and it's a 13 by 6 um lace, frontal and yeah. It'S body wave, texture, comes colored and everything all you have to do is install it, and i will be showing you guys how i did that in this video. If you guys would like to purchase this hair, i will put the link down below. I really love the color, so cute. I'Ve never tried this color before i've tried a ginger, but i've never tried like a brown like this before and i'll also be showing you guys like an updated um baby hair routine, which is pretty much like the fluffy baby. Hair type of look and i'll show you guys all of that in the video. So if you guys would like to see how i did this install and the edges and everything then keep on watching okay, so we are back in my little corner. I feel like this is the best place for me to like actually see what i'm doing, because there's a mirror right there and also like it's more brighter and it's a plain background and you know just easier for everybody. So here is the box and they sent me like other headbands like the usual shiny, headband and let's see a bag and a wig cap, but i already had another wig cap and then for the hair. Here it is. I love this color. I was worried like that was gon na be too dark, but i love it like it's different, i'm tired of wearing just black and stuff like that. So i'm really excited for this color, since i've already done the hard part well for me like to film. Actually, all of it's hard to film - i already did the wig cap part and this part like i've, filmed it in my channel before so. You guys can re-watch that. But i decided to just film me and like actually installing the wig on my head, i'm just going to put um like some foundation on here, so it blends and i'm gon na use the shade toffee. It is a bit lighter, so it works better because you never want your lace to be darker and not too much you don't want it to be like thick layer. Just a thin layer is good, and another thing i like to do when i do this. Is i focus more of the product like onto here, because you can't really go in after, but around the edges like in the front you can like fix it up afterwards, so it's just better to do it that way, it actually fits pretty good. I was worried at first, but it's looking like it's gon na fit good. I filmed like another video this morning, but it didn't work because the wig they sent me was so small and i couldn't like get the sides down. So i didn't end up wearing that. But this this fits so i'm just gon na cut um, i'm gon na cut like behind the ears and i'm such a fool. I forgot my scissors at the salon, so i'm using these little eyebrow i mean eyebrow eyelash scissors. I think the lace is going to work, though it looks lighter than my skin, so that's good now, so that we don't get any hair caught while we're gluing, i'm just going to pin it back. This color is so cool when you think, like you found this position, that you want the lace to start and everything i like to go ahead and use like an eye, pencil or eyeliner that thing and just mark through the lace like where i want it. To start, this makes it easier when you glue it down, you know exactly where you're putting it okay and then, when you lift it, you can see where you put the marks, and there is where we're gon na put the glue and i'm just gon na clean It up a little bit and i use um hand sanitizer or you can use alcohol and we're just gon na make sure. There'S no makeup or nothing like where the glue is gon na go so now using um the bold hold glue - and this is the bolt hold active pink one. Ghost bond has been okay, but i prefer the bolt hold for some reason. I haven't tried others but yeah. Let me know what you guys like what glues you guys like to use. What you want to do is make sure, like you, don't get too close to um the outline that you made, because you can't like it's harder to go back and than like, adding more glue and now lay it down as flat as you can and blow dry. So when it's clear like this, you can continue adding more layers and you guys can keep going as much as like you guys can do as many layers as you want. I like to do about um three or four, like all my clients and stuff, but i think we'll just do like two and a half today so now that i've put um my layers of glue on and it's fairly clear. But this is pretty good um. You can work with this. I am going to put the lace down and basically just want to match up, like the dots on there to here just easier this way, but you don't have to do it like this and be careful with this, because, wherever you place, it is where it should. Just stick to and it won't move after that or it'll be really hard to move after that. I'M gon na blow dry one more time just to make sure it's stuck now taking my eyebrow razor, i'm just going to cut off the lace around the edges. So now that um, all the lace is cut off, i'm just gon na clean up all the black dots. So now that i've done this um now for like everything, that's lifting i'm basically just going to go in carefully with um the bolt hold again and just fix it up now that i've got um everything. That'S lifting, like i've got the glue down where everything's lifting i'm just gon na press it down and blow dry it into place all right. I know it kind of looks a little messy, but once we wrap it and everything it's going to be fine. Now i'm thinking of doing like a side part but for the edges. Let me see, i know the edges. Look really big right now, but i am going to cut them after and just quickly wrap it. Now i'm just going to wait for this to settle and then we're going to come back and do with the parting. I will fix up the edges later, but now, let's just do the side part. So i'm going to go section by section and put some wax and then hot comb it and you guys will just watch what i do. So this is how it's looking, i'm really liking it so far, um i'm just going to take that concealer that i used earlier and bring out my parting and now let me fix these baby hairs. So basically, i'm just going to brush it out and then cut them into shape. So you guys will just watch me. Do that and there we are there's the baby ears, all nice and soft. This is how i usually do it on my clients. I, like it more natural like this, instead of like with gel and stuff like that, but yeah that is it for this install. I can probably prepare now, and i really like the texture as well. It'S another like nice body, wave texture, so you don't really have to do anything to this, and this is actually longer than i thought it's really long. Yeah. Thank you guys so much for watching and if you guys enjoyed this video, give it a thumbs up. Comment below any questions you have or what you guys would like to see next and make sure you guys subscribe. If you haven't already, i will put the link to this hair down below and yeah enough of me talking. Let me just go and i'll see you guys next time, bye,

Comments
Marbie Jay: Love this!!
Jules: Thank you for sharing, what foam did you use on baby hairs?
strawberryshortcake: can u do a bald cap tutorial please?? i just ordered this wig too!! <3
Shikorina: Your videos inspire me so much
Akua Bandele-Asante: Could you make a video on how you bleach and prep your wigs to be installed?
U mad cuz I’m right: Girl which glue do you use?
Danielle: How do you protect your hair underneath your wigs? I want to get into wigs but don't want to look like It with missing edges in the process
Asya Smith: Cant find the lace..... only scalp
JessicaMari: Does it come pre bleached?
Junior Chaves o Picasso de Yahushua: Hey there honey ♛