How To Get The Perfect Install Every Time | Stylist Secrets | Wiggins Hair
- Posted on 08 December, 2022
- Lace Frontal
- By Anonymous
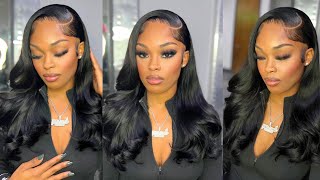
Hair details: 26 inches HD Body wave 13*4 Frontal wig 200% density
Direct Link➤https://bit.ly/3ONMYUr
#WigginsHair Official Store:➤https://bit.ly/3EOcmVv
More coupons!Join In Facebook Group➤https://bit.ly/3pzwi8e
You may also like:
1. Skin Melt HD Lace Wig➤https://bit.ly/3VKzkDT
2. Top Selling Lace Frontal wig➤https://bit.ly/3gP8g7v
3. NEW V part wig! More Natural➤https://bit.ly/3AYnAFJ
#wigginsloosedeepwave #wigginshdlacewig #wigginshairreviews
Follow Wiggins Hair On Social Medias:
Instagram @wigginshair ➤https://bit.ly/3ILWwdL
Tiktok @wigginshairbest ➤https://bit.ly/38krOfq
Facebook @wigginshair:➤https://bit.ly/3IQd84f
Wholesale WhatsApp: +86 18339906150 Email: [email protected]
Hi guys it's Zoe and welcome back to my channel, I hope you're all doing amazing. Today, I'm going to show you how I installed this wig, it's from wigan's hair. It is 26 inches, but we'll get into all of that in a bit. I'M going to show you how I installed it from start to finish with every single tip or trick included every single tip in the book. I'M going to teach you guys how to bleach your wigs, pluck them style them on the mannequin head and properly install it onto your wig, so that it looks like this. I also get into how I do my baby hairs and, basically all the secrets, your hairstylist doesn't want you to know, but yeah, I'm obsessed with this hair. As you can see, it is so silky it is moving like water. I just feel like you can't go wrong with it bust down a black wig, especially during winter, if you're a UK babe, you know our UK uniform is a bust down black wig yeah, you track seat and a fur jacket that is like the UK baby uniform And it's the uniform for a reason because, like I'm obsessed yeah, if you guys want to know how I achieved this, look and all my secrets on how to create the best insult of your life make sure you keep on watching by the way. I just want to add a steamer, because I know someone's gon na be in the comments like. Oh my God, I can still see your lace. You can't see the lace it's the light I saw in my life. I'Ve got some big box filming like right here and it like reflects onto the wig, but I promise you guys. This is giving scalp, then it's giving scalp and you can't see it in real life. So just just don't mind that, and especially that throughout the video. Just just don't watch it. Okay, are you ready so you're, jumping right on into the video? Like I said before, this wig is from wigan's hair. This is the little bag it came in and I'm just gon na unbox it for you. So you can see what I've got in the packaging. I'Ve got a little Edge brush. I got a wig melt band some lashes and I also got a wig cap and another like headband thing um. So the specs of this hair is a 13 by 4 26 inch 100 human hair wig, and it has HD lace. This is how it came packaged and, as you can see, there is a lot of parting space guys now, when you're investing in your wig, you want to make sure you try your best to find one with as much parting space as possible, and by this I Mean side to side front to back um. This will enable you to do as many looks and Styles as you can. You can go for a middle part, a deep side, part um and yeah. You really have the option to play around with how you want to style your wigs, I'm just going to put a picture up on the screen of the two different types that are most commonly found, but yeah just really do your research in this type of lease That you think will suit you best, but I personally prefer these types moving on. As you can see, the knots of this wig aren't super big. They are very manageable. Knots are those tiny little black dots that you can see. That is where the wig has individually been placed onto the wig and knotted together, which is why we call them knots now those tiny little black dots, you don't want in your install, so in order to get rid of those we often bleach. Our wigs here is a closer look of what the hair looks like on the mannequin head as well. Just so you can get a better idea of how this hairline looks now. This hairline is very beautiful. It bleached very well. I didn't have any issues in terms of the lace or the lace quality. Now for my bleach, I always use my Jerome Russell B blonde bleach. I just find it easier because it's pre-measured and all I have to do is pour out a little sachet and the corresponding developer pot into a little pot. Now I mix it together on a spoon and I turn my wig cap inside out and I place the bleach onto the wig. Now you want to make sure that you make sure bleach mixture. So it's about the consistency of toothpaste, I'd say you don't want it to be too runny, because runny bleach will end up seeping into the lace and dying the actual hair. You do not want to get this bleach onto the hair. You only want it onto the lace in order to get rid of those black dots, so you want to be very careful, don't apply too much pressure either again. This is gon na lead to the bleach seeping through once I've placed all my bleach on. I leave it to develop for about 35 minutes, while keeping a super close eye on the knots lifting now. In order to do this, I also like to take mine off the mannequin head, so I can really monitor it closely, because the last thing you want is over process and over bleach nuts. Once the 35 minutes have passed, I wash out my wig. I literally use any random shampoo that I have and conditioner um don't use your expensive stuff and also, if you have textured hair, avoid using any heavy shampoo such as shea moisture Cantu, like anything that will weigh down the hair, because you have to remember this is Straight so straight hair, you don't want to use something, that's going to weigh down the hair and make it look heavy. If that makes sense, so I would recommend using um any shampoos and conditioner that were made for silkier textured hair moving on to plucking the wig. I usually let my wigs air dry before moving on to plucking them um. As you can see, I've just used my spray bottle and sprayed the entire hairline. I like to saturate it completely and then I section off all the hair so that I can see exactly where I need to pluck the wig plucking. The wig is what is going to elevate your look and is what is going to elevate the realism of your wig, because you do not want to have a super. Dense hairline natural hair lines often have imperfections they're, never completely straight, and they almost look slightly thinned out not too much, but basically just want to get rid of any harshness that may be present in the front of your wig. This has been my plucking technique for a couple years now, and it has worked a charm every single time. All I do is wet the hair grab. Some sharp tweezers pluck, as you can see you keep, you want to keep your tweezers moving consistently. If you keep your tweezers in the same place, it's going to cause bald spots and you do not want bald spots in your wig okay, so I just pluck pluck pluck um comb, the hair back and then re-wet the hair, so that I can see exactly what I need to pluck once I've done the initial front layer I like to grab a rat tail comb and just section off a little section here. This is very important, especially if you're someone that likes to do baby hairs, as you can see once I've put it. There'S quite a harsh line of demarcation, and that is exactly what you want to get rid of. You want it to be a smooth, consistent, gradient. You don't want that to be any harsh lines. I pluck pluck, pluck and use the exact same technique as I did for the front, and then I section it back again, and I just keep doing this until I'm satisfied with how the wig looks. I found this wig super easy to pluck and especially since we bleach the knots before it almost softens the knots a little bit, they become a little bit more fragile, which makes plucking a lot easier. Once I section the hair off, I'm combing all the hair. Back again and looking at my work so far, and I'm just gon na keep at it until I'm happy with it um, it is really personal preference on how plucked you like your wigs to be, but I personally like to go for a slightly more overplexed. Look because I find it to be a lot more natural, but as long as you have a gradient line and there's no line of demarcation, then you're good to go, and this is what my frontal looked like after I plucked both sides um. It usually takes me about 25 minutes to pluck both sides, the entire hairline and I'm really happy with how it came out. This is how much hair came out of my plucking session um, which surprisingly wasn't that much I'm now moving on to the styling portion of my wig, I just decided to go for a bone straight Sleek. Look for this wig um, as you can see, I'm literally just straightening. It there's not much to it. So I quickly just sped through this. I personally prefer styling my wigs on the mannequin head because it makes installing the hair so much quicker and so much easier because you can actually see what's going on in the back your head for the front of the wig I use my Bed Head. Work stick as always, it is so important to use a wax when styling your wigs guys, it's gon na really bring out all the hard work he did with the plucking and really bring out the hairline and accentuate things and make it look extra clean. So, as you can see, I'm just applying it at the front and then grabbing a light hold hairspray. This is just a random one. I had lying around. You want to make sure it is a light hold one, because you don't want the front to be crunchy. So make sure you avoid got to be just any hard hold hairsprays once I've got all of that applied, I'm now grabbing my hot comb and combing through at the frontal, as you can see, and setting all that products once I've done the front. I now start sectioning off the hair section by section and repeating the exact same process, and this is going to make sure that the wig lays as flat as possible. The key for this is to make sure that you have a really hot hot comb. So I usually let my hot comb heat up for about an hour 45 minutes um to really make sure I can maximize the temperature because the hotter, the hot comb, the flatter the wig gets and, along with the wax and the light hold hairspray combo. It really locks in that flat. Look I'm repeating the exact same thing to the other side, and this is the finished look as you can see, it looks so clean, and this is how you get that perfect Salon finish big. Look. Here'S a little close-up of the final look and, as you can see, it is just so clean guys. The more work you do on your mannequin head, the less you'll, have to do on your actual heads and it's going to make sure that you Breeze through the install moving on to the actual wig installation. Here I am finally um. Here'S another look of how the wig looks as you can see. It is flat as hell now. Another very important step that you don't want to skimp out on is tinting your lace, especially if you are dark skinned brown skin or have any type of of melanin in your skin. For this I like to use my liquid foundation - and I just pour a little bit on the back of my hand and grab a dense, Kabuki brush and press that into the lace tinting. The lace is going to make sure that it matches your skin tone completely and blends completely seamlessly um so that it looks like your scalp. You really want to take your time of this. I used to use a face powder as well. I'Ve used lace tints, but I found that my Foundation works the best and matches my skin the best once I've tinted the lace, I'm going to put the wig on and adjust it to how I want it to sit on my head now, as you can see, Because we've done the styling, I don't have to worry about straightening the hair, hot combing or doing any of that stuff. Apart from General touch-ups once the wig is adjusted to my liking, I'm going to start by cutting off the excess lace on either side of the ear. As you can see, I'm doing here and once that is done, I'm grabbing my scissors again and it all slits into the lid. This is going to help break up where you need to glue your wig, especially really good for beginners, because you can take your time. Gluing down the lace rather than doing a whole entire strip, all at once for my glute, I always use my better than malt wig glue. I love this glue. It doesn't give me a reaction like go spawned and it keeps my wig super secure. So I always use this and pull the lace back and start applying it. On the back of my eyebrow razor, I usually do about three to four layers of this glue and you want to make sure that you wait for each layer to dry completely clear, guys completely clear. You don't want to see any white in the glue when you start pressing down the lace, as you can see I'm doing here. So I press down the lace. I hold it down for about 10 seconds before grabbing a little comb and combing the hairs into the glue. This is going to help everything blend seamlessly and make sure that the lace is securely bonded to the glue and your skin. I'M going to go ahead and repeat this exact same process to either side of the hair, really taking my time in gluing down the wig. This is very essential if you want your insoles to last and in general, just look completely perfect and seamless so again, waiting for the wig glue to dry, completely clear and pressing down on it and then grabbing a comb to make sure everything is bonded securely. Once I've done this, you don't have to do this, but I've noticed for some reason: um, maybe because I sweat more there, but the sides of my wig never stay down. So I always grab a bit of got to be hairspray and spray it on either side of my head, not the front just anywhere that it usually lifts faster and I just hold it down spray and dry it with my hair dryer. Once all of this is done, I just separate off my sideburns and begin cutting the lace cut the lace I use my eyebrow razor I've tried using scissors. I'Ve tried using the zigzag scissors that I've seen people use but honestly guys invest in some eyebrow raises. These are like 10 pounds on Amazon they're. The best thing you'll ever buy for your wig, because it doesn't create any harsh lines when you're cutting the lace and it makes it look naturally feathered, meaning the lace will blend completely seamlessly into your skin. So please guys, if you want to elevate your lace, frontal looks use an eyebrow razor once I've got all that cut, I'm grabbing my Wiggins melt band and tying that super tight around my head for about 10 minutes before taking it off. This is going to make sure that I give the glue a chance to completely melt into my skin once this is done. I take off the wig band and I grab a little bit of powder and foundation and just continue blending in the lace a little bit more you'll see throughout the video that I do touch up quite a lot just to make sure it's perfect. I also go in with some Foundation powder in The Parting and really make sure where they accentuate and highlight that part. This is going to help the wig look a lot more natural and seamless. Once I've sorted out the blend, I'm now going to move on to cutting the baby hairs, but before that this is what the lace looks like if you're, not a baby hair girl, you can absolutely leave it here, but I love a good fluffy baby hair. So for that, I'm now going to grab my rattle can pardon it from the last third of my eyebrow towards my ear and I'm just going to go down in a diagonal line. You don't want to grab too much of this and just play around with how dramatic you want your baby hairs to look depending on how dramatic you want your baby hairs to look. You might want to grab more or less hair, but this is usually my guideline that I stick to a hot comb, the rest of the hair back, so I can really focus on the baby hairs and then grab my eyebrow razor and then cut the baby hairs To my desired length, I usually go shorter towards the front of my face and longer towards the sides once those are cut, I'm now grabbing my mini hair, straighteners and curling inwards towards my face. I also wanted to add that I use my eyebrow razor to cut the baby hairs again because it creates that feathered, look and it looks so much more natural rather than scissors, which would create a very blunt once finished. So yeah, like I said eyebrow raises, are honestly my Lifesaver once I've curled all the baby hairs inwards, I'm grabbing a light, hold hairspray and playing around with how it lays this is very difficult to explain. Essentially, I'm just sweeping the baby hairs and I'm kind of giving them a life of their own, don't go where they want to go, and I just guide the hairspray and my finger in the direction that they want to go in. I like to use a light. Hold hairspray again rather than mousse, or got to be hairspray, because it creates a much lighter natural fluffy baby hair, rather than a stuck down molded baby hair. I just prefer this look, but you can, of course, do whatever you like. If you prefer a more defined baby hair, look I'm doing the exact same thing to the other side, I'm spraying the back of my Edge brush and guiding the baby hairs. Where I want them to sit once this is done, I'm just grabbing my wax stick and just finishing off the sides of my hair again with the hot comb going back in and making sure it's completely flat before grabbing my Wiggins melt band again and just securing My hair for another five minutes. This is just to make sure that the baby hairs stay in place and don't go anywhere. While I'm setting my baby hairs, I'm just quickly gon na restrain my hair literally just doing a quick pass through um, just to make sure it's super sleek and to get rid of any kinks or knots that I had due to installing the wig. As you can see, this hair is super super silky guys it is moving like quarter. Like I said at the start, it is so soft recording this voiceover around two weeks after I installed this and trust me. The hair is still moving the same. I'Ve had so many compliments on it and I just can't go over how smooth and silky it is like. Just the video speaks for itself, guys finish off, I'm grabbing a tiny, tiny bit of my oil Reflections and applying it to my hair. You want the tiniest dot of this. You don't want to go overboard again, because you don't want to weigh down the hair. You want it to move so avoid any heavy oils or heavy products, I'm taking off the wig band, and this is the final result. Guys look at that. It is perfect. This is a true bust down. Wig, guys 26 inches, I'm around five foot six and it reaches my hip bone touches my bum. It is absolutely beautiful. I just love how the lace laid the baby hairs and I'm just obsessed guys. I hope you guys enjoyed this video. I hope you found it very informative. Make sure you like comment and subscribe, and I will see you in my next video take care guys bye,


Comments
It's Bebe: Thank you for sharing. This was super informative for a beginner like myself ❤
Fatou Sm: It looks so clean