Headbands For Babies And Toddlers From Old Clothes Tutorial: 4 Cute Styles
- Posted on 12 January, 2017
- Hair Accessories
- By Anonymous
Click here to go to my Hindi Channel: https://www.youtube.com/channel/UCRfCM...
Connect with me here:
•••••••••••••••••••••••••••
Instagram: https://www.instagram.com/ish.preet.ka...
Facebook: https://www.facebook.com/slickandnatty...
Twitter: https://twitter.com/slickandnatty
About this Video:
••••••••••••••••••••••
A few days back, I had posted a video on DIY headbands for girls from old T shirts and a lot of you requested me to do a video tutorial on headbands for babies.
So in this video I show you 4 styles of how to make headbands for baby girls.
These 4 styles of diy baby headbands are:
1. Ruffle Flower Headband
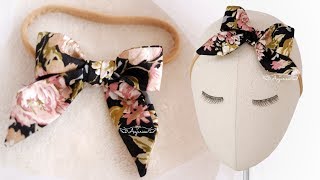
2. Fabric bow headband
3. Ribbon Bow headband
4. Knot headband
The best part about these cute baby headbands is that they’re so easy to make; there’s nothing to stop you from making one in every color imaginable!
Link for video on DIY headbands for girls from old T-shirts:
....................................................................................
https://www.youtube.com/watch?v=InGzy0...
About our Channel:
...............................
Slick and Natty is a channel dedicated to helping you always stay in style, keeping you abreast with the latest in fashion and helping you stay beautiful with natural products.
We share with you lots of DIYs on how to reuse your old clothes and other waste materials.
For Business Enquiries:
........................................
Mail at: [email protected]
Let me know what you think of this video in the comments below.
Thank you so much for watching, love you all !! :)
Hi guys welcome back to slick at Nike. So, a few days back, I posted a video on DIY advanced ferger's that you can make from more editions, and many of you requested that I should do a video on headbands for V Pickers. Yes, babies. Look absolutely adorable in headband and in today's video I will be showing you how you can make these at home yourself for your cuties and the model for today's video someone. A special is actually a baby boy and not a baby girl. He'S Christian he's my friend they're with us baby he's 3.5 months old and he was such a sport that he agreed to put on all these girly share, pants and happily posed in these hope. You will like this video do subscribe to my channel by clicking on the red button below for more such videos. First up, we will be making this pretty ruffle flower, headband and trust me. Babies, look absolutely adorable with this, for this taken old t-shirt and cut out a rectangle from it of width 4 to 4.5 inch and length should be your baby's circumference of the head half an inch. Now I will fold the rectangle into half such that the wrong side is facing outwards and then stitch on this blue line, as I have marked here, leaving about two inch opening in the center, which we will be using to turn the band inside out. I am now stitching along the blue line and, as you can see, I have stitched leaving about two inch opening in the center, and I will now use this opening to turn the band inside out. Now. All you have to do is to close this opening, which you can close using a straight stitch like I am doing here, or you can even use fabric glue as I'll be showing you in one of the subsequent headbands. Now just join the two edges of the band like this and stitch them together. The stitch is now done and now just turn the band around, and you can see that it looks very neat. The band is now done, and now we will be making the flower for the flower, you have to cut out circles from the same t-shirt. You will need four large and five smaller circles. The diameter of the large circle is three inch and that of small circle is 2.5 inch. First, take one of the large circles and some fabric glue put this glue in the center and fold the circle into half in the center now again put some fabric glue in the center again fold it into half and leave it to dry. For a couple of minutes, you have to make petals like these from for large and for small circles, so we are left with one small circle which we'll be using as a base, take some fabric glue and put it in the center of this base circle in Plus shape like this take the four large petals and stick these on the base pressing these in the center after this will again take some fabric, glue, put it in plus shape and now stick the smaller petals in the same way as we did with larger petals Press these petals in the center and lift these up from the sides like this and your flower is ready. Finally, take the band fold it to find its center and now take the flower and stick it on the band not on the center, but a little away from the center with fabric glue, pressing gently and this beautiful headband is ready and our Krishna baby looks absolutely Stunning in this headband, I think he loves it too. Next, up we'll be making these cute little fabric bow headbands I'll, show you how I made the red one for this, take any t-shirt or leggings or whatever and cut out a rectangular strip from it, which is 1.5 inches wide and the length should be the circumference Of the head of your baby half an inch as it will stretch when wound, put some fabric glue on one edge of the strip and fold it to bring it to the center of the strip, put fabric glue on the other edge as well and fold it. So that it meets the other folded edge, now bring the two ends of the band together, such that one overlaps, the other and stitch them together cut out a small rectangular piece from the same t-shirt place it under the joint of the band and fold its two Edges with fabric glue to cover the joint like this, the band is now ready. Now, let's make the bow for making the bow. You have to cut out two fabric pieces of this shape. I am cutting it out from red shorts for the bow you can use old t-shirt shirt, leggings shorts, whatever I am tracing the shape on the shorts with the chalk and then cutting it out. These are the dimensions of the fabric, piece that I cut out for your reference cut out two identical pieces like this placed one over the other, such that their right side, so the good sides face each other join the two pieces together by stitching along this dotted Black line, leaving about 1.75 inch opening in the center before stitching, join them together with all pins so that they don't get displaced, and now you can start stitching close to the edge like this. You can see this opening in the center, where I have not stitched. Now, just pull the bow out through this opening to turn it inside out. The boy is now almost ready. You don't have to close the center opening, as this will be hidden when we tie the knot now take the bow tie a knot in the center like this, and your bow is ready. Finally, all you have to do is to stitch this bow to the band that we had made and the headband is ready to be worn. So let's ask crochet feel likes it Christian. Do you like it? I think that was a yes well, since he liked it. So much I made him another one from this t-shirt and, as you can see, he loves this one as well. So now let me teach you another bow headband. This bow is made from ribbon instead of fabric, so you need some red ribbon. Mine is about 1.5 inches wide cut to 7 inch long and one six inch long strip from this ribbon burn the ends of the ribbons very slightly by placing a close to a candle flame for a second so that they become hard and the thread stone come Out join the ends of each of these three ribbons using say we call or any liquid adhesives so that they turn into loops. So you have three loops now press these a bit so that they flatten out now take the two loops that we are made from 7 inch ribbon and join these in the center in X, shape or cross shape, using heavy coal or liquid adhesive. Take the third loop, which is the smaller loop in the center horizontally, like this, take some thread, wrap it around the center and tied two ends together. This we have done so that the three ribbons don't get displaced from their place now cut out another ribbon strip, which is 3.75 inch long and make triangular notches on both its ends. Paste this horizontally on the backside of the book finally cut a strip which is 2.75 inch long and paste it and wrap it in the center to cover and hide the thread that we had tied make a band for this, as I had made an option number Two stitch it to the bow and your headband is ready to be worn and there are no prizes for guessing that our crochet rocks. This look as well, finally I'll be teaching you how to make this absolutely cute and smart north headband. For this you need a large t-shirt, because you have to cut out a rectangular strip which is 10 inches longer than the circumference of your baby's head. It will come somewhere around 22 to 26 inches. The width has to be three inches now fold, this strip into half and cut triangles at both its ends. The tip of the triangle should not be pointed, but should be a bit rounded make this triangle on the other end as well. Now we have to stitch around this strip, leaving about two inch opening in the center, so here I am stitching close to the edge. This is how it will look after you have stitched it, and this is the opening in the center put your thumb through the opening and pull the strip onto the thumb, then pull it out to turn it inside-out. Do this, for the other end as well, to close the center opening, take some fabric glue, put it on the edges of the opening to join them together, like this and the opening is closed. Finally, take the two ends of the strip and tie this in a double knot. You can tie this knot directly on the baby's head as well, and your headband is ready and, as always mr. crochets really excited to sport. This hair band - I had a blast while shooting for this video, and I want to thank my friend David ah for letting me shoot a cute little boy and dressing him up as a girl. I hope you like this video do. Let me know in the comments below which one is your favorite headband and do connect with me on my Instagram account, which is slick and natty and doo dodoo subscribe to my channel. Thank you. So much for watching see you guys next time.

Comments
Picture Queen: I love these ideas! So simple yet so cute! I am going to make a bunch of them. The baby is adorable and you are so pretty. I love your hair.Thank you for a great video!
Grace Chakravarty: The baby is adorable! Feel like cuddling him! Thanks for sharing these wonderful ideas for making headbands using things which we would have otherwise thrown away!
Chris Eich: They are all adorable. You made it look so easy! Thank you!
Humaira Shah: I wanted to do this without a sewing machine! amazing tutorials ☺
Amy Selina Jarvis: I love these headbands!! my daughter is just waiting to have cochlear implants and I cannot find anywhere that sells headbands to keep them in place. so I decided to make my own and found myself here.....you make it look so easy! all I will need to do is add a small pocket on them!! thank you for your great video
Joanne Stroud: What a beautiful baby. Great tips in the video, thanks!
Vaishnavi Naik: Every style is so beautiful and very much practical.. It's actually better than the readymade ones.. Loved it
Ria Rose Crafts: That baby is gorgeous! Thanks for the video tutorial.
Beansprout.31: I absolutely love it! Thank you!
haritha b: The baby is absolutely adorable :* and the head bands are cute as well, i personally liked the red flower one.
Dresean Browne: Totally love this video. Going to try them out for me baby. Fav is the 1 with the petals. Cute
Jenny Robert: Excellent tutorial. So clear. So neat!! Bravo And this baby is so beautiful. A real star
Kripa 29: I tried to make the first hairband in the video , every one likes it, my little sister also likes it.. Thank you sister
linda pucillo: What a cute baby! So happy and personable! Love the headbands. I will be making some soon. The only change is I will stitch them on my sewing machine since hand sewing is difficult for me. Thanks for posting.
Ms Williams: Thank you for this video! Very informative and easy to follow
Cherry Tree: I love it! Ur tutorial is simple and clear. ❤❤❤
Christine Lovell: You make these beautiful headbands look so very easy and I can't wait to try some for my newest granddaughters, Thank You!
Gwendolyn Foster: Love all of these, thank you for sharing!
Rose Ruiz: Love the headband and the baby, very cute! Did you make the bracelet he is wearing also? I would like to make one like it.
MeBe Chea: Love your ideas for these headbands , so cute..
Angiejamu: Thank u for ur lovely explanations. I love that we don’t need a sewing machine n that we are recycling fabrics. A big clap for u!
Jenitha Antony: I have tried the last one and it turned out awesome.Thanks for sharing your ideas.
Maureen O: Thanks for sharing this beautiful diys, now I can make some lovely head bands for my girls. the baby's smile is heart melting.
food nthusiast: Great tutorial! Imagine showing this video 16 years later. I wonder how loud he would laugh being dressed in cute headbands
Dominican Kandie: What a handsome boy . All the headbands are super cute! I love them all. Thanks for sharing
Ambar Boukhari: I loved the video! I'm definitely going to try it out! And I have subscribed (:
lakshmi S: Hi.. i made one for my baby. It went good... Thank u..
Aracelys Feld: Beautiful and easy too follow .Thank you.
Afshan abdul karim: I made them .. ty for the tutorial.. they are super easy to make
forever a learner: Wowww... Saw ur video for the v first time and it's soo amazing...how.simply u have made these hairbands.. its unbelievable kudos for the amazing content thankssssss
Nirmal: Easy to make with ur instructions, thanks.
Artistry Aesthetics: These bands are very cute and very simple ta make love it
tabassum tabassum: Awesome..it's too easy. n looking really nice... I'll try it on my baby..
indra manchanda: Very cute and the method is very easy Thank you so much
Alina Kaif: wow....thanks for sharing....i will definitely make these head bands for my baby girl...
Elizabeth Swan: Lovely, thank you for sharing, the baby is super cute.
Elizabeth Peter: I tried to make it and I did it is very nice ❤️❤️
بنت محمود: Wow !!! its sooo simple ....gonna try the flower one :)
Sanjana Shaikh: wow it's really amazing to do at home only for the babies thanku so much
Ncroad Trincomalee: Very simple and useful hacks.I'll make for my little sis❤❤
Niyatii Rao: very nice , creative and easily doing Ishpreet... Really good job !... Always looking forward for ur videos...
kaju322: They are all soo cute...and the baby too
Camy Itzy: You made my day!! I have some many old tahures i can use..was about to purchase some headbands for about 9 dollars each.. thanks love your Chanel
Tilly Sews: Simple and cute!
Vasudha Girish: The baby is sooo cute. I love his shirt that says "I woke up this cute" Love your ideas. Past few years I put on a few pounds. Can you give tips on what can be done to fit in my old beautiful clothes (of course I know losing wt is one option)
Cuenta App: Muy hermosa trenza
Shadeen Clifford: All of them is so unique wish I can do something like that
Jinali Shah: I tried this too... looks too cute
Alicia S: Great video, very easy to follow your instructions. That baby boy is adorable.
Loved2bFoodie: awesome diy! Loved it!
Kazi Jahan: I would definitely say thanks and you have very creative ideas indeed.
Natalia’s Vlog: Love your great ideas!
snehi talwar: awesome. I am surely gonna make all 4
Naazhadi Tabassum: all head bands are cute n well explained... ..
Megha Mehta: Awesome Wanna ask that are u using stretchable material or simple one for making bands?
My Green Nest: Thank you very cute tutorial
edidiong johnson: i love it , thank you for sharing with us.
glskfjrnndks jdontjsnf: Omg your baby is so cute and beautifull and your tutorials are so helpfull
Madhuri SunilMadhu123: Wow it's soo good , thank u sister it's soo cute
Praveen Rao: We loved all your videos .we made them too,it turned out really well. We are looking forward for many more videos.we are requesting u for 10 year girls headbandstyles
ashwini upasani: So swweeeett baby, and yes your tips r very good i going to make it for my 6 month old baby.thnx for the video
Nola: My husband is in the military, I wanna learn how to make headbands from his old uniforms for my daughter and for myself
truly a homemaker: Very easy to make and lovely...just wow
mikulcikivai&pavelsfam mikulcikova: absolutely beautiful i love it
F Gineh: Thank's, I will use these headbands myself
Saba Sayed: Awesome I will definitely try this for my 2 months baby girl
Michele Lara: i found it! great way to recycle.
Lori T Creations: I love all of them. Thanks for a great video
M0msie Jenny Random Vlog: so cute i cant wait to try these i did one for my baby she is wearing on my profile
Divya S: its very nice.. i will try for my dd .. love your works dear.. way to go by your passion :)
Winsant Store: Very beautiful headbands and super cute baby..... Wishing happy and prosperous life ahead for the baby...
Anjana Ashwin: OMG! Does your creativity have an end? Wow you are really creative. I love all your videos and your channel is the only one that I frequently watch.
Emelania Gonzalez: Muy lindo gracias
Nessa Lara Malapitan: I really like it thankyou for sharing
RAJANI SREEKUMAR: Thanks.Very easy methods and affordable.
anusha s n: such a cute baby loved it
Mili Dey: Thanq slick and natty. I just wanted to gift something to my 2 months old niece and your video came up. I made it. It was lovely. And my niece loved it. Thank youu
malavika nandakumar: Made for my baby awesome
Jinali Shah: loved all ur videos... learning a lot from u
Safoora Firdousi: i love it...i'll try...thnks for sharing
Harriet Lizzie: Though I can't do the head band, watched your video just for your creativity and for your cutest baby. Btw I am mom of twins boy and girl. Who is 3months now.
Syeda Ahmedi: awesome I tried to my daughter thanku
Tanisha drawing channel: I love this ideas, and very cute thank you so much
Little Chef Nidha: I tried it and came very well....
ICCR in Malaysia: hi i am just 10 yrs old and making a headband for my sisters daughter your videos were helpful thank you
Everythingliz: These are so creative.
Ramya Pramod: Very cute very beautiful & easy thank u so much for the vedio I going to make this for 40 days old girl baby
Ranjana Rani: I like the First one the most and I have make this one for my little sister
Ramly Ahamed: Love your idea
Mansi jain: tysm for such a lovely DIY.. I'm soon gonna be Bua soo hope to welcome a baby girl..soo i can make for her...
Emerald 💚: too cute
Onyinyechi VictorEbere: What's the standard measurement for sowing an headband for a baby of 2 month.
veronica lee: What’s the estimate length of the head bend
Amrita Varma: first headband looks awsum .. n its easy to make thanx4 sharing ..will surely make for my daughter
Floness Kadyamo: So cute, thanks
aman rataul: Thank you so much for showing resuse old clothing ideas as well
Neha Dayma: i m gonna make it for my cutie, n ya waiting for more such videos for toddlers, like their frocks and trendy jhablas
Merry Gea: i love love love love ur videoooo.....thank u so much, so i can make it for my twins baby girl
Jabin Memon: Really nice. But if we don't have old t-shirt then which fabric should we use for making these beautiful headbands?
Premi Thangjam: Your gifted.... Everything looks so amazing