Diy: 3 Ways To Make Stylish Headbands From Old T-Shirts
- Posted on 31 December, 2016
- Hair Accessories
- By Anonymous
Hi Everyone!!
Connect with me on:
.................................
Instagram: https://www.instagram.com/ish.preet.ka...
Facebook: https://www.facebook.com/slickandnatty...
Instead of tossing an out of style T-shirt or knit dress, why not turn it into a pretty headband instead?
In this video, I show you how you can make 3 different types of stylish headbands or hairbands from old T-shirts which you are no longer using.
Headbands are very popular and make for a very stylish hair accessory that can completely transform your look. There are tons of headbands available in the market but they are all so expensive.
Why spend so much money on these hairbands when you can make these yourself at home from your old T-shirts.
3 headbands shown in this video:
........................................................
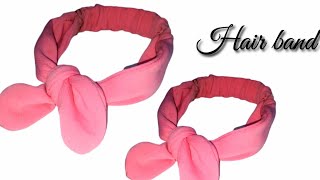
1. Knotted hairband
This hairband has a very pretty knot that looks very intricate but is very simple to make. Once you get the hang of how to make this knot, you'll get addicted to it.
You can even make this using strips from 2 different coloured T-shirts
2. 5 Strand Braid Headband
This braided headband looks very classy and elegant and is equally simple to make.
You can even make this from a black or brown T-shirt to match the colour of your hair.
3. Turban Hairband
This is the most stylish one and has been worn from time to time by many celebrities. It goes very well with a high or up hairdo.
Related Videos:
..........................
Make Infinity scarves from old T shirts: https://www.youtube.com/watch?v=A_q3Yi...
About our Channel:
...............................
Slick and Natty is a channel dedicated to helping you always stay in style, keeping you abreast with the latest in fashion and helping you stay beautiful with natural products.
We share with you lots of DIYs on how to reuse your old clothes and other waste materials.
For Business Enquiries:
........................................
Mail at: [email protected]
Let me know what you think of this video in the comments below.
Thank you so much for watching, love you all !! :)
Hi guys each prepare welcome back to slick and natty, so this is going to be my last video of this year. So very happy New Year to you all and in this video I am going to show you how you can make such cool headbands from your old t-shirts. These headbands are for grown-up girls. If you want me to do a video on headbands for baby girls, then let me know in the comments below so without any further delay. Let'S start, first up, I will be making this beautiful, knotted hair band for this headband. I have taken a medium-sized girls t-shirt. You can even de for men's t-shirt the larger the t-shirt, the better. It will be, first of all, remove the seam at the bottom of the t-shirt. Now we have to cut 3 strips from the t-shirt each about one to one and a half inches wide. You can fold the t-shirt into half and then cut the strips as it makes the job easier stretch each of the strip's like this, so that they curl inwards. You can here see the difference between a nun stretched and a stretch. Strip gather the 3 stretch strips like this and cut them open from both the ends. So now you will have 6 strips divide them into 2 groups of 3 strips each lay one of these in the shape of a loop like this and the other one in you shape over the loop now notice that the loop has two legs. One upper and the other lower on the side of the lower leg pass the arm of the you under the leg of the new and pass the other arm of the you under the upper part of the loop. Finally take the first term of the? U and pass it over the loop and under the second arm of the? U and out like this over the loop under the second arm of the? U and out the basic knot is now ready, just pull out the strips from the four corners in order to tighten the knot from the remaining t-shirt, cut out two strips and one rectangular piece about four into 6-inch. Give all of these a good stretch so that they curl inwards place the band around your hair to determine the you want place. The two strips on two sides of the band, depending on your desired length, attach these strips either with the help of hot glue. If you don't have hot glue gun, then you can stitch the strip like this now cut off the excess strips from both the ends. Finally, take the rectangular piece and fold it from two sides: now the two ends of the band have to be attached to it. Like this, so you can increase the length of this rectangular piece. If you want to increase the overall length of the band, I am now attaching the two ends of the band to the rectangular piece using hot glue gun. You can also stitch them instead of using hot glue gun finally fold. The other two ends of the rectangular piece inside either using hot glue gun or by stitching them to give it an easy look and you're pretty knotted hair pan is now ready. Next, up we'll be making this five braid hair band for this hair band take a large t-shirt. I have taken a men's t-shirt as done before, cut off and remove the seal now hold the t-shirt into half and cut out five strips from it. Each about two inches wide open the folds and cut open the strip's from one end stack all the five strips on top of each other like this and join them by stitching them together after this pull and stretch each of the strip so that they curl like This now we have to braid the five strips for this tape: the stitched end to a flat surface so that it gets fixed space out and place. The five strips like this start with the three strips on the left and braid them like you, would braid a normal three braid plate, starting with the outermost strip, bring it to the center, then bring the inner strip to the center, now shift up middle strip of All the five strips to the right side, so that now you have three strips on the right side, and now you will braid bees, beginning with the rightmost strip, bringing it to the center, then bringing the inner strip to the center and now shifting the center strip. To the left side, so now again you will braid on the left side as done before, and you will keep moving back and forth between left and right side. One thing to remember is that whether you are on the left side or the right side, you will always start braiding with the outermost strip. Keep braiding like this. At one point, the side seams of the t-shirt will appear tuck it inside like this, so that they are not visible once you are done, braiding place it around your hair to determine the length you need and now place stitches at two ends, depending on your desired Length cut off the excess braid, leaving a little margin from the stitch repeat this on the other end of the braid as well. Make sure that you keep your final length about one to one and a half inch lesser than your desired length, because the band will stretch when wound now it's time to bring the two ends of the braid together so that they overlap and stitch them like this. Finally, cut out a rectangle from the leftover t-shirt roughly about four into five inches fold, it from two sides and stitch its one end to the inside of the headband now fold. The other end of the rectangle like this and stitch it to the other end turn it around and see how neat it looks and your headband is ready. Finally, I will be making this very stylish turban style, hair band for this band. Again, I've taken a large size, men's t-shirt and I am starting by cutting off and removing the bottom seam. I will now cut a strip about four to five inches wide cut open the loop from both the sides so that you have two strips both about five inches wide fold. The strip into half such that the good side is facing inwards, now stitch on the edge like this repeat this on the other strip as well. Now turn the strips inside out to bring the good side outside for this attach a safety pin at one end push it inside now start pulling the strip down on the safety pin. The safety pin will emerge from the other side and then can pull out the good side and remove the safety pin next place. The strip such that their scenes are in the center now place one strip over the other in plus shape such that their seams are facing each other fold. One strip over the other, like this, finally bring these two edges and these two edges together and join all the four edges by stitching flip over the band to get a knee joint and your hairband is ready. I made this band with another printed t-shirt and it turned out to be super stylish. I hope that you like this video, do connect with me on my Instagram account, which is slick and natty. Thank you. So much for watching see you guys next time happy new year.
Comments
BloxyPlays: She actually taught us how to make french braid too while making the 2nd headband. Thank You ❤️
Chase Mitchell: I love how clearly you explain! Some tutorials don’t explain enough and it goes so confusing. But you do a really good job with it.
Lin Kreisz: Thanks for the very clear tutorial! I did have one problem that I finally figured out. I don't think you ever mentioned that when you cut your strips from tshirts horizontally that they roll to show the inside of the shirt. In my case I wanted to use a printed shirt but every time I stretched the strips they rolled to show the opposite side. I found out from another site that if you cut them vertically they roll to reveal the outside. They are less stretchy but I allowed for that and I have my beautiful side showing. I'm growing out my grey roots and really needed to make something to hide my skunk stripe.
Tanisha Sanyal: I tried all the three styles...they looked amazing... Thankyou for the tutorial
khushi Jain: I tried the 1 hairband just now... It turned out really beautiful ❤️
DuchessPinkbunny: Thank you for this! I've been trying to figure out what to do with all my scrap fabric. This is great!
Yojna Mishra: Actually the most stylish, I mean the last one was super easy to do..and the 1st one was easy as well..but 2nd was tough...I will definitely try these out.. thanks for giving these amazing ideas..some of my casual tops were worn out,but now I even use them again to prepare cute hairbands for me.. thanks thanks thanks thanks
Pineapple, Lemon & Watermelon: This was the best tutorial! I've been searching YouTube for how to make these and had no luck. All the other videos included more bloopers and intros than actual video. Your video was clean, simple, and to the point. Thank you, and I will definitely be doing this soon!
Ishita Singh: I tried the 3rd one and it turned out so well!!
Sofia E.: Thank you so much for this video! It's extremely thorough and helpful :) I'm currently growing out a pixie haircut so my hair is going through a lot of awkward phases and these beautiful headbands will help disguise that
Palak Katiyar: Hey, I tried the first hair band with two different colours n it looks so pretty n really easy to make..
Mary Woolley: This is brilliant. My hair is driving me mad and there is still no hope of seeing my hairdresser any time soon but a few hair bands will keep me going until then. Thanks for the clear instructions.
Koran_ 4e: Thx I love how you made it look very simple.. exactly what I need
Aashi Hadi: I really loved ur 5 braided headband and so I made 2 headbands.. Its super easy to make and looks so good.
Michele Lim: I love this!! resuse, recycle! Thank you for the great ideas <3
MegaAnezia: thanks for this tutorial, it's very clear and simple! I really needed this because I have long hair and the band is very trendy at this time but, unfortunately, the ones I like, they all cost a lot!
Crissy Jones: Absolute Genius, Thank you so much for an excellent tutorial and beautiful headbands
Sheilia W.: Very creative and cute. I'll be following your tutorial. It's just what I've been looking for. Thank you.
Lilliam Narvaez: Very creative and excellent ideas for this time at home. Thank you very much!
Suvarna Maji: This was the first video I've watched in this channel. And i have subscribed immediately. Thank you sooo much. You made everything so easy. I'll definitely try it.
Zara's Journey: This was beautiful and easy. Thank you so much.
meems: I'm going to try that out! It looks so adorable ❤:D
Meenakshi Padmavathi: Thank you do much for this❣...I did the 5 braided one it turned out be really beautiful
finia dame: Thank you for your ideas and I have made the first step and second step it really look nice and beautiful and I have already wear these bands thanks once again for you and good job
Sunita Mahto: I have tried all three of them and they turned out really well... ❤❤❤❤
Victor Lee: I tried it and it works so well! Good tutorial
monique dunkley: I love those...definitely what I'll be making for my baby girl
Raju Flower: I made the first two and it turned out stupendous..thnkz a loot..♥️
Komal Rangoonwala: Very well explained! I like the ideas! thanks for sharing :)
Pooja Karkera: This is the best way to use your old t-shirts. Thanks for sharing this DIY
Fighter: Tried the 3rd one and came really cute... Thank u dear...
Sanskriti: I tried 1st headband...it turns really amazing..it was giving that market Wala look..
Syed A Rehman: Wow I've tried third one and that looks amazing
Swarnava Saha: Tried the 1st style out. Turned out awesome.
Jami Lyons: omg! this is so easy and fun to make. keep making more videos
Radhika Karnwal: I tried all the bands and they came out with the beautiful look,I am very happy keep it up
Suman Lata: I tried it and it looks awesome .Thanks for its procedure .
Tutorials by Aishwarya: wow this is too good.. especially the printed band at last looks too cool
Ma. Elina Guillano: I so love your diy headbands. ❤️
Zeeka Desai: Heya... I made that turban headband n really it turned out to d best❤️...I loved it ❤️.. thank you so much ❤️
Jaiswal Pooja: i loved your concept of making hairbands. its really very unique from the other videos. keep it up. may god help you.
Aastha Mittal: i tried ur second one and in one try only i got my perfect band . really thank u for this idea
farooque patel: I tried this turban headband and it turned out to be aweeesomeee good work ishpreet
Ka Rma: This is exactly what i was looking for.. Thank u
Royal Princess_20: I made it... And it was fabulous
Sharwari Jadhav: Thankyou so much..made this..and it turned wow❤️
Neenu Pradeep: I tried it... It came out into a big success... Thank you So much....
《•Pastel Cloud•》: omg. this was so helpful, thank you so much! imma do the second one
Jasmeen Adiz: I tried the second oneits really beautifulthanks
Jenisha Raja: I'm tried this!! It come very well❤
Heta Patel: It's so easy and so beautiful
juliet bonilla 7: these are wonderful t shirt hair bands , i love your DIY'S thank you for sharing have a blessed weekend
k y: Thank you Soo much, cutting all my husband's good t-shirts now
orlendatube: THANK YOU for clearly showing how to do that knot on the first one-saw it in another video and it was just so slow, and annoying, and overly complicate-this made it much more understandable!!!
Ms. Kanika Dhiman: Super cool diys... I made them for me... They came out superb Thank u so much ji
Subha B: I tried this one came out beautifully
nikita mohite: I made the 1st one ..N it has turn out super cute ...I just love it
THREE LIONS: All ur tutorials r really very good & useful ,I have watched a few of ur video's but I really loved❤❤
Shalat John: Made the second one.. turned out good .. thanks!
Minati Tripathy: The second one is really easy, I will make that one for my DaughterThnks
komal shukla: Amazing thank you so much ...i made it myself yeppy
Selin John: Excellent.. The first handband really worked.. Thank you
Raghavi Raghavi: Wow what a easy method of making amazing hairbands
Shaquille Oatmeal: Amazing, mine turned out exactly the same
Nandysake Nandysake: Thank you so much for this hair band video sister:)
RAJASTHAN TOUR: Beautiful yrrr i love it i will absolutely try this thank u so much
Areena Krystal: I have tried the 2nd one and it was awesome Txs a lot for this awesome video
Bidisha's world: Your method is too much easy to learn
Sheffin Paul: Thankyou soo much...I was thinking about for buying a new one..this is very helpful.. You explained it soo humbly& clearly..... THANKS
Hafiz Ashraf: hey its really wonderful i tried this and it was successful
kim balisi: loving it! thanks for sharing.
Filza Qureshi: Love this headBands style..❤
Poulami Ray: I really love your videos. I watch them everytime.
Sujana Priya: Tq soo much for bringing these beautiful hair bands ❤️
Poonam Mehra: Hi ishpreet didi. I made the 1st one and it turned out so beautiful....
Penny Lane: Thanks for explaining how you did the headbands, all the other videos I watched nobody was talking, so glad you were. Thanks again.
Khaira Alesha: Thank you so cute!
Anjali: Absolutely wonderful !!
Impish Artist: Love this! Thank you so much!
Roomi Biswakarma: This was really very good hair band I try the first one and it was great
Harinder Kaur: Ĺovely video...i needed these kinds of bands and now i can make these on my own..thank u so muchh for this video..bands are super stylish
Mandeep Aulakh: I tried this and result is very good. My Dad had appreciated me a lot.
9 E 130024 HASINI B N: hey gurl uh are really amazing i just tried all of'em they all worked out uh just made it simple i want uh to make a DIY on hairbands like this ill support ur channel
Emily Ratan: The way you direct is simple to understand and amazing.
Sandra Solaligue-Pérez: A -M - A - Z - I - N - G ! ! ! I love them!
Priya Singh: Hi Ishpreet... wish you a very happy new year!! I have watched all your videos and really appreciate all of them. Could you please make a video on how to reuse or restyle bridal lehengas... thanks
Lamia: I made it thank you❤️
Taylor Jansen: Thank you so much for these hacks my crush said they looked cute and a popular girl asked where I got it and I said I made it she is my friend now thank you so much
zeena lewis: Lovely!! Definitely gonna try it...
Genji: Omg thank you for this, much love
parvez shaikh: Hey ishpreet thnx for the lovely DIY love it
Niranjana bhatt: Hi I am your new subscriber and i loved the way you clearly explain things i totally loved the video and subscribed and liked . Awesome
Alicia Martinez: you are awesome! i love all of these!!!! thank you :3
Aishwarya: Hey thank you it really works
_D_Paridhi_ Baranwal_39_: These r amazingtotally loved it
Komal Arora: Thankoo thankoo so much i tried all the headbands and it made perfect ♥♥
Jahanvi Patel: Very amazing and pretty ideas.
Priyanga Vadamalai: Hi!!slick and natty ur giving a very cool way idea's<3<3 I love it...very useful and very easy to learnt.. ur amazing!!!<3<3
Lucia Vivanco: You can tie dye the T-shirt’s for an even cooler look
Radhe Gaming: The second one was so interesting to do