Easy Diy Clay Hair Clips | Polymer Clay Ideas
- Posted on 25 January, 2021
- Hair Accessories
- By Anonymous
Today I've got a super easy DIY tutorial for polymer clay hair clips! This was really fun and seriously so simple, I love how they came out. I still have some polymer clay left so I'm sure there will be more clay tutorials to come Let me know if you try this one out!
Follow me on Instagram! I am actually a photographer so you can catch some of my work there and some personal life stuff : https://www.instagram.com/nimafatima/
#polymerclay #diyhairclips #easydiy
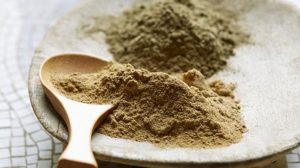
Hello, hello, hi, hi hi. So if you couldn't tell from my last video which why would you be able to tell this, i only did one video but i'm on a bit of a hair accessories. Kick in my last video, i did um one of those scrunchies that has a bow attached to it, and you know these like clippies, that have been kind of popular for a while. I saw on pinterest sorry. The lighting in here is terrible and keeps going in and out ooh. I would love some in and out right now, anyways i saw these types of clips barrettes, whatever you want to call it on pinterest we using polymer clay and we all know i have a ton of polymer clay which now we've made little dish ring dish things With and we've also made candle holders, so i figured i would use the clay that i have left to make some cute little hair accessories. So join me on this journey. I have no idea how these are gon na turn out. First, i have my clay. I'M using polymer clay as you know, but you can use any sort of clay that you can bake in the oven. It can also air dry, just some form of clay and then, of course i have these hair clips. So i have the like pop open clip situation and then i also have this alligator you'll need some sort of glue, i'm using e6000 glue, but you can use gorilla glue, any kind of super glue. You could use hot glue, but i feel like hot glue. Just doesn't hold up as well over time, and then i just have these various tools. This just came with like a polymer clay kit thing, but you can use stuff from your kitchen like a rolling, pin a knife whatever you want. This is just kind of if you want to carve out any designs in your clay, and then i also have paint and sandpaper polymer clay or clay in general also comes in colors. So if you want to skip the painting step, just buy some colored clay and then you don't have to do that part. So i'm talking too much and rambling. Let'S just do it alright, so the first one i want to make is this like like lines one so i have the clip out just so i can make sure i do the right length. I want to do it a little bit longer than the clip so for this one. I am just going to get some pieces of clay and roll them out super skinny and then try to keep it like as even as possible and not like lumpy and skinnier. In some areas try to keep it all right so now i have this super long. Skinny thing i don't know if it's going to be enough, but that's about as skinny as i want it so now i'm just going to so i want it about that length. So now i'm just gon na squish it together and then go this way and i did want it a little bit fatter. So i'm gon na make another. I'M gon na chop off this end and i'm gon na make another so far. It looks like this. So now i just have this like stripey piece, it's going to go on here, so i'm going to put this aside because i'm going to bake them all together, all right so for this next one, i've rolled just a perfect ball of clay. Well, not perfect! Nobody'S perfect ew, but i rolled this ball of clay and i just want to roll it out to have like, like a kind of like an oval shape. So now i have this like oval skateboard shape, and i want to put some shapes onto this shape say shape again. That looks like a hot dog. I don't know we'll see the beauty of this is you can do whatever you want? Next, i'm going to keep it simple and i just want to do just an arch. That'S it just an arch, so i've got my piece, i'm just rolling her again. I literally just want to do something like this, but i want it to be flat all right. So here are my three guys: they look a little wonky, but you know what that's the beauty of homemade promise. They'Ll look cuter in the end, so i'm just gon na pop these in the oven at 275. They'Re pretty thin, so probably only about 10 minutes is all they need, and then i'm going to show you what you need to do after because when they come out of the oven, while they're still a little bit warm and pliable they're, not completely hardened yet you're Going to want to arch it a little bit on top of your clip or barrette just to make sure that it will glue on and not be wobbly if these are too flat, because the clip is arched a little bit so we're just gon na mold it To the clip - and i'm probably showing that to you right now, because i don't need to re-say that again cut to whatever i was saying before. I think it's while it's still pliable, i'm gon na actually glue because it's wanting to pop back up. So i'm gon na glue, while it's still hot i've, got my six e600 six million whatever and i'm just doing one generous glue line here. I wanted to paint these before i glued, but that's not happening all right, so we're just gluing it down, holding it there for a bit and then this you're just going to want to let dry for a while. So then situate it where you want it and then kind of fold it. So it's really flat on the clip. I hate this one. I don't even know if i'm gon na show it in my hair, but here's a reveal. So you


Comments
Nima Fatima: Sorry the lighting is so all over the place! We're still not in the new house yet. Which also means, more DIYs to come. Thanks for watching!
Katie from Canada - Frugal Living: Ohh I love the first! Turned out super cute and your editing in this video is GREAT
Kayla Alexander: This is a great video and so creative!
Craft with A: So cute and easy to make
Sundays with Hart: So cute. great job.
dead39bunny: “Nobody’s perfect... Eeww.”