Half Head Wig Installation & Updo Tutorial ♥
- Posted on 15 August, 2014
- Hair Accessories
- By Anonymous
*OPEN ME*
Facebook: http://www.facebook.com/pages/Lisa-Car...
Instagram: oxlisalouxo
Tumblr: http://oxlisalouxo.tumblr.com/
Business Enquiries Only: [email protected]
Hey my Lovelies!
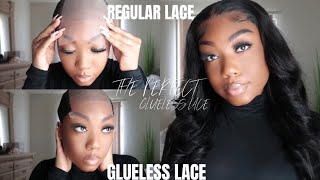
As many of you requested, here is a tutorial on how to install a half head wig. This time I went a step further to see if you could also use the half head wig as part of an updo, and it worked! :D
Massive thank you to my sister Emma, who acted as a fabulous model! Also thank you to Stranded who supplied the 3/4 Kimberley Wig!
The Kimberley 1/2 Head Wig is available in 14 different colours, and is 22 inches long. It can be yours for £30.60.
Stranded Info & Links:
Kimberley 1/2 Head Wig: http://www.strandedonline.co.uk/hair-c...
Stranded Website: http://www.strandedonline.co.uk/
Facebook: https://www.facebook.com/strandedonlin...
Twitter: https://twitter.com/Stranded_Online
Blog: http://www.strandedonline.co.uk/blog/
Instagram: strandedonline
ENGAGEMENT CONTEST: Every month I send out a little gift to the subscriber who has engaged the most as a thank you. The more you like/comment/share the better chance you have of winning. See my Facebook page for more info. Good luck!
Music:
I do claim to nor do I own rights to this music. It is by the artist; Podington Bear, and is called: Good Times. It is uploaded under a Creative Commons License and is free to download here: http://freemusicarchive.org/music/Podi...
Hi guys so today, I'm here with an exciting tutorial which is actually assuming that you guys have been asking for. If you don't remember a while ago, I did a 3/4 wig review that was sent to me and you guys really annoyed at me that I never so I did a tutorial for it. So guess what it's here now, with the help of my sister, I actually get to show you guys how to install it and also to do what different looks using the same hairpiece, which is pretty excited the Wonder weave. This is a packaging for it and it's quite simple: it's good that it comes in a buck from another back. It'S just got maintenance ideas, but this one in particular is the Kimberly weave and you can see the color on. There is midnight brown start enough, weave clean hair. It doesn't have to be a hundred percent straight, but straight ish is kind of what I'm, after just brushing it through to get rid of any knots when I'm doing now. Oh hello, fly is just section off the front of my hair. Well, my sister's hair kind of like you do with a quiff or a poof, but bringing it round down to the sides past the ears, because this is gon na hide the 3/4 wig which you'll see shortly. But before that I need to create an anchor for the 3/4 week, so it doesn't come out or anything like that. So just backcomb in sections and my sister's hair and then what I'm going to do is absolutely smother it in hairspray and let it dry for a little bit after that. I'M actually section off a bit at the bottom. So just continuing that first section round. In a circle shape on my sister's head and you'll see why, in a moment, but just putting all of this hair, she has so much hair in a bun about the messiest whatever. And then I'm just gon na tie this hair up at the bottom because, as I said, it's very important later on ok, create in the bottom main canal, more backcombing, more hair spraying and then we're just gon na flip the hair. Over and here you can see the Kimberly weave - it's very beautiful - it has this comb at the top and also the comb like teeth at the bottom, so taking the teeth that there at the top just gon na slide that into the anchor we created securing it With a bobby pin or a couple, however, you feel is necessary, and this is a bit tricky just pulling the end of the cap down to the bottom anchor. It'S really really tricky and then I'm just grabbing all of her hair that hasn't been tied into that bubble inside, so those teeth can actually hook onto the anchor I created. All I'm doing now is trying to secure it at the sides. It'S a little bit tricky. Trying to do it on someone else, but if you have a ton of bobby pins and you've got someone who doesn't mind you stabbing them with bobby pin it's not my sister, then you'll be fine, so you can see how it looks when it's on the hair. There is a slight gap, but just sawing through any knots and things right now making sure it looks so pretty, and this is how it looks like from the back it's very long right now. All you can see that I've done is put a quiff or a poof, whatever you call it in the front section of a hair. So the very first section of hair that I separate it - and this is the hair - that's at the side and all I'm doing - is twisting it because I'm just gon na bring it over and cover the rest of that seam like this look so right now, I'm Just gon na grab some bobby pins and secure that in place, and I promise it'll look nice so bear with me. What you're gon na do is just repeat the same thing. So grab your section of hair twist. It grab a bobby, pin and then section it in place there you go bit of force, I'm sure she don't mind and you can see here is a top view. There'S quite a few bobby pins in there, but I don't think it's messy same side. You can't see the join there, which I'm really happy about here we go. This is the first look with the quiff and the long long, his hair, which is fine, and it blends really really well with her own hair and from the other side, you can see that you can't tell right moving on to the updo taking that bubble. Out of all that hair underneath this is just gon na act as another cover for when I put her hair up so grabbing. All of that hair. Please note. This is extremely heavy, and all I'm gon na do is try my best to get all of this hair in a ponytail guys. You would not believe how much hair is a. She already have really thick hair, but with this three-quarter wig it is crazy. So the best thing to do is just start off with putting it up and then meeting it up sort of as you go along. You can see that bits of a hair are falling down that I need to sort out, which is what I'm doing here. So you definitely need a lot of bobby pins on hand, but it did turn out very lovely, just tightening the ponytail now and it's just going to take a lot of messing around. But here is how it turned out. I think it looks absolutely beautiful. You can see, I'm hoping you can't see this the join, but I really really loved how it turned out. It'S a really gorgeous ponytail. So I hoped you enjoyed that video and that it was helpful. You can do down dues and up dues with this hairpiece. So I really do recommend it. I can't remember exactly how much it is, but I'm not gon na plug it too much so I'll leave all of the info down below if the interested in go and have a look at stranded, hair pieces they're really inexpensive, and I was really impressed that I Could do it updo just saying my sister loves it? The only feedback that she had was that it could probably do with more teeth in the sides to keep it in place, because I literally had to stick loads of bobby pins in which she hasn't. Given me back so that's a bit annoying but ya know it did look really nice on that and she really liked it, but I hope you enjoyed. I should be having some Co detail review things coming up for you guys, which hopefully you'll enjoy, but for now don't forget links to my facebook, Instagram and Tumblr are down below. So if you want to come over and follow me, that would be awesome. But apart from that, I've already said that I will see you all in the next video bye


Comments
Not your regular Emma: The colour match is spot on!
Regina Hanson: Thanks! Love all of your videos. ♡
Kady: Your hair is getting so long! Lovely tutorial.
Jade Yo: Love it ! Deffo gonna invest in one :)
Kathryn Castanares: beautiful!!!
Ambzmariebaker: Thats goregous lisa. Well done. Looks fabbbb xx
Misty May: finally someone that left some hair in the back out to make it look more like her own ponytail the only thing I would have done was leave some more hair behind the ears to cover the sides better it still looks great tho
crystal k: Yay! New upload! Making my tea then watching...
Studio Blixje: It looks really heavy indeed! Doesn't it feel to heavy wearing it?
Emily B: You look so great! (look like you've lost some weight as well) ^_^
Chelsea Babits: what color is this wig that the client is wearing? i need that exact color?
TruckerRochelle- RachelRolandaHarrisBoyd: NICE!
Letroy Altidor: Nice
Mom of 4: Buy more wig clips or com s sew on yourself problem solved
Denise Jones: May have alook for my wedding I kinda know how I want my hair but I no il need more hair for it lol x
kia p davis: This girl obviously is not a hairstylist because she's installing the half wig wrong. The teasing is good for added security but the rest of the hair has to be up and out of the way.