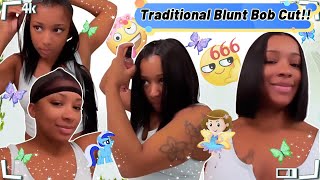
Straight Hair Tutorial - Short Hair Tutorial For Older Women - Hair Care For Color Treated Hair
Straight hair tutorial for women. Blow-dry and flat iron straight color-treated hair. Sharing all of my favorite products for hair care and styling.
Flat Iron/Straightening Iron - This is the best price I've found this - https://amzn.to/2YExPc6
Blow Dryer - Best Price I've found this one - https://amzn.to/2yvvhCF
All of my Hair Products - https://www.amazon.com/shop/justdoingm...
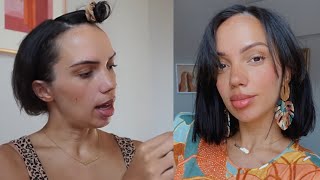
I have always suffered from a huge case of hair Envy. I want everyone else's hair, but my own. I have been like that. Probably since I was 12 years old, I see people I'm like. Oh your hair is so pretty. Oh, your hair is so pretty. Oh, I wish my hair look like yours, so the idea of people asking me for pictures of my haircut and wanting a hair tutorial baffles me, but today I'm gon na do it. I am done with just doing my best and I think I have the straightest hair on the planet. I can remember being in middle school and high school and everybody had such pretty hair and it took me forever and ever and ever to try to do those hairstyles and by the end of the day I just looked like, and I was just sick about it. But I think that we all just for lack of better words just do our best. So today we're gon na talk about styling, straight hair. You can see mine is about chin length and it's super super straight and I don't have a lot of hair. So if that's your hairstyle, that's what we're gon na do today and I hope that you will take a minute and you will find me on Facebook and on Instagram, say hi check out my website, where you can see all of my outfits and some of my Favorite very favorite products and the links - and I hope that you'll share this with other women who are just like us, we're over 40 we're over 50, and we just want to do the very best that we can with what we have to work with right now. So today we're gon na style. This super super straight hair. I think everyone has their routine and what works best for them. For me, what works best is I like to put my makeup on while my hair is what and then do my hair. I don't know why I think it just works better that way, but also I find that I'm not having to move my hair out of the way to put makeup on or get makeup in my hair. So this way it's just a little bit cleaner for me to put on my makeup on and then do my hair last now all the products that I use, I will link in the description of this video. The first thing that I start with is the color Wow dream coat if you've not used this. I love this for humidity. It helps keep the color, vibrant and long-lasting in your hair, but also it helps with humidity, and it was it. The other day my husband and I were going to church and I happen to check the weather app and on our way to church. The humidity was 97 %, so to say that I need something for humidity in this. Summertime is a little bit of an understatement and what's great about this color, while the dream coat, is you only have to use it? You spray it in your hair wet and you only have to use it every two to three times so you're, not using it every single time. So this bottle will probably last about six months. It lasts a good long time. I want you to know that, because I'm gon na say it's a little over twenty dollars, but you're definitely gon na get your money's worth out of it and it's activated by heat. So while my hair is wet when I'm putting makeup on what I do is when it's drying out, I just keep wetting it. I'M still putting my makeup on. I keep wetting it. I don't put this on until right before I get ready to blow-dry because, like I said they say it's heat activated, so I want to put it on work it through my hair and then blow-dry my hair. So that's the first thing so when I'm using this, like, I said every two to three times that I wash my hair in between time, I'm using the leave-in conditioner that I like or whatever product that you decide to use. But this is the one that I use honestly. I will be really honest with you with my hair, because it is so straight like mind-numbingly, it doesn't hold a curl horribly straight then it really does me no good to use a lot of products that are gon na do volume, and things like that. I personally have not found many of those things that works for me, because my hair is so straight and because our humidity is so bad. So, between the two of those I just kind of do the best, I can and then just say a prayer when I leave the house a while back, I finally invested in a really good blow-dryer and I'm so glad I did, and I will link that as Well, I do want to tell you, before I blow dry, my hair, that I could probably spend a whole lot more time with the whole holding, and you know curling and doing all that I probably could spend a whole lot more time on that. And would it help maybe a little but I'm gon na be honest with you and just say that I don't want to spend 45 minutes or an hour doing my makeup and then 45 minutes or an hour doing my hair. I don't want to spend that much time, so I spend the time doing my makeup and then I would I do my hair. I only want it to take about 15 or 20 minutes. I wouldn't do it and be done and leave the house, and so when you see me and you think, oh my gosh she's, not you know doing all of this all over her head, I probably could maybe it would help, but I don't want to spend all That time, so I'm just gon na show you what it looks like doing. My hair every single day. They say to put the dream coat on in a few sections and brush it through. So that's what I'm gon na do. I'M gon na brush it through and then I'm gon na start blow drying and one of the things that you will notice when I blow dry. I normally part on my right hand, side, which I do excuse me, but because I want more volume. You'Ll see me, while I'm blow-drying moving it over to the other side, when you move it over to the opposite side, one your blow-drying, then it gives you a little lift on the side. That is your dominant side. The side that you're going to work with normally so I blow dry a lot this way and this way because I need a little volume in the crown - and I want a little volume right here. So that's what you'll see turning the heat down a little bit, because I have it on the highest heat to skirt with well, it's very, very wet, see it does give a little bit of lift over here when I do that, but you'll see it doesn't. Last long, so could I spend more time on it probably, but it doesn't do a ton of good. So I'm just kind of keep grabbing grabbing grabbing aim and I only do it in a few places. So that is blow drying and then before I start styling it. I take a dry texture, spray and I'll also link this. But I take a dry texture, spray and kind of just give it a little bit of texture a little something to work with, and then, while I'm styling it, I also use a little bit of hairspray to kind of lock it in just a little. Now you see me when I'm styling use hair spray. I use it during. I use it after because once I get done, if it's not locked in by the time, I get three miles down the street. It just looks like this, so I need to. I need to kind of you know, give it some give it some hold power, but I remember when I was in high school and all the pretty hairstyles and everyone was using their curling irons and oh, I wanted that so bad and I worked so hard on It and it just fell straight so you'll probably never see me - do a curly hair tutorial because it just doesn't work for me. It doesn't work at all. So when the Flatiron came out, I was all praising the Flatiron gods, because this is my tool of choice and it's really the only thing. That'S gon na work for me, so you will only see me flat ironing and hairspray and texturising, and that is pretty much it so you'll see. I will show you what the back looks like at the end, but it's just kind of tapered in the back so and all I'm doing is I'm really just smoothing it out, smoothing out some of kind of the frizzy ends and just where it kind of you Know wants to kind of go a little crazy at the end, but keep in mind something when you're using your Flatiron see. If I can show you and show you well. So if you start with the Flatiron at the base and work your way out, you get a good kind of curve. Okay, if you I'm gon na, do it down here, because I can straight back up. If you go straight and then you turn, it see, you're gon na get the ends to go under like this, which is what I don't want. So I'm just gon na kind of make it straight and it doesn't want to go under anyway and it really doesn't want to go out. So even when that is super stylish, you know everybody was going out. My hair doesn't want to do that either. So I'm just working with what God gave me. So if I do when I come around back here, excuse me if I do start at the base and kind of give it a little curve like that, then what I usually do is is spray it so that it so that it stays in place, and since My hair is so straight, and it's not super long, and I really need to see the back until the end anyway. Just makes makes saving myself a little bit of time, so I'm just taking it in about two to three inch sections. You'Ve got a five inch on a five to six inch section here, but you don't want to use that much. You only want to do a two to three inch section and I started face, and I said I'm just giving it a kind of a curve is what I'm doing. So. If you can kind of kind of see, that's all I'm doing and then, like I said, if I get the perfect curve I'll put a little spray on it and just pray over it and hope that it stays but start from the bottom and work. Your way up, because if you start from the top then by the time you get to the bottom. So if I do this and then this and then this by the time I do here, it's gon na flatten out what I just did in the middle. So start from the bottom and work your way work, your way up, see I'm just kind of giving it a little bit of a curve in there. You see that I'm gon na show you again what I did with my bangs cuz. What I don't want is, I don't want it to be really curved in the front just a little. So what I did was I'm kind of move this out of the way, and just do this part for now and I'm just more going out and curving at the same time, that's uh, probably a little too much but as you'll see in a couple of minutes. It'Ll fall flat, so you are gon na kind of work with what you have and see what will, if it will stay. You know some people, your hair, even if it is straight, will hold a curl a little bit better mine clearly does not fit so now. I'Ve kind of made my way all the way around so now I'm going to do this part right here, where I want a little lift in my crown, see it's not a super big section. Can you see that it's not a super big section and I'm going to start at the base and do and work out work it out just a little bit and then I'll show you something else that I do a lot of time right in the middle before I take it up, give it a little bit of a tease and maybe even spray it before I run the Flatiron through it, and do you see that see it really kind of stands up, get a little rooster action going on up there. It won't stay like that, so I don't really. I don't really stress it too much so another thing that I do is when I've done that and I've got kind of my curve there, then I kind of spray it into place. Don'T know why I'm not linking that right there, but that is pretty much curling or straightening, I suppose, and now I'm just gon na style it and honestly, I just style it with my fingers, and I do a lot of this you'll see me where I need To spray it to kind of hold that little bit of a bump or a little bit of curve that I put in it, but what I do is I don't want a helmet. I want to have a little bit of texture in it. I want it to be PC ER, and so what I do a lot is, if I want to spray this part right here, I protect the part next to it with my hand, so that I'm not getting it all over, so I'm not just putting an entire Layer of hairspray on I'm really targeting the area that I wanted to get okay, so I'm gon na go ahead and style it. Now. Let'S see what happens before I start styling. I did want to say something about the Flatiron, whether it's a flat iron or curling iron um. You want to make sure that you're sectioning out your hair. Now I don't have a ton of hair, so it's usually never an issue. For me, my daughter, on the other hand, has enough hair for five people so for her it is super super important to brush everything, really well and use small sections to section it off. So if you notice that I didn't do that, it's because I don't have a but about five years of my whole head there, just a really close-knit group, and so I don't have to section off my hair and just do this part. I don't have to do that if you have a lot of hair, be sure that you're getting some clips see it doesn't want to stay up. There be sure that you're getting some clips and you're doing just the bottom section and then you're sectioning off the top and you're just doing the middle section. Because then, if you don't do that, what's gon na happen is when you run your flat iron through your hair you're, going to be creating permanent waves instead of permanent straights. He might stick straight anyway, but my daughter's is so thick and that if she's got tangles in it or she uses too much hair, then you're just gon na make pom Annette just where it's all going to want to stick together and map together. If that makes any sense, so I don't have a ton of hair, I'm not sectioning it off, because I don't need to. If you have a lot of hair, be sure that you're doing it in sections. Do the bottom then do the middle then do the top and use your clips and section and section it off whether you are using a flat iron or whether or not you're, using a curling iron, because you'll get a much better style and it will stay so Much better for you, okay! So now all I'm gon na do is I'm just going to style this and I'm just using my fingers and a lot of hairspray and, like I said, I will find a little section and kind of spray. It and then kind of protect the rest so that I'm not creating a helmet, I'm just creating some some pieces and some texture. So that is pretty much that and now I'll show you the back. Here'S the back and the side, and I'm just doing a lot of this when I am styling it now. I did forget to say that my favorite, shampoo and conditioner is it's a ten and I'm gon na link that as well. So if you click on the link in the description, one of them will take you to almost all of the products that I use for my hair, so that should make it super easy, but I would love to know if any of this helped. Please leave a comment and let me know if you have straight hair if you have curly hair or what kind of hair you have and if this helped, if you're here today, I appreciate you so much. Thank you for liking this video and subscribing. Please let me know what else you'd like to see in the future and I would be happy to help for now. I hope you'll go out today and you will be blessed and you will do your best.

Comments
Mendy Elliott: Thank you so much for this tutorial! Like you I have super straight fine hair. Have struggled all my life trying to style it. Perfect video! Awesome job!
Recipes For A Better Body: For someone with really straight hair, you sure do a good job if creating lift!
Emily Williams: OMG, this video is for ME! We have almost the same hair and style!! I was actually thinking of asking what products you use. My hair is a little on the oily side also baby fine!
Melinda Hofe: Nice tutorial Dawn! You have a great cut as well. How would I describe it to my stylist?? Thanks!
Amy S.: Very cute cut