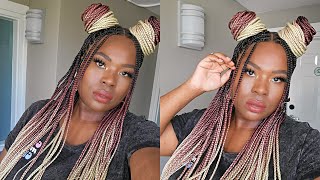
How To: Knotless Goddess Box Braids
This is my first time doing these braids and I LOVE THEM!! I wanted to show you all what I learned along the way so you can try it yourself with the advanced OR beginners method.
This style took 10 hours to complete, split between two days with many breaks. I have 93 braids in my hair total.
I ended up using:
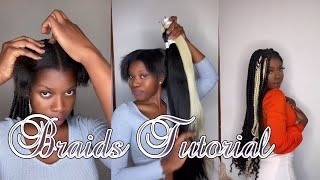
1.5 packs of Xpression braiding
Half a pack of FreeTress deep curl
1 full jar of Murray's Hair Pomade
For more videos, posts, and updates on curly hair health, you can follow my hair page on instagram: @Curly.Strands or Twitter: @CurlyStrands_
#CurlyStrands #DIYBraids #KnotlessBraids
Hi guys, my name is Natasha, and today I'm gon na be showing you how I do my own knotless SCOTUS braids. These braids are perfect for the summer, because they're super lightweight on the scalp and they're by far the best braids for healthy natural hair. Alright. So for products I'm going to be using all natural African shea butter to moisturize my hair, this Carol's Daughter, hair honey on my scalp and this Marie's hair pomade to kind of just slick, my natural hair, really nice into the braiding hair. So for the actual hair, I'm going to be using this expressions brand in the color 2, which is just a bit lighter than jet black and for the actual curl. At the end, I'm going to be using this free tres in deep twist 22-inch and the color 1b. So I just want to start off by showing you guys exactly how I'm parting my hair, and I really really want to stress making these parts just as perfect. As possible, because since these braids are smaller and they lay really flat, your parts are going to be extra noticeable. So you just want to make sure they're super clean, and you also want to part directly on top of the braid below it, so that when you start braiding, each one of them falls in between the two that are underneath it. And this kind of adds to that really flat and that flowy effect that makes these braids so gorgeous and also this is about the size box that I'm using per braid. I'M going to show you guys two different ways to do this in advanced way in the beginners. The advanced way. Isn'T that hard? It'S just one extra step, but it does make the braids look a lot cleaner. So I just wanted to show you both cards. So you can kind of choose which way you want to do both of them, though you start off just by braiding your own natural hair, about three or four braids down so to connect the braiding hair into yours, you're, basically going to just attach it to one Of the pieces of hair, so as you can see, it's kind of stuck on one and I just braid it as if it's not there and you braid down about two times and then you take these two pieces on the Left, connect them together and then continue. Braiding so you're just going to braid down a couple more times before, adding in your second piece of hair and I'm gon na show you guys each method three times, so you don't have to rewind or anything. So again, I'm just going to add this piece in and rest it on top of my head just kind of keep it out the way. So I braid down two times and then I connect these two pieces on the left. Pinch them together and continue braiding down as if it's not there, and this method is great because it just makes the feet in here completely invisible, and it adds to that illusion that the hair is like growing out of your head. So it just makes it really pretty so one more time, I'm just taking a piece this little and I'm putting it right in between my fingers here resting it on my head one more time in between my fingers putting it on top of my head and then Braiding it in two times one and then I'm pinching, those two pieces on the left holding them together and then braiding them into the hair. So this is about the width and the size of the braid that I want cuz it matches the rest. So I don't have to add in any more hair and I'm just going to continue braiding down alright now for the easier version you're gon na start it off the exact same way. It'S just braiding your natural hair down three or four times, but instead of adding one piece of hair on to yours, you're going to add it onto two pieces of hair and then start braiding. So this will be a lot clearer once i zoom in but again you're once you braid that piece in you're gon na braid down a few more times before, adding in your second piece of hair looping it on. So it's basically connected to two pieces and then braiding it. So you don't have to wait to feed in a second piece or anything like that, and it's not easier to kind of keep up with. You don't get confused as much so you're gon na braid down until you want to add your third piece and just one last time, it's almost like you're, laying it flat against the hair and kit when you're connected to two pieces, and then you just simply start Braiding it in and again this is the width that I want it, so I'm not going to add any more hair and I'm just going to braid it down. So I just wanted to show you guys the biggest difference between these two methods, and that is in the easier version. It'S a little bit more noticeable to see the feet in here, but you really need, like a magnifying glass to see it. So, in my opinion, if this is easier and faster for you, then you should definitely use this method. Alright. So if you ever run into this problem, where it kind of looks awkward and like there's like a loop around it, just means like you might have been braiding too fast and really all instead of undoing it, because I know that can be frustrating all you have To do is just kind of pinch it down and usually this is caused, because one of your pieces are too much bigger than the other, and so I'm going to show you guys just how to fix that. All you do is just pull some of the hair over and then connect it in the middle and then start braiding down, and you really can't even notice that at all so now is about the time to add in the curly hair - and I add on a Very very tiny piece, the smaller the better, because if you add too much, they will accumulate really quickly and before you know, you have a record and that's not cute, so I'm adding it the exact same way as the easy method. Also so this step here is totally optional. I just prefer to have my braids looking really crisp and neat and I'm not too attached to the length of my hair, so I don't mind trimming it just a little bit to make that braid. Look perfect. If you don't want to do this, all you have to do is just simply gel it down. So, as you can see, one of my braids is a little bit longer than the other, so I'm just gon na trim it in a downwards motion to give it that nice tapered look and prepare the hair for dipping tomorrow. So I give my hair a break between braiding and dipping to let all the products set in and dry in my hair. So this way you know if I just put a product in and then I dip it in water. It doesn't just wash right out, and it kind of helps my braids last a little bit longer too, and you can use just any conditioner on the ends of your hair to kind of detangle them and make them look extra shiny. And then I just spray it. One more time to set the product and I basically take care of it like I do my own hair for the last step, I'm just going to again cut in a downwards motion and remove all that excess fuzz to give it just a nice even shape at The bottom, so I just wanted to show you guys that I used all of the pomade in the container, so this, I would probably say, is the most important product to get if you were to get one. So now it's time for my favorite part, which is dipping the braids and I like to use a little bit of baby oil and my hot water, because it kind of makes your hair really shiny and it also rubs off on your skin and kind of gives. You this dewy look, which is again great for the summer, so really important. You only want to put the middle part of your braids and not the ends. If you do this, then your ends will just fall straight flat and your hair will be down to your ankles again, not cute, and then you just want to take a small hand, towel and kind of squeeze the water throughout the braid. You don't really want to rub it straight down, because this will make the hair kind of start peeking out of the braids, so to just keep everything nice and neat just squeeze down, and then I like to just pull it down one time onto the ends. Just to smooth everything up so last, but certainly not least, is nighttime care and I'm using this oil because it's specifically made for braids and it only has very light oils that naturally absorb into the hair. So it's great for keeping the hair moisturized and healthy, but not leaving a really oily residue or any buildup in the hair. So this also helps it last longer and I'm just using this silk scarf, that I got on Amazon and they have a bunch of different beautiful colors and I'm really just tieing it like a little pilgrim. And then I'm gon na pull the sides up tight around the top and it's basically just gon na protect my real hair at night, while the rest of it is kind of just flowing. So these are my final results and I just absolutely love them they're. So lightweight and really really light on my scalp and the best part is that you don't really have to wait for them to loosen up like regular knot, braids, and I can just immediately tie them up. I can put them in a ponytail. I can braid them and since they're so little and flat they just they honestly look like my hair straightened, so I just I love this. Look I'll definitely be doing this again. If you guys enjoyed this tutorial, I have a bunch of little mini videos on haircare and little do-it-yourself masks and just little tips and tricks to help. You take care of your own hair, and this is my natural texture in case you're curious, and you can find all of these on my Instagram page at Curley dot strands. Thank you guys for watching and please feel free to reach out to me. If you have any questions or if you do decide to try this style for yourself and, of course, be sure to like and subscribe, thank you

Comments
Angel J: The calmness of her voice, the patience and clarity in the video. THANK YOU!
Zoe Haynes: Tips for anyone who wants to try this method: 1. I’ve used this method and IT’S BOMB!!! 2. If your hair isn’t as thick as hers (mine is slightly thinner) add the braiding hair in sooner 3. When she says the braiding hair piece should be “tiny”, she means TINY! You’re going to want to make it thicker than it should be...don’t 4. You can add more hair as you continue to braid down (like she said) because IF you add too much hair too soon, the thickness of the braid will be really uneven 5. *Most Importantly* When you bring down the second leg of braiding hair (that was resting on top of your head) hold that newly connected piece AWAY from the braid and pull BEFORE continuing your braid. This will keep the braid as neat as possible Shout out to you girl for making sure we don’t have to struggle with this
janiah: Now I have to find 10 hours of time so I can do these braids
Lisa Lee: You're the 1st youtuber that ive seen that have actually showed how the feedin technique works.. Everyone else does it so fast that you cant follow what the heck they're doing. thanks so much.
Niyanna Smith: I’m finna be a whole hairstylist
Dayane Dydy: 93 braids and 1.5 packs of hair. Girl you're my new favorite when it comes to stay fly on a budget.
Khadidra Medford: Who else thinking the advance method is easier and more neat?! ♀️
Birgitta Denver: I literally just finished doing these for the first time by myself today, and my goodness they’re so full, it looks and feels so lightweight this video and this beautiful woman is Godsent. Thank you, thank you thank youuu for this video
iconick kuwonu: you definitely would be a good school teacher because you explain things so well
Miah Banks: I’m finna do this while I got this quarantine lockdown time looks so simple thank youuuu
samaria caesar: I have NEVER done braids in my life I cant even do a french braid. I did this method AND added loose hairs like goddess braids and I had people asking me where I got it done. this is the BEST tutorial.
Helima Jackson: BEST tutorial I have seen. Very clear and easy to see! Thank you for this!
Pr3tty Plus: I used to braid hair professionally. This is the best hair braiding tutorial that I have ever seen on YouTube. ❤️
Aalaya Cooper: I’m subscribing. Your voice is ridiculously soothing, your technique is neat, and your style is adorable and so natural! ✨
Shaina Smith: You inspired me to try this myself. First time EVER braiding my own hair and it turned out pretty good. It was hard for me to do at first but I got the hang of it ... towards the end so just redid some of the bad braids. Thanks for showing us how to do this in great detail you saved my pockets.
VictoriaEGordon1997: It's like you have eyes in the back of your head. Those parts were perfect. Pretty hairstyle!
Inky Kira King: These braids are perfect!!! The size and neatness makes them extra pretty
mmyersoi: Baby oil on hair when dipping is old school Yaaaasss!!! I'm going to try this on my daughter, then hopefully I can do it on me. I've been wanting something light and natural looking for my hair.
Amellehn: Girl! You need to put out more videos. I went to go look because this tutorial was BOMB. Keep it up, good video.
Kyera Minor: girlll you make me wanna do these TONIGHT lmaooo this was so helpful and clear! thank you for this video
Eden S: This is the best tutorial I've ever seen for this style! I decided a while ago to stop going to braiders bc every time my hair is ripped out and my edges are non-existentThanks so much for this, can't wait to try!
Denise: Wayment... I can probably do this! Thanks for getting right to the point. it's gorgeous!
jusDenyse: Yes, my client said these braids are perfect because of how light they are. You did a good job boo, super cute
Keyrell Wingfield: GIrl! why did I come across this and I didn't even realize it's you! So proud of you Nat and really growing in your natural hair journey!
Jaja: I appreciate the detail! You make it look so easy. Can't wait to try
Centeera Plummer: Thank you!!! I got the method in like 2 seconds love your teaching style
Vicki Combs: Great detailed tutorial
Vivian McCray: Love this. Your hair came out beautiful. Think I’m going to try this on myself this weekend
Jadorecoco: This is honestly the best and most understanding tutorial I’ve watched on knotless braids. Both methods seem so easy! Thank you for showing these methods
Vivid Rose: Girl !!! I thought the first method was the beginners. ❤️❤️❤️ Wish I would've saw this before I did mine!!!! Awesome tutorial!!!!!
Cassie S.: Wow you make it look so easy. You did a great job explaining how to feed the hair in.
Nina Williams: Absolutely getting ready to try this - great to the point tutorial, soothing video , beautiful idea and work. Thank you so much!
Dime Store Deva: Thank you for a close, easy, detailed braiding pattern! I can braid my daughter’s hair!
Jay-Kayla: Definitely will be trying this soon! This looks so good!
Lanellsia & Wilfred Hamilton: Very beautiful! Thank you for the tutorial:)
Jiah Lee: Thank you! Been looking at getting this done but really don't want to pay 300+. You made the tutorial super easy will definitely try now!
Kimberly Michelle Thomas: Hands down the best knotless tutorial I’ve ever seen, bravo!!! Also this here was pure sorcery
MrsPO: This is the easiest and most proficient tutorial I've ever seen. Thanks so much!
Dantavia Haynes: I did this style over the weekend and it was incredible! Thank you so much!!
That Woman British Innah Yaad: I'm gonna try this, love it
Vee Jay: OMG! Because of this video, I am sitting here doing my own braids for the first time and am doing a pretty damn good job! Thank you so very much for the close ups, the repeats, for being thorough and going step by step, and for the two options! The first step was much easier for me than the second one. Your video has so far been the best that I've come across, and it's been over a year since you posted this. Thank you so much!
Yasmine Elmi: I’m obsessed with this look I’m going to send you the final results on Instagram when I do it I know I’ll love it
Ayesha Laremont: This is gorgeous! I will be doing this tomorrow!!! Thanks this is the best tutorial that looks super natural.
tola: ✨Best box braid tutorial I’ve found on yt. Thank you for showing closeups of the steps and not speeding up the video.✨
Zay- ellé: Wow love this so clear and to the point ! Finally giving me confidence to do this style
Jasmine Jones: Best tutorial hands down! After watching a TON, I finally feel confident enough to do them! You’re so gentle & thorough with your explanation. I love it. TFS ♥️
TheGoodWtchDr: Best feed in tutorial I’ve seen thus far. Thank you for your clear instructions, tips and black girl magic ✨ keep shining. I support you #SUBSCRIBED
M Charmayne: Very thorough and thoughtful explanation!!! Thank you beautiful ❤️
Urban Mala: Thank you for this tutorial!!!!! I just finished my hair. It took me about 12 hours....I did it over the course of 3 days. The braids are sooo light! I was able to put them in a bun right away. When I take these out, I already want to do them again! Lol. Great tutorial! And, for the record, the “easy” version is definitely easier than the advanced! Lol.
daije banks: I love the way you showed this.! I feel like I’m a real braider you’re a sweetheart and genius thank you
Lauren: I love how clear and simple you made this tutorial seem thank you!
Courtney Martin: You did an amazing job explaining this!!!!
Jess: This is definitely the best tutorial I’ve seen. Thank you girl ❤️
Tanya Jané: This is by far the best knotless box braid tutorial!! Thanks for sharing I can’t wait to try this style on myself
Dipped in Shanelle: this was a GREAT tutorial! i’ll be trying this next week thank you so much!
Miss Understanding: Love your hair!!! Both the braids and the natural curls look gorgeous on you!!! Great tutorial!
rawrXD🙃: Wow. This was honestly the best tutorial for natural hair that I have seen! It was so detailed! Thank you so much for taking your time❤️
Educator Kae: Such a great tutorial!! ♥️
Jbelovedson: This is the cleanest and clearest tutorial I’ve ever seen of how you feed the extension to the braid.
Vivette Wilson Brown: YOU did a great job. I love the ease of adding the braiding hair!
Kandidly Kriss: This was a beautiful tutorial
Species Unknown: I just want to thank you so much You have made the most comprehensive simplest tutorial so that I can set forth and do my daughter's natural hair and I love the minimal products that you use okay thank you so much
NYMahogany: Gorgeous results and your instructions were superb!
La Tasha Michelle: You did an amazing job on the braid tutorial. Your hair looks beautiful, neat and healthy. Keep posting the tutorials. They are clear and informative.
Amberly: First video where I feel confident that I can do them, THANK YOU!!!!
Tia McCullough: Came across this video as a recommendation. And I must say this was such a soothing and easy tutorial!! ❤️ Loved every bit of it. Had to subscribe and save. Beautiful outcome and beautiful woman.
Shieka Brooks: Thank you for this video. I'm always trying to see how people DIY in the front and you definitely executed that perfectly. Thank you thank you thank you
uhitshaleylol: Love this video, the camera angle is perfect and you explained everything perfectly! ❤️
Kieoni Lynn: Wow! this was the best tutorial out of all the ones I’ve seen , thank you girl ✨
MEME LASHEY: You did a DAMN GOOD job. Im definitely going to be using this video for braids
Ebonii Hodgers: Thank you for making this video. You explain the methods so well for beginners! I used to struggle feeding in the hair. This was perfect. I finally had success doing this on my own.
Kezia Saul: This method is soooooo easy to follow. Way easier than every other tutorial I’ve seen. Thank you for being so thorough and detailed. I will be attempting this style this week.
Bria Boyd: I needed this tutorial in my life
Danielle Criss: Wow, thank you. You explained and demonstrated the process so adequatley! amazing <3 my next summer look
Olivia O: I’ve watched so many tutorials and this is hands down THE BEST EXPLAINED AND THOROUGH knotless braids video. Thank you.
Life of KASH: You did a fantastic job explaining this! Thank you.
ChantayLainey: I ordered my braiding hair today to go to a salon, but now I feel like I can do them myself after watching this! Honestly the most clear tutorial I’ve seen on this. And your voice is so nice and soothing lol
Claudia Amon: Thank you so much! You made this super simple and easy. Can’t wait to get started on mine!
Cherl Lowe-johnson: Nice job Natasha, & thanks for showing us the process! I'm going to try on myself, practice then do it on my daughter's hair. Maybe not as long (bra strap length) but it will come out just as beautiful. I have braided my hair off & on for years since cutting off the perm & wearing a short afro 10 years ago. Natural styles for 6 yrs & I got back the thickness & healthy hair (good shrinkage & elasticity). Thank God!! Now it is pass my shoulders & I'm researching how to get it bra strap to waist length in 3 or 4 years. Thanks for your tutorials & encouragement!!
Alexandria Martin: Girl this is honestly the best tutorial for goddess braids! Thank you so much I'm doing this myself for my birthday next month!
Ile Bailey: Wow this is an excellent tutorial. Thank you for filming close up, giving very clear instructions and keeping video under 20min!
Diyah Ambi: This is absolutely THE BEST braiding tutorial I've ever seen ❤ Thank you
Jasmine Dean: Omg I’ve been looking for a good clear tutorial for months now!! I finally have the confidence to try these. Thanks girl ❤️
B H: Literally the BEST TUTORIAL I have ever seen and I’ve watched ALOT. Thank you. I actually think I can do this now
Lyndsey H.: this is honestly the best braiding tutorial ive ever seen. its so detailed and you explained what to do so well
Raquel Lauderdale: Wow she really made me feel like I can take my time and do it myself ❤️
Gray: First time viewing this channel, this video, and I really appreciate thoroughness of this tutorial! I'm definitely trying this look out. I am a beginner braider, but feel confident I can do this look after watching this. Thank you! Subscribed!
Nicky Daley: So freaking beautiful! I'm going to do this tomorrow, great braiding tips.
Domi's World: WOW. you are such a good teacher! I never thought i would try my own braids, but after watching this... i think i can do it.
Coco: This is the best tutorial I’ve seen and I’ve watched a lot. Simple to the point and easy to understand/follow. Plus we got to see a beauty and her braids Thanks girl!
TheBrownIsland: *_You're the only one who show the correct way on how to feed-in braids_* The others are flying through it like Speedy Gonzales to where you can't even see or tell how to do the feed in braid. They only show one side Not even very close up. You should have way more likes & views.
LoveSabrina: This is the best tutorial I’ve seen Thank you !! Can’t wait to try this ✨
Jalessa Bragg: Her parts are so satisfying to see These are some beautiful braids omg I’m so excited to try these
Miss Meredith: That looks beautiful ❤️
Jasmine Waynes: This was soooooo great!!!! Everything about this was perfect!! Thanks. Good job!!!
Shaniece Mullen: Best tutorial.. hands down Thank you for this video girl.
Rhyaaa F: This is probably the best braiding tutorial I’ve ever seen. The instructions were easy to understand and you took your time explaining how to add the hair into the braid. I’m definitely trying this!
Carlan Thomas: This was a really good tutorial!!! The angle you showed every step made a huge difference. Can’t wait to try it
Naeem Madatt: I love this so much, you made it seem so easy
ShantieMcK: This is by far the simplest & most detailed video I've seen on knotless braids from the many I've watched. Thank you! I'll definitely be braiding my own hair and saving my coins.