How To Do Knotless Box Braids On Yourself | Tips & Tricks For Doing Your Own Hair | Very Detailed
Hey babes! Thinking about attempting to do your own knotless braids? I gotchu! Here's everything you need to know compiled into one video. Leave questions down below, I hope this helped!
Tri mirror: https://www.amazon.com/dp/B097GY776X/?...
Hair used: Outre Twisted Up DIY Pre-Stretched Hair 4x
Shine n Jam
Rattail comb
IG: https://instagram.com/outre_hair?utm_m...
Enroll in my course here: https://indybindybraids.teachable.com...
indybindybraids.com
✰ FAQ ✰
Where are you located?
-Orlando, Florida near UCF
how old are you?
-21
what do you use to edit?
-vllo and final cut pro
where are you from?
-Miami, Fl
how long have you been braiding?
-4 years
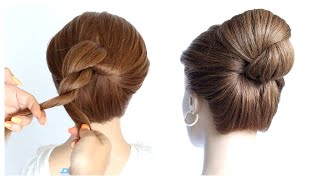
Hi babes, i just did these medium knotless braids on myself and i'm going to show you guys what i used and how i did them. So the materials that you're going to need are outrace twisted up 4x diy pre-stretched, braiding hair, and i got the color 2t1b violet. This braiding hair is great for knotless braids and comes in 40, 50 and 60 inches. It'S also very lightweight, but still full when it comes to volume, a rat tail, precision, comb that has a rat tail edge and shining jam, and i use the yellow one so step. One is going to be to part down the middle from the front to the back and a tip that i use is to line up my comb in the middle of my nose to make sure that my part is in the middle. And i am going ahead and using the rat tail end of my comb as well as my tri mirror, to make sure my part is straight at first, it could be a little intimidating trying to maneuver your comb with your hands because you are essentially doing it In the mirror backwards, but with practice and time it definitely becomes a lot easier. So next you're going to use your shine and jam and place it directly on your part and then you're going to re-part it with the precision edge of your comb. Just to make sure your part is as crisp as possible so now we're going to do the same thing, but horizontally from ear to ear and you're, going to make a t party, essentially from ear to ear and directly down the middle of your head. The row below the top of my ears is going to be my first row and i'm going to base the size of every row above it off of that one. So for this sizing i did medium and i did six rows in total, make sure you're using a brick layering pattern, which means that the boxes are staggered on top of each other to make it full, but not heavy. So, let's talk about how much hair you should be pulling out of your bundle. I like to keep my pieces small so that i have a lot of room to work with the size of my braid and if i want to build up on that size. I'Ll add more pieces or if i want my braids to be smaller i'll, add less pieces. So i'm going to start off by showing you guys how i do my overhand method of installing a knotless braid, and i find this one to be a little bit easier. Once you get the proper hand positioning down to do it, because it allows you to have more grip, so you're gon na first start off by splitting your piece into three sections. You'Re gon na grab that right piece with your right hand and the middle and left piece with your left hand. Now i am right handed if you're left-handed, it might be opposite for you just do whatever feels most comfortable. So i'm going to scoot my hands closest to the base of my head and begin braiding. So using your index finger and your thumb you're going to go underneath the middle piece grab the left side and do the same thing to the other side. Go underneath that middle piece with your index finger and thumb and grab the right side. This video is not mirrored by the way it's not flipped backwards, so you can literally watch this video place your hands behind your head and copy the same movements that my hands are doing so now we're going to add in our braiding hair, so you're going to Hold the braiding hair in between your fingers and place it in between your index finger and thumb. That'S already holding your actual hair. You want to make sure that the strands of your real hair are lining up with the strands of the braiding hair and again use your index finger and thumb to go, underneath the middle and grab the other side. I prefer to do the overhand method for braids. In the back of my head that i can't necessarily reach by turning my head, so this method is easier for me, but you want to make sure that you're also keeping your fingers and your hands close to the base of your head so that you're not pulling On the braid - and it's not falling apart as you're trying to braid it, but the process is the same you're, going to continue adding pieces to the right side until the braid is the size that you want. For me, i did add about eight or nine pieces in total, but as these braids are super long past, my butt, i did add more strands toward the bottom of the braid to make it longer, but toward the top i added about five pieces. But honestly, i don't really count how many pieces i'm adding as sometimes the hair in the back of my head, is thicker than the hair in my front, so i just add pieces until my braid starts to become the size of the ones around it. So throughout braiding, you're going to see me touch the base of my braid, and this is just to make sure that it's not twisting as i'm braiding down and after i get about an inch or two down the braid, i switch my hand positioning find the three Strands that i was braiding again and just continue to braid down, this is just to be more comfortable and, if you've ever tried to braid your own hair you'd understand what i mean. You can't really continue using the overhand method with your hands in that position, just because, as the braid starts to get longer, you have to change your hand. Positioning do this is where i added in those extra pieces to make my braid super long. So i usually add one right about where my real hair ends and the braid starts to get a little smaller i'll. Add another piece to maintain that thickness down to the point where i want it to be. Once i've decided that my braid is as long as i want it to be i'll, stop adding pieces and just continue to braid all the way down to the end. So now we're going to move on to how to start a knotless braid using the underhand method. This method is very similar to the overhand method. The only difference is that i'm using my middle fingers to lead and go underneath that middle piece, my hands are also angled inward, as i'm braiding, with more of the underside of my hand, therefore underhand braiding. So we're going back to step one split, the piece into three sections, and this time you can see my hands are facing the braid and angled inward. So this time, instead of using my index finger, i'm using my middle finger to go ahead. Go underneath that piece and add in the hair with this method, i add the piece of hair in between my middle finger and my index finger and continue to braid. I prefer to use this method when i'm on the sides of my head in the front of my head, and this is just because i'm able to actually use my hands to reach, as you can see my head's like kind of turned a little bit, and if I try to use this one in the back of my head. It'S just a little difficult and i literally have to twist my neck like an owl, so this one's really helpful to use on the sides, the front and the top of your head, making sure that you're keeping your hands as close to the base of the braid. As possible is going to make sure that it's tight and it doesn't flip, sometimes you'll - see me pull on individual strands to kind of angle, the braid more in the middle of the box and to make sure that everything is tight and the way i want it To be again, i do switch my hand positioning to make it more comfortable for me, as i'm braiding down the braid, so now it's time to boil our hot water to seal the ends. So i use this kettle by fairway, but you can use any kettle. You can boil your water on the stove in a pot, doesn't matter, but you just need to boil it and make sure that it is boiling hot. So make sure you have a towel handy as well as a pitcher that has a handle on it or you could use a container a cup, but i do recommend something that has a handle. So you do not drop that hot water on yourself, while dipping i'm going in an up and down motion to let the water straighten out the ends, you don't want your ends to be all crinkly and crunchy. Looking after dipping, i go ahead and use my scissors to snip off any tangles or any pieces that just don't match the rest of the braids. And finally, the last step is to add that mousse, the mousse that i use is vigorous olive oil mousse. And it's about a few dollars at your local beauty, supply store, and this mousse is just gon na set any flyaways that i have in place in total. This style did take about eight hours, but i broke it up into two four hour sessions with a big sleep in between. So this is what my parting's looking like. I did six rows with 45 to 50 braids in total, and this is the final look. Thank you guys so much for watching and if this really helped you out, please let me know down in the comments or if you have any questions or comments. Let me know guys. I really hope this helped you out, if you're trying to do your hair for the first time for the second time anytime and do not forget to hit the subscribe button to see more videos and content like this. I love you guys so much thanks for watching. You


Comments
Mrrae: This is a great tutorial! I’m currently on day 3 trying to finish my braids with two random dookie braids on top as a result of me having no motivation lol These are beautiful
Concetta Green: Okay, I did mine this weekend and they came out GREAT! Took a Fri night and all day Saturday but totally worth it. Parting is the hardest-I had to ask someone to help since I don’t have the 3 way mirror yet. Thank you for another great tutorial!
new move: I'm definitely at the point where I need to learn to do this for myself. They charge $200 minimum to do these and I bring my own hair. Between me & my daughter... It's alot of money especially for mediocre service. Thank you for this video
Keshe Bby: you snapped with this tutorial chile! very detailed! I've been trying to get mine to look exactly like these but they always come out too thick and heavy :( but nowww (thanks to you) I know that I just need to use smaller pieces so I can build it up to my liking. thank youuuu! I'm doing these tomorrow lmaoo
Asia Wasia: ive BEEN lookin for detailed tutorials & could never find one that i like but LOVED this one , you really showed step by step what to do, the arrows are a big help as well
Slay Cj: This was an awesome tutorial! I never knew tri mirrors existed! Although I already know how to braid my own hair, I don’t know how to feed-in, but after this I think I have the confidence to at least try it again! ☺️❤️
Plant Lover111: This was an awesome tutorial!!! It’s the first one where I can clearly see how to add in the hair!!! Thank you!!!
Feelisahtee: I love seeing these videos. I need all the DIY techniques I can get
Alexa Rexach: This tutorial was great! Very detailed, & the arrows were great too! You really have me believing I can do these...
missK: I love your tutorial! its very detailed and informational and easy to follow!
MoonHoney Mami: This is amazing I can’t wait to try it out thank you beautiful girl
Tia Say: Yes,so cute! I’ll be doing my own braids this weekend, could you do an After-Care video? How you upkeep your braids/wash your scalp/maintain your hair? Love the look but can’t handle having it in for more than a week!
Alexandria Monet: Doing this today! thank you for the over AND underhand method!
Placed1rst: You are an excellent teacher! It finally clicked for me after watching your video. Finally did a decent knotless braid! Bless you!
Ashley Wizard: This was SOOOOOOOO helpful. Thank you so so much ❤️❤️❤️❤️
Melody Gilliam: Best DIY tutorial I’ve seen, very detailed. Thank You!!!
Felincica Garrett: By far the best knotless braids tutorial ✨️
LifeWithEss: Great vid! This is exactly how I like my braids as far as fullness. Knotless are not supposed to be heavy/thick!
Ebonie Woodruff: these are pretty . I’m ready to do me some now
Whitney Hayes: Omg great tutorial. Thank you for slowing down and having your fingers visible. Thank you so much. Going to try this week
JERZGIRL: You are the MASTER TEACHER!!! Thank you for your tutorial…. You did that!!!!
Salon Shear Brilliance LLC: Great work that’s awesome thank you for sharing! Wow
Shonka Hall: Great video!!! This is the best feed in tourtorial that I've seen!!! You make it make sense!! Thank you!!!
Dayna Bledsoe: This helped me so much and it’s easy not complicated To watch
Theresa Thomas: This is the most detailed video Ive seen yet!!! Thank you.. Im gonna try today.
Martine G: Thank you. I really needed this.
T M: This is oddly relaxing to watch! And they came out bomb
Courtney Nel: I have knotless braids I did on myself in right now but I just haddd to click this bc you’re the best instructor and I adore your voice
Jayden: This is so beautiful!! It helped me a lot. Could you possibly for a video over some hairstyles and how to maintain the braids?
modeste : Used your vid to braid my hair for the first time it was very helpful ad detailed so thanks a lot fo that!!! Had a friend to help part because that is still hard af for me to do bymyself still
Valerie Jones: Yes thank you for that step by step helped out a lot
Kim Sue E: Nice job! Your hair looks great! I hope I can do as good a job as you because i have to redo mine theyve been in a week and wrong hair making me itch!
Sheena Lewis: Great tutorial!
sasha dinnall: Best one yet… thanks for taking your time darling Now I can go be great
Concetta Green: I think I might try this. Thank you!!
Sharay Ackwood: You definitely help me start cause adding the hair was a illusion to me now I understand (beginner) but more practice I’ll get it braiding my own hair is easy but Thnk god u helped me understand adding the hair
Rashonda Davis: Beautiful awesome job
java watson: Simply stunning
E Jefferson: Awesome tutorial
Julie Isse: Looks beautiful
Anastasia Bennett: Waiiit I never knew how to get the braid longer lol so thanks also I need a tri-mirror now
ShanniTheGreat: I was four rows on when I loosed my braids to start over and do it your way
GeetSlapped: Thank you wow so detailed
Latisha McRae: Love this video!!!
Ari_Aesthetics: Easiest video I’ve come across
Ashley 🦋🤍!: Thank you for the video✨!
Sibongile 'Sboza' M: And hairpiece doesn't tangle on your lap... Looks so so easy when watching, will definitely attempt especially since I watched your 1yr ago tutorial... U r the plug
Latanya Bradford: Thank you ma'am.
Elizabeth Sagel: Looove this
Liltyi: This really Taught me how to braid like I love her
Jasmine Ward: Great video!
im: how do i prevent my natural hair from sticking out of the braid?
Kryssys World: Ok I'm subscribing this the best tutorial thank you
Vivette Wilson Brown: Good job!
Sirius jazz: My God, thank you very much, I waited a long time for a video like this (sorry for my English, I hope you understand me )
maya teague: yasssssss you did a great job chile. where did you get the 3 way folded mirror? please
Melissa M - Naturealizta.beauty: Good video sis!
Jayda Barcena: So talentedsuch great content
SARAH !: I follow you from France, thank you for the video sis <3
chantal williams: how many pack of braids did you used ?
Sarah Johnson: Hey I Really Do Luv Your Knotless Braids Right Now.
Elsa Gebreselassie: I love it i we try and thanks for everything
DaughterofZion😇: The bestttttt tutorial everrrrrrrrr I’ve been looking onto this yt for sooo long Smt Thabksssss boooo❤️❤️❤️❤️
mythoughts 176: BEAUTIFUL
SAKAM: So parting took 3 days? Lmao the front is my best part sorry for the back ion got time but yours loon bomb!
Dawnshia Hargett: How many packs did you use ?
Valeria Reyes: you’re my favorite youtuber
Khaliyah Liyah: I guess I'll try again for the thousandth time
Island Gyal:
Amaka ozobia: Where did you get the mirrors?
ohkc: I’m really not understanding the grip I guess, this is like the 8th video I’ve watched, all detailed and straight forward but nothing is working. Maybe bc my hair is shorter and I can’t grip my actual hair as well ):
quanita bailey: I’m trying to learn how to lock at the root I’m having a hard time
Heyitstahiraa: I struggle with adding length
Abigail Tamera: Where did you get your tri mirror boo?
Avril Andrews: Nicely executed.
lilly💞.: The tri mirror link isn’t in your description btw I really wanted to buy it I’m 13 and my moms tired of doing my hair so that mirror will be really useful
Bertilla ogechi: Bindy u are by the best
Tiblets Abraham: Thanks
Just Me: Aww.... a pretty young princess. Nice style.
Namithalie Mendes: Beautiful girl
Nabuuma Claire: How many barids do you used
Moyann Campbell: Just to note she adds hair every second plait
Петр Ди: Apreciando a una mujer tan hermosa. 2:2 sentadillas son unos SEXBABY.Uno muchas y un buen ejercicio. 5:25 Se deja ver que hay muy buenos resultados Saludos desde la Cd.. de world losz mortales abian apreciado tan hermosa mujer
Mia Miles: I like the color
Sami A: I can never get my parts neat
Aisha Hodge: Where you get your mirror from
Deandre Parham: Indybindy
anewme294: My parting is horrible but I think I'll just have to fake it til I make it
Crystal Nelson: Do them your self I'm not interested
Tama: Have faith in JESUS CHRIST as LORD and SAVIOR for HE SAVES ❗️ *What is the Gospel?* The true gospel is the good news that God saves sinners. Man is by nature sinful and separated from God with no hope of remedying that situation. But God, by His power, provided the means of man’s redemption in the death, burial, and resurrection of the Savior, Jesus Christ. Ephesians 2:8-9 For it is by grace you have been saved through faith. And this is not your own doing; it is the gift of GOD, not a result of works, so that no one may boast. Romans 10:9 9 because, if you confess with your mouth that Jesus is Lord and believe in your heart that God raised him from the dead, you will be saved. JESUS CHRIST can come anytime! Just Believe ❤️ Love you and GOD BLESS
Christopher Ford: Baby girl. Iove you . Moue you too.
Child of Grace: Jesus Loves you all. Please accept Jesus Christ Love into your heart today and your life will never remain the same again
Edwige Koffi: salut