Hermosa Hair | Skin Melt Hd Lace Install |
- Posted on 22 February, 2022
- 6D Hair Extensions
- By Anonymous
Hey Boujie Fam. In this video I'll be showing you all how I installed this 4x4 lace front. The hair was provided by Hermosa hair company. It is their new Skin Melt HD Lace and it is bomb! I will also include details on the lace tint spray that I use. If you want tips on how to make your install look as natural as possible and less like a wig you definitely want to tune in. Thank you so much for watching and don't forget to LIKE & SUBSCRIBE!!!
FOLLOW ME:
https://linktr.ee/FauxBoujie
●▬▬▬▬▬▬▬▬▬▬▬▬▬♛#Hermosahair♛▬▬▬▬▬▬▬▬▬▬▬●
Direct Link ➤ https://bit.ly/3sPxSmu
Hair Detail: HD Lace Straight Huamn Wig 26inch 220%
Use Code "HER12" To Get 12% Off
※ BUY NOW, PAY LATER, All the hair can be paid in 4 installments.
Pay Via: Paypal & Klarna
More Best Selling Wigs:
Hot HD Lace Wigs☛:https://bit.ly/3JBi2Tg
Hot Colored Wigs☛: https://bit.ly/3GTsyDF
13*4 Lace Wigs☛: https://bit.ly/369U9Uw
13*6 Lace Wigs☛: https://bit.ly/3sNFKF7
4*4 Lace Wigs☛: https://bit.ly/3GWmytO
5*5 Lace Wigs☛: https://bit.ly/3Lz7yG5
❥Follow our social media:
IG @hermosahairmall : https://www.instagram.com/hermosahairm...
FB @hermosahairmall : https://www.facebook.com/hermosahairma...
Email: [email protected]
Whatsapp: +86 13253731788
WANNA COLLAB?
For brand promotions, public relations & appearances, please email: [email protected]
FAUX BOUJIE
P.O. Box 496554
CHICAGO, IL 60649
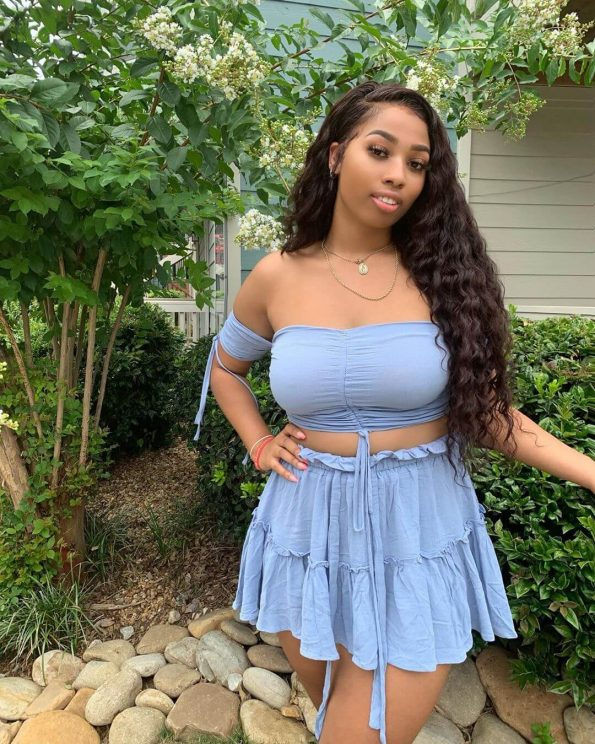
Hey everyone: what's up, welcome back to fake boujee in today's video, i'm going to be showing you all how i installed this beautiful lace front that i got from hermosa hair. If you are new to my channel, welcome, don't forget to like and subscribe, but let's get right into it, alright, so getting right into it. This is the beautiful unit that i got from them. It is a 4x4 hd lace, closure, wig, 100, brazilian straight human hair. It is, i believe, 200 density, and they sent me one in 26 inches and i just love the length. It is silky straight, absolutely love it very beautiful. I did bleach the knots before i started this video and it does come with baby hairs. It also has the combs and the adjustable straps in the back, so very excited to show you all how i installed this. I did want to say that i use sulfur eight on my scalp in between my braids anytime. I do an install. It keeps my scalp moisturized and hydrated so make sure you all are using something of the same nature. I will be spraying on. My got to be. Spray is similar to the wig dealer melt spray, and a lot of brands are starting to sell something like this. Now but you know, sometimes you got to go back to the basics and i still love got to be, and it's still like at a really good price. A lot of people try to overcharge for like really small bottles, and i hate that. But it looks like i'm spraying a lot on, i feel like you, can never have too much and i always go probably like an inch or two in front of my hairline, because i one i don't want the wig to be too close and two sometimes you Know you want to make sure that you are customizing to the um cap to fit with the wig if that makes sense. So i do everything first, like i go across my entire hairline and a little bit back onto my braids, but i save my um parts. Next to my ear for less because i like to hold that down and get it if you can see in the video i'm like really actually using the comb too and focusing the heat right in that spot, just to make sure it sticks after a solider. I'M going to use the concealer and look at how much i'm using now, it's like literally next to nothing and i blend two together just to get like my perfect skin tone. So if you need to blend two or three like that's perfectly fine, you just want to make sure it's your perfect time and, like i said you wait until everything is completely 100 dry and i'm just going in and rubbing it everywhere, even though this wig is A 4x4 i'm still going to do my entire hairline and i just i'm used to doing the whole cap in the front, so i'm just going to keep with it so afterward. Of course, i'm going to go ahead and cut and, like i said i like to cut a little bit in front of my hairline, i don't like the wig to sit right on my hairline, because i don't want. You know the glue to end up pulling my hair off and i hate that, and so i'm just going to do both sides exactly the same, not getting too close to my hairline, and i don't really worry too much about the fly aways because they're going to Get cleaned up later with the glue, and i always go back in and wipe my forehead before. I add the wig unit on also doing my ears just to make sure you know i have a clean surface, it's harder for it to stick. If you have something you know on your skin like sitting on your skin, so for this part, y'all, absolutely love this, i'm going to be using this even tinted, lace, spray and, as you saw, i had to comb the hairs back first, because it will color the Hair so make sure there are no little flyaways or anything in the way, baby hairs. Nothing like that, and i usually do about two or three coats, depending on the type of lace. This is hd, so only have to do um, two coats and you're going to make sure it is a hundred percent dry. If it is not dry, it is going to be like you know, basically, spray painting, something and then touching it's going to be weird. It'S going to be impossible to get glue to stick to it, and it's going to rub off onto your skin. As you can see, it did mine a little bit because i was trying to be impatient, but oh and i want to say this is my first time using a 4x4 closure. I usually just get the 13 by four, but as you'll see at the end of the video i ended up liking this a lot and it was just quicker - only had to put glue literally on my spot. So, as you can see, i did two layers of the glue just rubbing it in and i always let it fully dry. I do not use the blow dryer for this part because letting it air dry is like 100 better, and so i'm just putting that on making sure it's in the right spot, making sure you know everything is lining up and if y'all have any tips to get Like the size right here by my ear to stay and like not be visible, i would absolutely love it, so you can leave that for me in the comments below and so on. This part i'm just pulling up some hair so that i can spray and tie it down and i usually leave it tied down depending on the wig, maybe like 10 minutes, and then i go ahead and flat on it. This wig was straight, but at the end of the video i'm going to show you all the curl tests that i did on it and i'm just going through flat ironing everything just making sure it is bone straight because i did wash it like. I said i um had to bleach the knots and now i'm just going to go in once the glue is fully dry and cut the lace on it very quick process. Now, as you all can see, i'm cutting and i'm laying the baby hairs again going back in with my got to be, and this like doing baby hairs is an acquired talent like i have a daughter, so i got used to doing hers first and then i Have to practice on myself. So if you don't know how to do it, it's fine! You just keep doing it until it looks right, and sometimes it just takes time. It depends on the hair, but the guy to be helps a lot and even if you use eco styler gel that helps too, but just like literally a little bit and as you all know, i do my parts by just pulling the lace. I don't pluck it with tweezers because it always ends up with the hole. So after i get done with everything, i tie it again just to make sure my baby hair is laid, everything is set, and this is it absolutely love it love, it love it and i will say the gatsby didn't make that part hard where i sprayed it At it just made it go back more so that i could pull it down, and i love that this hair has so much body like absolutely love it. It'S very flowy, very, very silky, and it's so soft y'all, so so soft. I was really in shock, especially after i washed it. I know that sometimes that can dry out hair, especially like cheaper hair, but this hair y'all is really really good, very minimal shedding. I will say that, and this is the curl test that i was telling you all about, and this is literally just me holding it for like 5-10 seconds. I can only imagine if i like really did it and put it on flexi rods like you can tell it will really hold a curl even for the rest of this video. If you all look at that, you'll see that it stayed kind of wavy. So if you wanted to do a body wave, look with this, it would be so so bomb on this hair, but overall really really enjoyed this hair. I'Ve actually installed it two more times since filming this video. So if you all want the link to the hair and their website, they will both be listed in the description box below, as well as a nice discount code. For you all thanks so much for watching and as always stay bougie. You


Comments
TeCorian Rowland: I love it! You did good!!!
Hilda Shaw: it looks so good on you as well!
David Hopkins: you make it look so easy
SHAN & HAILEY: This is the best review I’ve watched on Hermosa hair
Mattie Sanders: not sure if I like it or love it
Barry Wells: seems like it has some good quality
Melinda Richardson: can I order that online?
Darrell Russell: such a great video
Trigo Alline: you are looking fantastic
Jesse Cook: I'm glad I watched this.
Virgil Lopez: my wife loves your channel
Just Dej: Very helpful video! Also, faux is pronounced "foe" lol
Joe Murray: how much did it cost
Cody Velardo: I can see why people love you
MUFASA!! 🦁: Was the lace hd? Or did they lie?
Gordon Harper: best video I have seen today
Christina Lister: when are you gonna post again?
John Coffee: Hey Hey ☺
Jasmiere: How tall are you?
Hermosa Hair: Attention!!Buy 1 Get 1 FREE is here Now!! Pls check our official website below the hair video.