Lash Extension Tutorial | Mega Volume Strip Lash Look
- Posted on 12 July, 2021
- 6D Hair Extensions
- By Anonymous
It's a long caption...I dare you to read all the way to the end!
I never really know how my sets will turn out, i'm still learning and trying new styles- sometimes they fail, sometimes I succeed but every set is valuable learning to me, just like this look I did today!
I don't hold back on this video- it's packed with little styling tricks:
- direction
-pre fan theory
- layering techniques
- wet lash
- semi opened fans
- symmetry
- mapping techniques
PRODUCTS: www.lostartistrylash.com
Short Stem Pre-fans: 6-8D
8-16mm lengths
doll eye mapping
sensi bath
lint free eye pads
bond aid
glue ring
micro swab
quickie
Short Stem Pre fans
Volume lash trays
Grippo Slim boot tweezer
Ultra curved iso
Mirror
Bladeless fan
For reading the whole caption enjoy 30% off the tweezer of your choice .
Use code: YOUTUBETWEEZER30
This code will expire July 17th 2021 @11:59pm.
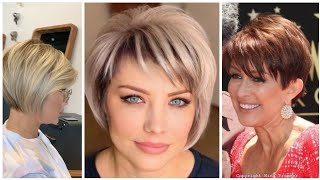
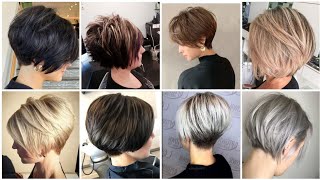
Today, i'm doing a set of lashes on my client anna, so she has a set of strip lashes that she loves wearing. She wears them all the time so today we're going to mimic the appearance of that strip, lash set that she loves so much now, i'm going to be totally honest with you. I have never created a set like this before and that's something i just want to speak about for a hot second, so 90 of the time, that's a little bit of an exaggeration, but a lot of the time when i'm creating any set of lashes. I'M honestly, just using my theory, my styling knowledge and the techniques that i've learned along the way meshing them all together to create my version of masterpiece. So, quite honestly, i don't always know what a set of lashes is going to turn out like on a client. I'M just giving it my all, i'm doing the best that i can do and hoping that it works out. Sometimes it does sometimes it doesn't, and that's okay, so anytime, that i'm trying a new set of lashes like i am today i'll show you the set that she's going for in just a moment, but when i'm trying a new style, i don't expect to achieve perfection Right away, i imagine that by the end of the set, i'm going to look at the style and say there's something that i might want to tweak in order to make this set even better when you come in for a fill next time. So here's the set of lashes that i'm doing today so, let's take a look at this photo. I actually just took a screenshot of a photo that she's taken of herself and just by looking at this photo and knowing her natural lashes, i'm going to run you through my styling by the way, if you haven't already done so go ahead. Like comment subscribe ring the bell so that you can always follow our lash tutorials just like today, so let's really dive into my styling for this set. I'M really excited to see if my plan can be brought to life and look very similar to this set. So, as you can see in this photo, the lashes are by no means dense, they're long, so just having photos is a great way to truly understand what your client is asking for, because a lot of clients will come in and say: oh i want drama, but That is there's a world of options out there. When it comes to drama, do they want length? Do they want density? What does density mean to them? What does length mean to them? There'S just so much room for error. If you don't have a visual of what they are looking to achieve, pictures speak a million words. I know that's so overused, but it is so true, okay, so for anna today she really is looking for length over density, which is good because the longer you go in length, the less density you get. Naturally, it's really hard to get super super long lashes and also get density without having a lot of planning going into play. Mixing curls, mixing shorter lengths in your longer length sections and all that. So when i look at this, i'm thinking, okay, those pc pieces that come up they're, not super stark, they're, not super dense. They don't look like dramatic peaks. They look like they're a little more on the fluffy side, so how i'm gon na create those fans is i'm going to i'm going to make wet lashes, but instead of making those pointy peaks, i'm going to keep them just slightly open. Now, when i'm working from eye to eye, it's going to be really important for me to make sure that i'm balancing them out, i don't want to have a fan. That'S open this much in the same spot on the left eye as a fan, that's open! This much in the same spot on the right eye, it's gon na be really important to have symmetry between the eyes, which means fan. Consistency is very important, as is direction so when i see a set like this, that has long pc, textured bits in it, i see mini fills as a must. If i don't do mini fills on this set they're going to look pretty wonky and uneven. Very fast reason being is: if we lose a spike over here and no spike over here on the opposite eye, then the eyes are quickly going to look unbalanced and the client will not be happy with the result of their set. So mini fills are great. It keeps the lashes looking amazing and who doesn't like having perfect lashes all the time. So basically, everyone wins often mini fills - are quite a bit less expensive, but they're really quick service. So it's fun for everyone. Now, let's get into my mapping, so i've used my procreate app and i've drawn up just a makeshift map. Now, let's take a look at my mapping plan, so i usually have a photo of my clients eyes with no makeup no lashes, nothing like that. Their inspiration photo on hand, and then i use both of those together to create a mock plan of how i'm gon na do their lashes. So, let's look at that together. We are really looking for as explained before length here, so even on the inner corner. We'Re looking for length, but we're also looking for that texture and you can get texture in many ways without getting like crazy, crazy, dark lashes. So what i'm going to do is in my map, you can see i've gone from length 10 into length 16 from my mapping in a dull eye finish. Your mapping doesn't have to be anything special, it's just something that you can look at and use for guidance while you're working, so i'll lay this on the side of my station while i'm working. So i can always refer back so i've gone from length, 10 to 16 back down to 13 and 14 on the end, because she does have a beautiful almond eye shape. So if i do really long lengths on that outer corner, it's just not going to do anything good for her. So i like to avoid those areas and just lift that up a little bit with shorter legs. But i'm going to take that even further and on her bottom layer on the outer part of her eye where it naturally tilts down that beautiful almond decline on the outer corner. I want to lift that up on the bottom in order to keep my spikes high. So how i'm going to do that is on my bottom layer, i'm going to mix deep curl in just that area and then for the rest of the eye where she doesn't have as much space between her eyebrow and her lash line. I'M going to work with secret everywhere else and you'll notice that my short stem pre-fans, which by the way, are much wider in appearance, wider fans, equal texture and we're really going for texture today. So my short stem pre fans, i'm going to be working with 7, 8 and 9 d, just depending on the natural lash health and the reason why i'm choosing these bands is because, although they're considered mega volume, they are so light and fluffy. So, let's think about a 60 fan in .07 diameter latches, even though it's a 6d fan that .07 diameter is going to make them very, very stark and dark versus. If i have a 7d80 or 9d fan in .05 or 0.03, even though the dimension is higher, the diameter being lower makes them look lighter and fluffier, but when they overlap like crazy, that's when they start looking dark and then the higher you you move in dimension With that diameter, the darker the results, of course. So that's why i'm choosing 7 8 and 90 for my short stem pre fans, i'm getting texture from the short stems and then that lightness and fluffiness from the 7, 8 and 90. and you'll notice that my lengths for the base of my set are quite a Bit shorter than the lengths for my spikes: that's because that's going to create that pcpc texture so you'll see i have 8, 9, 10, 11, 12, 13 c and d 13 d and then 12 11 10 d on that outer corner now. The next question is, which layers do i place them on, i'm going to place them on all three layers. So, although i'm using lots of spikes they're not going to cover the full top layer, that leads me to letting you know that i am going to be placing my spikes on the top layer only and making sure that that is consistent between the eyes. Because it'll look wonky if some of the lengths are placed on the top layer, others are placed on the bottom, it'll look great for texture, but not for balance and symmetry between the eyes. So, with my shorter lengths on the bottom, the only area that's going to be different from layer to layer is my outer corner. Where d curl is going to be placed on the bottom layer and c curl is going to be placed on the top layer. That d curl is going to lift the bottom layer up and mesh it with the c curl and also lift up the appearance of the outer part of the eye. So that is the only place. You really need to worry about layering in the other section, you're already going to get a feathering type technique which helps create texture by simply putting the links that you're looking for on each layer. So in my inner corner, although the inner corner normally has only one's two layers - and i know that to be true for anna - let's say actually, let's pick somewhere in the middle - let's pick 12c, so i know she has three layers in that area. So if i put 12c on the bottom layer, the middle layer and the top layer, bottom layer will look more like say, 10c, because it sits lower on the eye. The middle will look more like 11c and the top will look more like 12c, so it just depends on where it's placed on the eye and layers definitely do not all sit in the same spot. So you have to factor in the millimeters of difference between each layer. So that's already going to look like a stair effect and create a lovely textured finish. So that is my plan for this set. Now, let's bring it to life, so so so so so you
Comments
Krista Winters: Wow! The before and after pics are Amazing! Kaitlyn, you truly are a Artist!
B Linda: Love your videos!! Can you please add next time the photo of the client when you explaining, so i can i see the points, if you can ♀️ Love from Mexico ♥️
Cici Love: Wow
Richa Febrianti: subtittle indonesian please
Mindy Snyder: I need training from u wow I need this