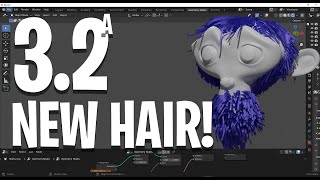
Tutorial: Hair Comb Simulation | Blender 3.2
- Posted on 09 May, 2022
- 6D Hair Extensions
- By Anonymous
In this tutorial, you will be learning how to make a comb simulation. Hair dynamics are an important part of Blenders particle workflow and you may find a use for these methods.
Links:
Skillshare 1 Month FREE: https://skl.sh/3aROa69
Patreon: https://www.patreon.com/PIXXO3D
Social Media and Portfolios: https://linktr.ee/pixxo3d
Thank You for Watching, and enjoy your day.
#Blender #3D #CGI
Hello guys and welcome back to another blender tutorial today, i'm going to be teaching you something really cool, which is hair dynamics in blender. So this is actually a beginner friendly tutorial. The comb is just going to take like two minutes to model, it's very simple and then i'm going to take you through the very basics, the very, very basics of hair dynamics. It'S not complicated. Definitely a beginner friendly tutorial and something that you guys would enjoy. So keep watching as i take you through the process check out some of the links below like a free link to skillshare. If you want to try, it out got a lot of really cool courses on there and um. I think i've said enough. Let'S get into this, one have fun: okay, so go right ahead and jump into new scene and blender. Today, we're going to be using the default cubes go ahead and click on that, let's just tab into edit mode and with all of this geometry active. Let'S press s and then x to scale along the x, and let's just go about this much. This is really something that you could actually eye doesn't have to be too perfect and then we're going to go s y and just flatten it on the y about that much okay. So not looking like a comb yet but i'll quickly show you what we're going to do so, let's go into the wireframe mode and let's just click and drag to select. All of these bottom votes we're going to go g, z and just move them up to about here and at this point, we're going to go ctrl r, hovering over this edge and we're going to roll our middle mouse button to add in some extra geometry. So, let's go with about that much! You can really eye this, like i said, and we're going to go to our face, select option here: we're going to just drag and select all of the bottom faces like that, and then we're going to do something very cool. We'Re going to type in f3 on our keyboard, we're going to type in checker like a checkerboard, we're going to click on checker deselect and that's going to automatically select every other one for us. This is actually something i learned a few years ago and in the past i used to just hold and shift, and i would individually select to select every second thing on a set of faces. So this is pretty handy little technique, if you guys haven't heard of it. So if every other face selected we're just going to press e to extrude and make sure if it's not on the z, that you do press z and go down about this much and then you can go e to extrude again down. But this time you're going to go over here and you're, going to change your pivot, transform to individual origins. If you just use the standard origins that they have there, the transform pivot it's going to do this so make sure to change it to individual origins, and it solves that issue. So just scaling each one down about that. Much just a little bit and then e to extrude one more time and then s to scale. I guess now we have a very rough comb here: um, let's just select all of these top votes and go g z and just move them up a little bit. Okay, now, let's go to our modifiers and let's give it a subdivision, surface, modifier and tab back into object mode, and actually you can see here that the sub is actually doing a lot of distortion here, which is actually what we want. This time usually we'd come in here and tighten that up with an extra loop, but we kind of want that because that's what a lot of combs look like. So let's go to the subdiv modifier here bump it up to two in the viewport we're gon na. Go to the drop down and apply, and there we have it now. We can now right click and go shades move and let's just also give it a subdivision, surface modifier again and that's just going to smooth it out. You can always come here and just disable. It while you're working, but i'm just going to leave mine on there. We have our comb out of the way and let's set up our hair okay. So far as choosing an object goes, i'm going to go with a uv sphere, so we're going to press shift a and with the mesh options here under the drop down just get a simple uv sphere and i'm going to go right, click and just go shade. Move while i have that there i'm also going to just select the comb, i'm going to go s just to scale it down a bit, i'm going to go control a i'm going to apply that scale and keep in mind when we're dealing with physics. It'S always important that if you change any of these transform vectors by scaling that you have to apply that scale because blender looks at that scale, you determine the distances between things. So just keep that in mind. We'Re then going to go g z and just move this comb down here. For now, let's get this uv sphere, let's go over to our article properties, let's click on the plus here and we're going to make this hair, okay, so cool! You can see here that this is the hair length now we're not dealing with real world sizes here. Let'S just leave it at four for now, but what we have here under the mission for those of you who don't know the number here is just the amount of parent particles, so essentially each one of these will generate a certain amount of hair later on when We go down here to our children's tab, so in this case, if we clicked on interpolate it, you can now see over here in the display amount. Every one of these 1000 parent particles is representing a display amount of 10 and a render amount of a hundred. So if we render this each one of these, original parent ones would be representing a hundred particles, so i hope that makes sense. But for now let's just come to the number here at the top. Let'S make something like 400, that's more than enough for what we're dealing with and as far as the display amount here, we really want to set it as high as we can go, so we can see it in real time, but going too high at a certain Point is going to definitely cause lag in our viewport performance, so keep that in mind you might have to mess around a little bit with that display amount. Now, if we were to actually press the spacebar now, do we have a hair nothing's going to happen, and this is where the hair dynamics come in. So if you go over to the top you're going to see a little box, click on it, that's hair dynamics and you can go to the drop down here. You can see there's some options which we'll get into in a second but heading over, to frame one and pressing the space bar you can now see we have these hairs falling and that's just the default settings here. You can see that it's not that detailed here. We don't have a lot of segments in the hair so i'll get to that in just a second, but you can also notice here that the hair is quite um rigid, it's a little bit firm. So what you're going to do under your hair dynamics is you're going to come here to the structure and over here you can see stiffness pretty self-explanatory if you set that to a lower value. So, in this case, i'm going to take it from point five down to point two. If we go back to frame one and press the spacebar, you can see, we have it a lot more droopy um. One of the things here as well um is that it's interacting with the actual sphere so select that sphere, which it is at the moment and go over to your physics tab and give it a collision, go to frame one hit the spacebar, and now you can See there is collision with the surface and if you wanted to change the distance between the hair strands and the surface here, it has to come under the physics here under the collision and go to the thickness outer and enter, and you have to mess around with These values here i'm going to leave them as they are for now, but that's also pretty self-explanatory. Let'S just get back into our hair and, first of all, let's give it a few more segments here. So let's go to the viewport display and let's set the steps up and the higher you set, the step amount up the nicer it's going to look but keep in mind once again it's going to affect performance. We can't get stuff for nothing in the world of 3d, so maybe at about three or four where you'd want to cap it. If you have a smaller device, i'll, probably go up to four or five in this case. So now, if we go back to frame one and we press the space bar, it's a little bit slower, but we have a nice result. Okay, so now we have that hair dynamics, we'll tweak it a little bit. But let's do the fun part where we select our comb. Okay, so make sure to select that comb and let's go into the right orthographic view by pressing free on the number pad and we're going to go g and just move it over here. The comb, okay and i might actually scale the comb up a little bit and then go ctrl a and apply the scale, and i'm going to just select my hair here and i'm going to actually make the length of it. Okay, let's just make it five meters. Instead, let's go back to frame one and let's select the comb now and let's go over to our physics here and give it a collision as well, and let's press the spacebar - and you can now see these little hairs - are actually interacting here with the comb which Is really cool so now what we have to do is just animate our comb sweeping through here and that's going to be something that is going to slow things down. So now, let's just select our hair here, go to our hair settings and let's just go down to our viewport display or actually our children here, let's just set the display amount to two, so it's not going to lag. We just want to see the results here. So, let's select the comb and in frame one we're going to press. In fact, let's move it back a little bit we're going to go i and insert a location and rotation keyframe and let's give it about 40 seconds to fall and then i'm going to go. I insert a location and rotation keyframe and now we can come to frame 100 and we can go g and move this forward about here and also rotate it like that and then we're going to go i and insert a location and rotation key. Now we have these very basic keyframes here and if we go to frame 1 and press the spacebar you're going to see it's going to be a little bit slow. But we now see our comb sweeping through and interacting with that hair. And that's the simple thing with hair dynamics pretty easy to set up from here. It really is a matter of selecting the hair and going to the hair dynamics, increasing the quality steps which is going to make it a bit slower, but that'll give you nicer results and when you get interaction with these hairs kind of going through an object, you Also have to come here to the collisions and mess around with this distance and also the quality here now keep in mind. You can always bump the quality up to get great results, but it's always going to be a little bit more intensive. So it's all about finding a balance and there's not really much. I can teach you about that in this tutorial, something you really have to um, try on your own device and see where your performance limitations are um, but that's the basics of it all. So, let's for now just set up a basic camera, i'm going to come down here, i'm going to go shift a i'm going to set up a camera, adding it in and i'm going to press 0 to go to camera view. I have my camera active. Actually, i already have two cameras in the scene, so i'm just going to delete that and select my original camera press 0 to go into camera view and we have our cursor in the center. Let'S change it to 3d cursor on our transform pivot. With that camera active, we can double tap r and then rotate around it pivots i'm going to rotate to about here. Then i'm going to press g middle mouse button and i'm just going to move back like this and then double tap or again, i'm just getting a nice view here. In fact, this is completely up to you how you want to do this, so i'm going to go something like that. I'M going to go to my camera settings, i'm going to type in 95 and a focal length. I really like these sort of focal lengths and then just zoom back a little bit more okay. Now, let's go over and save first of all, make sure to save then we're going to go to our render settings. Let'S change it to cycles. If you have a gpu feel free to use it, if you don't just stick to cpu come to the render and let's just change the samples to 120, maybe even 80.. That'S more than enough for what we're doing here and, let's just once again save and now what we can do is just go shift a add in a light, add an area light move it over rotate it and, let's just give that a strength of 200. Let'S just increase that size and then press z, let's go render it and see what it looks like okay, so because this is a larger scene, i'm going to bump it up to 700 and then i'm going to go shift d to duplicate it and then just Press r to rotate - and it's still rotating around that 3d cursor, which is really good, and you can also come to your world and just go click on the color tab here and give it a sky texture, bring that strength down to 0.1. And you can also go to your render settings and just go down to film and make it over here transparent. That'S just what i prefer to do. You can add in a background or a hdri if you wish and then from here just select your object go into shading the shading workspace here with that ball, we'll just give it a material and that'll automatically become the hair material. Let'S just call it hair and i'm not going to get into any sort of fancy hair stuff, just simply going shift a search, getting a noise texture, plugging that noise texture into a color here and then going shift a search and just getting a color ramp to Convert those colors into something more visually: pleasing putting it on that cable. Now we can just grab these values here and just change them increasing the scale, and it's up to you what you want this um, the differences here to be so just having a few different colors here. Speckled just helps to break up that even color just makes things look a little bit better. So i'm now going to press z and go render it and see what it looks like now. I'M going to select the comb and i'm just going to give that a material and i'm going to make that a nice orangey red comb bring down this roughness and i'm also just going to go and bring up this clear coat amount. That'S just going to make it look a little bit plasticky, which is all we want. You can definitely add some textures to it. If you wish. Okay now select the hair again and let's just go over to our hair settings. Let'S go to the render. Let'S go to the hair shape and let's make the root diameter point free and the tip point zero. Three like so, and now what we can do is we can go over down to our children and, let's set that render amount to 70 just to get started with. Let'S also just go to the clumping and make our hair look a little bit more clumpy by dragging up the clump, so the clumps stick together a little bit. We can also just go to the roughness and give it just a little bit of on uniformity by dragging this amount up and also randomizing the size a little bit. Okay, you can also work with the random amount down here. This slide value changes will work. Okay, that looks cool for now. Let'S go and also just click on here for long hair under the children and make sure to save and let's just quickly go, render and render image and see what that looks like, and here you can see we have the final render. It does look a little bit weird here, because i did use the denoiser and i set the samples really low. You can get a bit better results by um setting your samples a little bit higher, but this is just so you guys kind of get the idea, and that looks pretty cool. What you can do now is just render this out as an animation. I'M just going to close this render here and one important thing before you render you do want to select. Your hair object, go to your hair settings and you do want to go and find the cache, and in this case, let's go back to our layout. We don't really need to go too far here, let's just go to about 140, so we only want this to cache out 140 frames. So once again, with the hair here go to the cache lost it there. So, let's set the end amount to 140. So, just as the animation here is 250, we don't necessarily have to go and cash it out to 250, but you could, if you wanted to obviously leave the simulation start time at one and um. If you wanted to make a shorter animation, you could come here and make it something like um 140. Maybe it's just going to be a short little animation, but once you have that all set up you can go and click on bake and it'll bake. All of this in make sure that you do go back to your hair settings and mess around a little bit with some of these quality steps, and also keeping in mind that that will speed, slow things down a little bit. The more you um step up these qualities here, but yeah that's pretty much how to do the sort of combing simulation, pretty simple, very beginner friendly. I hope you guys have enjoyed this i'll, probably chuck this on to my patreon, but one other thing i wanted to mention is: if you guys want to check the link below, i do have some really awesome resources. You can check out my skillshare, which you can try out for free by using my link. I'Ve got a really cool, blender, beginner courses on there. They come with all the files and resources you can download them, and it's just very handy so much more in depth and you learn all sorts of cool character, animation, stuff and modeling so definitely check that out in the description below, and i really do. Thank you guys for watching so um once again. If you, i don't know if you guys noticed, but if you did want to render this out, you have to go here to your output select somewhere on your computer and then you can change the file format here. To whatever you want so maybe like an ffmpeg and you can go to the encoder, make it a mp4 if you wanted to and then just go render and render animation. So i'm not going to get too much into that. But this is how you make a combing hair simulation and thank you for watching.
Comments
Bennie Woodell: Thank you so much for this. All my problems I've had with hair simulation not looking right pretty much was solved thanks to your explanation of how all the settings work. Fantastic stuff.
TMPLT: LOOKS INCREDIBLE! Thanks as always <3
Psycho Raccoon: Thank you very much, in 2 months im gonna start mi career in videogame development and thanks to your tutorials I gained a scholarship to study in my dreams college, i owe you a lot, thanks man :,)
Тётя Мотя: Cool results) thank you for begiiner friendly tut)
『MαD Gαɱҽɾ XY』: Keep it up Thanks ❤️
Wýdovník obecný: Thanks bro
andinic2: Cool!
USBEN: Bruh i didn't even know hair physics existed LOL
Alparslan Demireli: Thanks.
daze: Stand with Ukraine
emmanuel addo: We love you too