Diy Faux Leather Sizzix Hairbows
- Posted on 11 April, 2022
- 6D Hair Extensions
- By Anonymous
Hey guys in today's video I show you how I make hair bows using my own custom faux leather!
DIY Hair Bow Tutorial: https://youtu.be/2PuKwPCKXj8
Sizzix Hair Bow Tutorial: https://youtu.be/rHlnPeca0rI
DIY Snap Clips:
_________________________________________
♡ SHOP WITH ME ♡
_________________________________________
♡ CREATIVE FABRICA ♡
https://www.creativefabrica.com/ref/23...
_________________________________________
♡ GET A GLOWFORGE ♡
GET UP TO $500 OFF A GLOWFORGE!
https://glowforge.us/r/YVTJSLLE
_________________________________________
♡ PRODUCTS USED ♡
- Faux Leather: https://amzn.to/3tU0UTS
- Printable Vinyl: https://amzn.to/3qNEmCb
- Printable Vinyl: https://amzn.to/3qQFzZy
- Printer: https://bit.ly/3DtAUCb
- Ink: https://bit.ly/3IXYh7T
- Heat Press: https://amzn.to/3iOhTAR
- Heat Press Mat: https://amzn.to/3rdR6mb
- Parchment Paper: https://amzn.to/3DqsFXg
- Butcher Paper: https://amzn.to/35qhdyi
- Sizzix: https://amzn.to/3KA3aWc
- Sizzix Bow Die: https://bit.ly/3renYLy
- Sizzix Snap Clip Die: https://bit.ly/3EgCRSV
- Hot Glue Gun: https://amzn.to/3E5IOSj
- Hot Glue Sticks: https://amzn.to/3MdqOsj
- Super Glue: https://amzn.to/3Kvh4J7
- Hair Clips: https://amzn.to/3uu390m
- Black Snap Clips: https://amzn.to/3MdqOsj
- 2 Prong Clips: https://amzn.to/3Kw5JJ9
- Black Nylon: https://amzn.to/3jpr4If
- Nude Nylon: https://amzn.to/3xl4pFe
- CreativeFabrica: https://www.creativefabrica.com/ref/23...
_________________________________________
♡ SOCIAL MEDIA ♡
Instagram: ElleRaiDesigns
Facebook: https://bit.ly/2NjxUma
Business Inquiries: [email protected]
_________________________________________
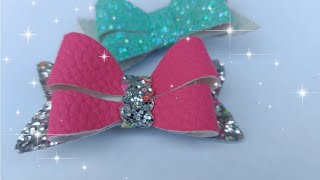
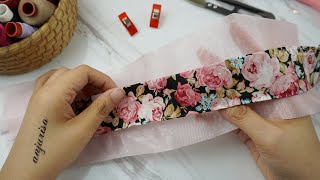
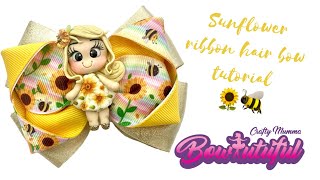
Okay, you guys so if you haven't seen my last video, i showed you guys how i pretty much made this custom faux leather with just printable vinyl and heat pressed it onto actual faux leather to make my custom faux leather sheet. This is going to be very convenient if you want to do your own projects at home, instead of waiting for faux leather to come in um. I haven't sold anything with this, yet i pretty much just been testing out with making both for my daughter, because i like to test things out for a while before i sell it. If i don't know how it's going to work so today, i'm going to show you guys how to use your faux leather sheets that you made at home to make hair bows. So i have this you're going to need your fabric that you made you're, also going to need whatever other colors you want for your bow. I am going to be using this glitter fold leather sheet, that's in like a yellow orange color, and i'm also going to be using a chunky, black glitter gold, glitter, faux leather as well um this one i got off of etsy this one. I believe i got off of amazon. If i could find them, i will leave a link down below for you. I will also have it linked down below the white faux leather that i use in the printable vinyl. If you watched my last video, i will have everything linked down below in that video too, and how to actually make this right here and now. We'Re gon na have to cut out the pieces for our bow um with that you could either use like a a cutting machine like a cricut, a silhouette or whatever you have. I personally like to do it on my physics machine. I do have a cricut and silhouette machine, but i just feel like cutting faux leather is way more easier and time effective using a six machine. I have the sizzix big shot with this, though you will have to buy dies for your sizzix. So this is a hair bow die. I got it from glitter sparkle studio, but this is pretty much the shapes it will be cutting on okay. So i have all my pieces of fabric cut out now now we need to run it through our big shot. Now for the big shot, you're going to need your machine and you're also going to need two of these clear acrylic plates to help run your machine down machine through. So i put one plate just halfway layer off and then i take my other plate and i just roughly lay my fabric on like this, so you can see. I got the black covering both these pieces here. You can see like that, so i just have them all laid out like that. I'M gon na place that right on my machine and then i'm gon na place this clear piece on top of here. You can do all this by trying not to move via fabric and then all you do now. Is you take this and you wind it through, and it's going to cut your machine cut your pieces out for you and i find that i literally only have to do it one time i don't have to run it through twice. They lift that up and now, as you can see, your pieces should be all cut out like how cool is that and now we just need to glue everything together. Okay, you guys. So of course i would have issues with filming me make the bow um. I lost a lot of footage, so we're going to be doing this again, so i did complete the sunflower hair ball and this is what it looks like super cute. As you can see, i used the clip and everything so since i lost half this footage, i did want to record it again, so you guys can see um. I didn't make the snap clip so we're i'm still going to show you guys how to make the sunflower snap clips in this video. Then i'm going to show you guys how to still use printable, vinyl and assemble hair bow and since it messed up we're gon na add a little twist to it. So this is the other printable vinyl, faux leather that i made. It is just a easter print. So we're gon na be using this in a bow and, as you can see, what i did different was, i did add another back piece, a little wing back here. I did another piece, so we're gon na do two to make it a little bit more dramatic. So to assemble our hair bows, we're gon na need all our hair bow accessories. We'Re gon na need a hot glue gun, i'm using a high temp glue gun. This is just the one i use right here, so i'm using that and with that i like to use the high tim gorilla glue. Hot glue sticks. This is for any temperature, but i find these work really well with high temp glue gun to be most effective and along with hot glue. I also like to use super glue and i use the gorilla super glue because i find the smoother faux leathers like this. One in this one, in the long run, they do come undone with using just a hot glue, gun, okay, so and then you're also going to need either a hair tie, a hair, elastic or a clip, depending on how you want to use the bow for your Hair i'm going to be using a clip. I will show you guys how i use the hair tie and i also like to use these little um two prong clips to help pinch any parts of the bow together that i may need to pinch together to hold it in place. So, first things: first, since we are using two back pieces, you want to figure out which one you want to be on top between on the bottom um, i'm going to do the pink on top white on the bottom. If you're just doing one wing we're going to just skip this whole step, so what you do is you're going to kind of twist it to kind of thin it out. So we can see both and what i do. As you can see. I make sure these parts go in between the bow like so and then just try to get it as even as possible. So, as you can see, you see both the white and the pink just like that, and then we're going to hold it down and i'm just going to use my hot glue gun and put a little dot and push that down and i'm also gon na. Add a little bit of super glue just to make sure it really stays. So just do it on both sides like so, and then we'll just push that down and then we're going to leave it until the end. So now we're done with this piece and then put it to the side, so we don't need it right now. Okay, now we're going to take these two pieces right here. The smaller piece is going to go on top and a bigger piece underneath and you're. Just going to center that as good as you can usually, if you line up these the end pieces together, they'll make it perfectly even once you do that again, i take my hot glue put a little in the middle, and then i do a dot of super Glue on both sides of the hot glue, you do not need a lot, just a little dab and then i'm just going to push that down until the hot glue sets, usually between, like um 15 to 25 seconds it will set and then once it sets we're. Gon na take this whole piece and we're gon na fold it in half, so you want both of these notches to be lined up together. Take that and we're just lining up. You see that middle piece right there take it, and then i give it a good pinch right here in the middle and then in that pinch make sure it stays. I am just going to add some hot glue pinch it a little bit and then i'm going to let that fit, and if you want, you could add a little clip to pinch it. While you wait just like that, and let that dry you let that dry for about a minute for that part, okay, once that dries, what we're going to do now, we need to flip this part over the front piece. You need to push it back, so you want to do push this little center piece. You want it to go up into that, crease that you made push that back to there and then you are going to again super glue it down and you can do the other side as well a little bit of super glue there in the center and then Push that back like so, and i don't use the super glue for every part that i use hot glue for um once i get to the end, i'm gon na use the most because that's really what's gon na make everything stick together and i'm also gon na Use hot glue to glue the top piece back again, i put a little bit of hot glue right here and then i'm just going to push that back and then i will usually for this part, go with my two prong clip and clip everything, and i will Let this dry for a while just so it holds its shape, pretty well. Okay, so once you glue all that, this is how your bow should be looking now, you got that nice pinch, and this is how your back should be looking at it. Now we're going to flip it to the back like so and you're, going to take these little tabs and you put them right in the middle and i'm going to glue that one down a little bit of hot glue right there and i'm just gon na glue That one down like so and then we're gon na take the other one from the other side of the blue and we're gon na overlap. It just a little bit and glue that as well. Just like so, and then we're gon na do the same with this top piece and just fold that over and fold it in now for these two pieces here they are not going to touch in the center or overlap you're, just gon na literally push it in. As far as it will go press that in and we're going to press it until the hot glue sets and that's how your back should look and now we're going to go in with this piece. And you are pretty much going to just put that down and then place. Your bow on top looks like that and then we're gon na flip it and i'm gon na leave it right where it is. I'M gon na leave my finger, pushing it down. I'M gon na add a little bit of hot glue right there in the center and then i'm gon na do super glue on the size of that and then i kind of turn the bow around and put super glue on the other side alrighty. So once that's settled, you need to determine now if you're gon na be using a hair clip on the back or a hair elastic like i said, i'm using a hair clip, but i will show you how to do the hair elastic. If you do the hair elastic, you get your hair elastic. I also like to use the nylon hair elastics. I will have these linked down below in black and in the nude color. So what i would do is, i would just add, a little bit of hot glue right there and kind of just push the hair elastic like so on there, and then you would take your middle piece and i will also hot glue that down like so and Then just wrap it around my hair bowl, while hot gluing and super gluing it close like that, so your hair elastic is under under it like like. So if you guys see that so the hair clip i just put it on so i'm gon na go put a generous amount of hot glue on the back of my hair, bow like so, and then just push that right down on the bow all righty and Now we're gon na go in with our centerpiece, for this we're gon na add a little bit of hot glue right in the center of our clip, and you also want to make sure it's centered with this little indent right here. That'S where it's going to go! So again, i just use hot glue for this part, literally just a little dab and then we're going to stick that right in there um, i usually pull mine over my hair bow, okay and then i start to pull this through just to kind of see where It'S going to lay and get it as tight as i can and then i go in and i am going to take some super glue along with hot glue to kind of put in place. So i put hot glue right here in the center and then super glue right. There make sure everything is pushed down and then i'm just pulling it pretty tight and then i'm going to just hold it right there in the center and i'm going to let that dry before i do the rest. So i said i put super glue right over here and then i'm going to do the same thing. I'M gon na put super glue right here and then we're gon na pull that and then i'm gon na finish it off with hot glue, with a little dab of hot glue and also a little bit of super glue right there. And then i just take that and i pull it and, as you can see, i do have a little excess little slab from that middle piece that once it dries, i just cut that right off. So, as you can see, i'll get a better view for you. Guys, but this is the one with two um little wings and then the sunflower has one little wing in the back, but the two little wings in the back just add a little extra touch and it comes out super cute. And then i just go in with fabric scissors and i'm gon na cut that excess little flap off like that, and now we're done it will continue to dry with the super glue. So i usually don't use these the same day, um, usually the second day. It'S okay to use my daughter's hair or i'll, also ship it the second day, if it's going to a customer just so it has time to dry and i just make sure everything is good, but that is our hair bow. I

Comments
SCLM B.: This is too cute, great idea. Just wondering in the video on how to make your own faux leather -- you used dark printable vinyl instead of the light one. Can you explain why? Thanks!
Julie Perry: Those are adorable!!