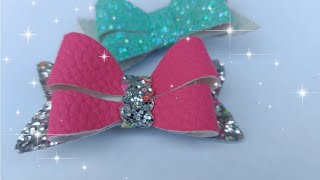
Loopy Puffy Bow Tutorial With Artemis In Love
- Posted on 11 March, 2016
- 6D Hair Extensions
- By Anonymous
In this tutorial, we will learn how to make a different loopy bow using 3/8 inch ribbon. What u will need:
-Lots of Ribbon!
- 6 different types (or same) of 3/8 inch grosgrain ribbon cut into 4 inch strips
- Hot Glue Gun
- Needle and Strong Thread
- Scissors
- 2 felt circles
- 1 lined alligator clip (mine is 2 1/4 inch)
- Lighter
If you enjoyed the video, please leave a like a subscribe! Thank you for watching!
Hey everyone: this is diana for mars to love, and I am back today to show you how to make another loopy bow, but using 3/8 inch ribbon. I have six different types of ribbon here that I chose and you can choose anything that you like before your the type of ribbon. I obviously have a little bit of like a sparkly kind of ribbon here and then three solid grosgrain and then a two pattern here. So basically, what we're gon na do is cut nine of these out. Okay, so I came up with a method to do this. Without cutting each one individually, so basically, what I like to do is try to show you things: how did how to do things a little bit easier and simpler, that a lot of other people aren't going to show you and they're not going to tell you about So how are we gon na go ahead and do this? Is we're gon na clip it and try to make each edge here exact and if you want to, you, can go ahead and light that now and it doesn't have to be perfect when you light it string these out as much as you can. So it's not squiggly and then we're going to compare it to this. You see this size here and it doesn't have to be completely exact. Okay for your measurements, don't ever think that it needs to be only with certain things that you're doing will it need to be so we're gon na cut. You see this right about there, so what we want to do is we want to put this here. Okay, let me put it over just a little bit more and actually, let me do just a tiny bit more and all we're gon na do is cut along this line, and I have all six of the ribbons here and we're just gon na like this and Do a straight cut across and we cut all six over those ribbons, and here, if you want to, you, can go ahead and light the ends. I always recommend lighting ends because they can fray and the ribbing can be ruined later on. So there we go. We got it there's two stacks that we have already, and this is so easy, so easy um, I'm gon na go ahead and light this up a little bit and once again they're all here and we're going to take this. Try straighten this out a little bit. So the links will be even and going to do this again, but I need to get this. How about we go like this? It would be easier to get the measurement right there. Okay, boom you're, not gon na see these ends. So it's not a big deal at all if they come out a little bit funny and choppy okay, so there we go so go ahead and get nine stacks of these okay and then we'll continue on I'll be back okay. So we have that all taken care of, and so that went by so fast and I hope it did for you too. So what we need to do is we need to align an alligator clip and let's measure this one real quick. I think if this is like 2 and 1/4 yep, this is about 2 and 1/4 inch alligator clip what's gon na leave a link to the video to show where I get my supplies from to make it easier for you and we need some felt circles. So we're gon na need two of these and we're gon na need, let's say about an inch inch and a half, and I always try to use you know it's basically anything you can find around. You go ahead and just cut a circle or you can freehand it, which I am going to do that right now. So all I'm doing is I'm cutting just a little square and then I'm just gon na cut a circle out of it. It'S really that simple: that is a it doesn't. It never has to be perfect, so don't ever think that anyone's gon na sit there and stare underneath your hair bow, because it's only the only purpose of it is to help hold the clip or to hold the ribbon together, and it's always going to be underneath. So here's my random circle that I just made see beautiful right just take that make another one size does not have to be exact on your felt circles, either. Never go to too small always go larger. If you need to okay, so I went ahead and cut myself out a couple felt circles: Oh ease do not buy felt circles. These are for $ 4. These look floor for $ 1. I get these at like Hobby Lobby or Joanne's they're. So cheap. You don't need to buy filled circles, okay, so we're gon na need a needle and thread tada. Okay, so we're gon na start out by taking this is gon na take a while one of each all we're doing is folding in half and poking through and if there's a certain order, you want to do it in fine go ahead. Otherwise, you can make it pretty random, but go through all six of them before you go to the next stack. So I think I'll do maybe this one next and of course, always leave your pattern on the outside and I'm not gon na make you watch through this entire thing, because I would be boring. I'M just gon na show you this first stack real, quick. Let'S do this one and there we go and our last one and I got the print ones. I believe I got those from Hobby Lobby there. We go you're gon na keep it on the needle like this. As long as you can, because they're, probably not all gon na fit, they don't pull them down to the bottom. Okay, that's it! So I'm gon na go ahead and pause. The video you guys have fine doing this for the next five minutes or so okay, so I went ahead and pulled it out, pull pulled it all down, and this is what I have. I hope that was fun. Frigga is not really but okay, it's gon na be worth it in the end. What I'm gon na do is pull like this. Do you see this? I hope you do. I'M gon na pull some of the string this way and we are gon na tie this. All together, just like this see that do our best tying this, let's see, if I can do this a little bit better, okay come on need over come with me, stay down there, yeah, obviously, I'm not the best tire, we'll just say I did it great. This is an important part, so try the best you get okay, so that's it we'll say it did really good. I'M just gon na leave a little bit here. Tie it good okay, and this is what we have so far. Some really really really really fun. Loopy bow, obviously we're gon na have to play with a little bit, and you know what is bugging me so much. I do have to tie it. I'M gon na go back through it again and sure to make this tighter because it is bugging me so see if I could do it like this, go through it a couple of times and then go like that. That should make things better. Okay, so just gon na move this around a little bit and my suggestion is going to be as good if this is going to be it to spray it with hairspray or whatever kind of stiffener that you have and to put it in the oven. For a little bit, that's going to be my suggestion because it will make all of these loops stay stiff and poofy for a really long time. Okay, but I'm not gon na - do that because it's gon na take a long time. So I'm gon na keep doing this for a little bit shaking it upside down and I'm gon na move the stuff around a little bit because it looks like some of the sparkly is a little bit more over on this side, and I don't want that. So I'm gon na position them a little bit differently and then I'm gon na turn around and shake again to do. Do it one more time, did you do to do so? What I wanted to do, let me pull all these up, because it's on the string, so there are just they're adjustable to move whatever way you want them to. So we have this fun mess under here. Okay, this is where the fill comes in. We are going to if my glue gun wants to work. Go my glue gun. Oh, it's! A poopy cover, put some glue down, see this fun mess here, just gon na glue the fun mess right onto the felt. Actually, it's not today. Yet, let's keep it there for a second okay Leslie at first, I can't let it dry and while it's doing that, we're gon na take our clip and we're gon na line it. I have a video on this, but I'm pretty sure that most of you probably already know how to do this by now. So I don't think I need to do any instructions or even link this video. There we go it's my doggy she's a very mean Yorkie. No she's not she's, very sweet there we go, and so after we do all this. Basically, it's gon na go tada and then we're gon na glue this that way. Okay, so let's take a look now, I'm gon na shake it a little bit more. Please do not try to put this in the oven after you've already put this on, because the glue will melts. So don't do that. Okay, okay, also, if you want to any of you, are already glued this on. You can spray this with hairspray right now and just set it to the side, and you can let it dry by itself, maybe in front of a fan whatever you want. Okay, so I'm just gon na try to play with these loops a little bit make them look nice. I think it looks pretty cute, let's measure it about five inches or so so now, although I think that we have to do, is we're gon na glue right here, make sure you glue the right side and we're gon na just put this right on top see That, and if you have these little spots right here, go ahead and glue those completely yawns, we have a cute loopy bow that is five inches. It would look good, I would say, on the back of a ponytail, the side ponytail and if you want to, I brought some of these gems with and you could gem it up if you wanted to so, let's see I have all these colors, but we'll stick With some pinks: let's do this one and it's these are so tiny. But if you just put just a tiny bit of glue on there just a spot and then you could put him wherever you want and it's so fine it to be able to decorate it more and of course, girls, love, gems right. So I'm sure your little girl or the bow you're making this the person here making this bow for, would love it so yeah. Let'S do it over here. You see the little gems and try this. We want to do it on like this, these plain ones or the, so they contrast really well. It was coming with me: okay, I'm gon na stop playing with it now, for now, you guys could do every white if you want to add some feathers, go ahead and stuff them in there wherever you want um. Basically, you can make this and be creative as possible once it's completely finished once you know how to make it add some stuff make it really fun, have some fun with it. This is why we craft so anyways. That'S it for this video. If you did enjoy this video go ahead and leave a like and subscribe, and thank you for watching bye,

Comments
Holly Wayne: I love your tutorial! It looks super easy and thanks a ton for sharing the tips and suggestions. I am going to try this and hope it comes out like yours. Love it.
Pam Raifsnider: Wow thank you so much I could not figure out how to make a full fluffy bow for presents with skinny ribbon lol I love how easy it was!!
Christine Alaníz Gutiérrez: Love your videos ☺️. Thank you for sharing.
Joy24: How long do you leave them in the oven. And and what temperature setting? Can't wait to try this. Thanks for the video --- so clear.
Kayla Harrison: Im gonna make one for my daughter thanks so much for your video
Autumn Gilmore: I LOVE YOU! I seriously just facepalmed, because I never thought to pull it back to the middle. Every other way that I've seen has involved sewing the end back to the beginning instead of tying it off and it is so difficult to get it tight enough doing it that way. THANK YOU!
Tay and Baby: I’m 2 minutes in and my mind is BLOWN by the clipping and cutting technique. You’re a genius!!
Christina Lopez: I love your videos! So talented!! Do you plan on coming back to YouTube with new videos? We want more! ☺️
Areli Miranda: You make it seem so easy..that it makes me want to try it lol
Fresh Rain: This video begins at 6:20 and ends at 12:20
Nicki Jaycox: Oven? I have all my ribbon but just haven’t had time to make it. But now after seeing your video, I’m making time. Shake shake shake! New Subscriber here, your awesome! Thank you for sharing.
GloAngel A: That's the easiest way I've seen, thanks.
Brandi Dias: Where do you buy your all your stuff to make these?
Betty Morris: Very pretty
Tammy Timmons: how long do you make the strips
Rebecca: You can also spray with hairspray and blow with hair dryer
Denise Sherman: Where do you buy your supplies...
Kimberly Hippman: did you say you bake it ? what temp how long
Amali Morales: Where do you buy your supplies love?
Jaycee G: Is your felt sheet 1mm thick ?
missgohead: Artemis will never fall in love. what about Aphrodite Love or something? Artemis is an eternal maiden.
Rubye Wiggins: Why did you put the ribbon covered part of the clip under the glued felt?
Deanna Oelkers: CAN ADULT WEAR THEM TOO
Sislertx: U forgot the links