How To Make A Bunny Hair Bow Clip - Theribbonretreat.Com
- Posted on 12 March, 2015
- 6D Hair Extensions
- By Anonymous
Learn how to make this cute bunny hair bow clip. Don't forget to check out our SPECIALS! https://www.theribbonretreat.com/custo...
How to Make a Basic Boutique Hair Bow: https://www.theribbonretreat.com/Catal...
How to Make a Twisted Boutique Bow: https://www.theribbonretreat.com/Catal...
How to Make a Bow Tie Bow: https://www.theribbonretreat.com/Catal...
How to Make a 6-Loop Bow: https://www.theribbonretreat.com/Catal...
Links to supplies used in this video:
Ribbon: https://www.theribbonretreat.com/Catal...
Pearlies: https://www.theribbonretreat.com/Catal...
Clips: https://www.theribbonretreat.com/Catal...
Glue Gun, Scissors, Needle/Thread: https://www.theribbonretreat.com/Catal...
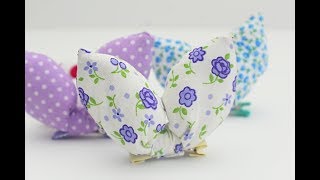
First thing that you want to do is to make your little bows. You can make any type of bow. So here I have a bow tie bow and it's layered. This one is 2 inches, and then this is a twisted. Boutique bow next two and a half inches. This is your basic boutique bow two and a half inches, and this is a six six loop bow and that's also two and a half inches, and you can find the instructions on how to make any of these bows down in our video description, and you can Also make these bows a lot bigger just depending on what type of look you're trying to get after you've made your bow, we're just going to add the little pearls on the top. So take your hot glue gun and take your bow and then place hot glue in the center and then place your pearl on top. I let that cool down, and that gives the kind of the nose for the little rabbit cut your quarter of an inch ribbon to three and a half inches and cut to pieces and then cut your eighth of an inch white ribbon to three inches. And what we're gon na do now is we're going to make the ears so take your ribbon and then you're going to take it and turn it like this and we're gon na glue the ends together and make sure that you keep it along like this and Not round like that, so take a piece or take your glue and just add a dab at the end and then wrap it around and glue it down, and then we're going to do this with the rest of these pieces after you've created your loops, we're going To put them together, so we want that we want the white loops to be up a little bit so place the glue a little bit higher up on the ribbon like so, and then do that with your your other one too, now we're going to add the Ears to the bow first, what you're gon na do is you're gon na take the ear piece and then place um where you want them to go, and then, when you have a good idea of where you want them to go, then turn it over place. Glue on the back of your bow place your ear on make sure to turn it over. So you can, you can see it and make sure that's the way you like it and we'll add the other ear place it on and again just move it around and before it gets to cool down and see how cute that looks and we're pretty much done. All we have to do now is just add our clip, so take your clip, add glue to the top of it and then place your bow on your clip and you're done, and that finishes you're super cute bunny bow. So you follow these same instructions when using the other bows as well.
Comments
spgurl47: Beautiful!!! Just in time for Easter
Lisa Quiñones: Cute!! I will be making these soon :)
Edi Pasinato: Very good! Achei lindinho!
Jessica Gisselle Posada Salas: Very Nice, thanks you