Let'S Make A Hair Topper Together! Love Peace And Happiness- The Hair Guru
- Posted on 09 January, 2019
- Clip-in Hair Extensions
- By Anonymous
Hi Lovelies!
Let’s make a human hair topper together!
Easy and quick!
Needed:
2 bundles of human hair ( you might not use it all)
Styrofoam head and clamp
Human hair lace closure
Hair bonding glue
Sectioning Clips
T pins
Blow dryer
Curved needle to sew closure
Brown hair thread or thread color of choice music
Pressure sensitive clips
One stocking cap
Here is another awesome hair topper video that I need that is definitely worth your while to watch . This goes in depth on how to make a topper as well. This is a wonderful video for guiding :
Bleaching knots for a scalp like appearance:
Let’s talk hair closures:
Topper I created:
Another Topper I created:
Topper I made /update:
If you were going to do this please complete at your own risk . I am a licensed professional just sharing my ideas and videos for entertainment!
Thank you so much for watching and don’t forget to like and subscribe that way you can become part of the family as well!
Camera used for filming :
Sony (White) A5100 Mirrorless
**Let’s Be Friends**
Facebook:
https://www.facebook.com/lovepeaceandh...
Instagram:
https://instagram.com/love_peace_and_h...
Influenster:
Business Email for inquiries!!
For entertainment use only
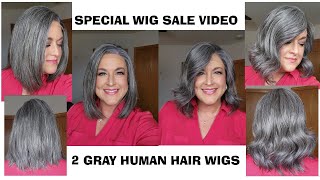
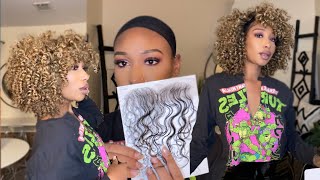
Hey guys, so you want to make a hair topper that looks as natural as this beauty take a look all around some of it is my own bio, hair. Obviously, but look how nice it is without having to wear a full wig. If you have a little bit of hair, you need to check this video out and I will show you exactly what you need to get the job done and much cheaper than if you would buy one in the store or order one online. So just keep on watching, first and foremost you're going to need two bundles of hair. You can make any topper, however, if you don't have the correct hair, it's really no good. So the this is the hair that I picked out. It'S more like my own hair texture. It is a light yaki. Almost anybody could use this just about depending on. If your hair is super thin, it might not work. I also picked up a closure. A human hair closure. This, I want to say, was about 20 dollars. It'S a 10 inch. I prefer a little bit longer when I'm doing a 14 inch. Topper, so you'll need a stocking cap. These come too in a pack. You'Ll only need one, and I use the black for this. Next is hair bonding glue. That is what I use to secure. My web saw to the stocking cap, and that is quick, easy and virtually I can get it done in about an hour pressure, sensitive clips that I superglue going around the inside of it, so that I can secure it to my own hair. This is outside of the box. This is what the closure looks like not real thrilled with this one. This it's cheaper, there's, definitely a set part in there, so you can't really part it any direction. You pretty much have to move it around on your head or deal with the part the way it is so I didn't bleach the knots on this. I'M considering doing it once I get everything together, but against my hair it should be okay, if you have something that you're laying it against. You can always use some concealer underneath with skintone color, and it should work so this again, this is a 10-inch human hair lace. Part closure, not real thrilled with it. It was 20 bucks and I just picked that up, because I can usually alter them a little bit and maneuver it and get it. How I want it. So I'm just applying the stocking cap onto the wig styrofoam head that I have for the shape of it and I'm securing that down with t pins and then after that is secured. What I'm going to do is get that closure out and I'm going to figure out where I want it and line it up. You can chalk it out. If you have to. I don't have to really do that anymore. Once you have that done, you want to secure that as flat as possible onto the stocking cap on to the wig cap, the styrofoam head. So this is what you're going to sew. The only part that you're going to sew and believe me, I'm no seamstress, and I could do it so. I'M gon na use my curved needle for hair and my brown thread for hair, which you can get at usually any local beauty supply store and I'm going to start sewing that all the way around small sections of sewing. I'M not sure the terminology for that. But I can't stress that enough, because you don't want this to buckle on the top, so you want to make sure that it's secure it's tight, it's not going anywhere and you don't have any ripples in it because ripples mean ripples on the head and it's not Going to lay good and flat for you and up here is crucial and then after each stitch that I throw in here through the stocking cap onto the lace that is around the perimeter. I am nodding that I'm throwing a little knot in there to keep it even more secure and just working my way around. Then I'm going to take out these webs cut them to the desired length and I'm gon na start a couple on the top first. I know some people don't do that. I like to do that. That way. I know what I'm working with and I already have that piece already melded right up against and then I just worked worked. My way down and I'll usually do two rows down and then I'll start at the maybe halfway through when I'm doing a topper, so I would say probably to the middle of the ear on the back of the head and then I'll do that work. My way up is that was my first one that I secured with a little bit of glue. I can't stress that enough do not use a lot because it gets messy and hit the blow-dryer to it. That way, it will dry quicker and you can start working efficiently and for a topper, a good density's topper, not over-the-top or anything get it over. The top is four to five rows or so that's all. I do really including the closure on the top. So I hope that information helps you in creating your own. I figured I would do various versions of one and I am going to try this top part and then I'm going to go ahead and I'm going to show you some pictures that I have that. I include it in here to show you what the inside looks like what the part looks like it didn't turn out too bad. I'M actually pretty happy with the way it turned out. So I am going to include some pictures now of the completed, look and don't forget to Like and subscribe that way. You are up-to-date on any crazy videos that I post. Thank you so much for watching.


Comments
Gillian Murray: Oh wow this was incredible,, it turned out amazing ❤️you are so creative,, I've subbed so I don't miss future videos,, the fact that I couldn't tell it was a hair piece blew my mind, so realistic.. X blessings girl
craine2013: Wow...love this tutorial! You make it look so easy. I wear toppers for my thinning hair, mostly on top and sides. I experimented with getting wigs and making toppers out of those, but some were too thick. Will have to try this now, great tutorial, quick, easy and to the point. Thanks for sharing, have a great. Day.
Autumn Ballog: How much did this topper cost you in total for everything? I’m trying to figure out if it’s worth it to make myself or just buy a already made one. Keep in mind I have no supplies for this at all. Thank you.
Rachel G: Such an awesome solution!!!! Love it! ♡♡♡
A g: How long does it last before your re glue your tracks? I'm really wanting to make one now
Clara: Thank you! After watching this I might have a go
Julie Mann: Hi. I have an old topper (only 2 x 5)--it doesn't cover my bald area. I need about a 7 x 9 now--the hair itself is still lovely. I can use the It Stays in front, but how do I attach in the back? Would I have to add wefting & more hair? Thank you so much.
Love , Peace and Happiness The hair guru: Hey , lovelies! On today’s video.. I am doing this one like my hair! Depends.. anyone love you all!!
Sandra Sullivan: Where have you been all my life! What a gem to find this video thank you for showing this.
Heather Edwards: Hi! I have a question; I have an existing topper (not lace) and it’s thinning. Is there a way I can add more hair to it? I wear mine 24/7 and they wear out SO fast. :(
Heather Edwards: Thanks so much for your help!!!
Archana S: Awesome video! Did you cut the extra fabric of the cap?
Sm3324216: I am a bit confused. Are we cutting off the cap after the glue dries?
the cosmic fishes: Love it..
Anthony Wolf: Great video. But its a shame the ending was missed out. So after the 4 rows you cut the cap there right? Then you put in how many clips around the edge? Thanks
Queen Bluntress: Hi I paid 26$ for a 22 inch closure on amazon I Gonna sew clips onto the closure
White Dove: I need to try this
Jude Deprey: Thanks much!
M D: will try to make it
ra. j. elasri: Please what color did you use to color the hair?
angie dunlap: Where to find blond closures