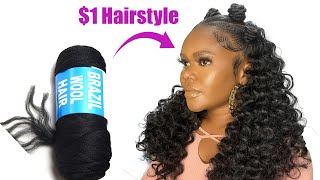
How To: Diy Curly Crochet Wig Using Braiding Hair/$3 Curly Wig/Customised Ginger Colour Wig
- Posted on 21 October, 2022
- Clip-in Hair Extensions
- By Anonymous
Hello Gorgeous
How are you? Hope fine. In today's video, I'll be showing you how I achieved this beautiful look using braiding hair. Stay Tuned.
Check out my other videos
https://youtube.com/channel/UCBpKg-ujG...
Connect with me on IG
https://www.instagram.com/invites/cont...
Song: SPIRIT LINK x Swole Sauce - Stay With Me (feat. Tom The Gaffer) [NCS Release] Music provided by NoCopyrightSounds Free Download/Stream: http://ncs.io/SWM Watch: http://youtu.be/
Song: Arcando & ThatBehavior - Ghost Town (feat. Vanessa Campagna) [NCS Release] Music provided by NoCopyrightSounds Free Download/Stream: http://ncs.io/GhostTown Watch: http://youtu.be/
Song: Part Native & Oly - Artificial Love [NCS Release] Music provided by NoCopyrightSounds Free Download/Stream: http://ncs.io/ArtificialLove Watch: http://youtu.be/
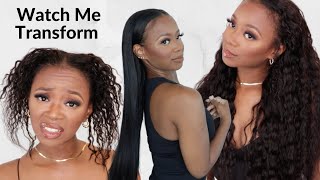
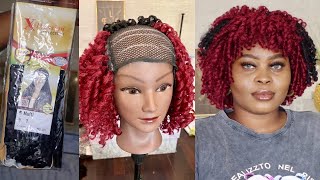
Something about you feel so different yeah. You messed me up inside hello. Welcome to my channel, okay, okay, welcome to my channel, if you're new here make sure to hit that subscribe button, and if you've been here, how are you how you doing? I hope you are good. I hope you are well so today I'll be showing you how I achieve this look using. I make alone hair or braiding hair, whatever you know it as, and I use just one pack very affordable to get this kind of sweet goddess. Like queen-like, look, you know, especially if you're black, if you're black being like you need to do this like this hair is given. You can tell that this hair is giving so make sure to tune in stay Foods wedge, enjoy the clip and make sure to try it out like. I would love to hear from you guys. Let'S get right into it. Colors are color, 27 and orange, and this is a pack. So when I went to the market they mixed it for me, so they removed half of this and half of that and mixed it. So I'm going ahead to cut it. You want to take each color cut it into two and take it again and cut into two. So at the end, you'll be having like four sections after cutting them, then you start to combine it. I took two pieces of the orange and one piece of the following seven and join them together, so I started to mix them by separating and joining separating and joining due to this method. I'M not that comfortable and conversate with it. I had to change the method in which I was trying to combine the two colors. You would soon see the clip after this step when I got tired of doing this because it was not working for me. I had to sit down at this point. I'Ve realized that the Orange is still too Shelty for me, so I took another color 27 and added so that is it being equal two pieces of color 27 and two pieces of color orange and I combined them. So what I was just typically doing is I'll put it on my laps and brush make sure that the attach is now divided, like separated strand by strand. You don't want it to still be clumped up together and, whilst I'm doing that, I'm making sure each part has orange and color 27 brush brush on brush brush tone. If you have another way to do these, then fine, but this is like the best one easier way for me: don't worry about the hairs, a lot of hairs that you're seeing coming out. I had to deal with that later because reality after combining these words, looking like you, can see, looking Ginger now and not more orange. So this is what I did to the pieces. I had to go back and start to separate it. It didn't take me too long, so this is just to prevents you from wasting attack and make sure you have a lot by the time you are doing the hair. So I'm using the regular wig cap, you can get from your local store. So this one is a net type you put in the crochet, make sure you're not putting it in a single hole, make sure you're putting like three to four holes to prevent it from like tearing. Then I crochet the hair normal way to crochet Loop it in take it and then Loop, the hair into the hole into the knots and tight. Take your needle put it into three to four holes of the net. Take your attach make sure it's folded into two equal parts, thereby creating a loop. Then you pass the loop through the hole and then the small Loop you now have you take the attach and pass through it yeah. So here I'm going ahead to show you guys what I just did. I went through the parameters of the head: try out the back of the side, the front and um the thick band above the cup. If you're using this recap, you will surely see what I'm telling you about, then this side, I'm taking my attached, passing it and only looping one strand of the hair through it yeah I'm trying to create like a center pattern. That is the look I'm going for. I don't want you to be like a rounded um Fringe kind of look. I had to show you guys how I was projecting the back. I was taking it in bigger pieces and I was um projecting it with space and then the next level, I'll crochet in each space below. Do you understand what I'm saying yeah? You can see it so now on this top part, the net is not as fragile and elastic as the other part below. So you want to be careful here because it's too fragile, so what I was doing was I was just going through the thick part of the knit, like all those black drawings you are seeing. That was where I was passing my needle to crochet to avoid it ripping apart, because if I crochet on the normal net, it's going to rip apart for sure so does that? Put that in mind like have it in your mind and when I was done crocheting the whole hair. This is what it was looking like this this that center part I did so. This is what it's looking like for now. I will still fix that later. So here I'm going ahead to show you guys how I rolled it on my roller or coiler to give me the cause effects I had as the result. So I just Twisted the root to try and bring the hairs together. Then you just take your roller, so you want to put the hair without twisting it just roll it on the roller, without twisting it. Let'S just be flat, then, after after rolling the ends on the roller, I would now slant it and start to roll. My roller up towards the head, the head and as I'm going I'm like slanting it so that it's not be like on each other directly. Then, at a point, when I've reached like half half the length of the hair and half the length of my ruler, I'll then start twist the hair, while putting it on the roller. So we're having like two different kinds of twists as we go so two different kinds of coils, so the Twisted coils and the non-twisted coils twist the end to bring it together brush. Take your hair roll the ends on your ruler to secure the ends. Then you start to roll your roller on the hand going up and then start to twist and roll, don't forget to trim the excess hairs after rolling your hair, and the next step will be to put it into hot water. So you want to make sure that your water, you put a hot boiling water. You can use a bar for anything. You have then check a conditioner put into the water mix it. The conditioner is to help it to help me attach soften up, because you want the attached to have some body and movement to it. You don't need to be too stiff, then you take the wig and everything you dip it into the hot water. Make sure you saturate the hair very well with the hot water? Don'T leave it there for too long you take it out and you dry. It now make sure that this whole thing gets dried before you start unraveling the curls, so yeah. This part is so satisfying. Like, oh God, this part is so satisfying, so you want to when you're unraveling it you want to turn it opposite direction of how you like um, coiled it initially yeah, you messed me up inside your energy was kissing My Soul Back to Life once we're done. Taking out all the rollers, all the coilers from the hair, now we have to start separating the coils now what this is exactly why I crocheted before coiling, because it makes it easier to separate, because I just use the crochets like each strand of crochet. I start to separate it, and that is me separating the hair and it will help to like reduce the freeze, so that is just what I'm doing here. I hope you can see it clearly now, if you want to reduce the frizzy ends, I would advise you, take your scissors and cut the ends a little bit before you unravel so now, I'm showing you guys um. This is like, after separating each crochet to separate the coils, so now now take each crochet again and separate it more and more, depending on how big you want your hair to be or how loose you want, the coils to be so like for that strand of Crochet, I separated it into four for some into five, some into three just depending part, I didn't separate. Was that front Fringe part? So now we're done with the hair, and this way it's looking like it's looking so beautiful I've not trimmed or shaped it. I'M showing you that center part, you see that the hair was still showing. So I went ahead and took it comb to tease it that is coming backwards to try and make that part through a little bit like rough, so there'll be hairs to cover it and, as you can see it's covered up now I took my scissors and I Started to trim it on the mannequin head trim the excess hairs that is like hanging around. I didn't do much because you know you want to put it on your head to make sure that it's framing your face. Well, so this is where I put it on my head and making sure that I'm cutting The Fringe part on my own face to make sure that it is at the length I want you to be. This is the final result, I'm loving it. I look and feel like a goddess like, oh God, is this so long sis? I dull dogs, like this, with this type of hair like something that shouts bold confidence? Okay, I'm loving it and wow. That'S all. I have to say like seriously. I just didn't know what to say. One thing why I I crocheted the hair through the parameters so that, even if the breeze is to blow it like it will not be so bad. It'S not look so bad. It looks okay, I don't look too bad foreign like this, but just in case yeah the weaker, because of that this thing here I couldn't crochet or something so that is just that oh yeah, and get into my makeup like get into it. Okay, just just get into it. I just tried these stars and the eyes today. How do you see it? I hope you can see it. It'S giving it's giving it's David just make sure to like comment and subscribe down below if you enjoying this video and especially if you're going to try this out, make sure to, let me know, follow the steps accordingly to get the same. Look I love you bye!

Comments
Maryann Edeh: I really enjoyed watching this. You are creative, and I also love the outcome
Felicity Faustina: The hair came out very lovely ❤️
Felicity Faustina: You finally did it ❤️
Chidimma Mbbah-Offor: Let me know if you are going to give it a try. I'll really love to see y'all give it a try.
Maryann Edeh: Your make up is