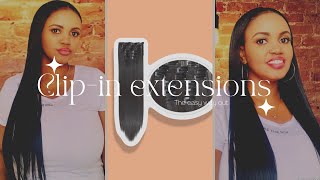
Make Your Own Clip In Extensions At Home| Diy Clip Ins
- Posted on 14 May, 2022
- Clip-in Hair Extensions
- By Anonymous
Hey guys, todays video is how to make clip in extensions at home. This DIY Clip In extension video is everything you need to know in order to make your own clip in extensions. I used 100% virgin hair to create these clip ins from my hair company nusecretshair.com. Thank you for watching my DIY Clip Extension video, make sure to like, subscribe and comment. See you in my next video soon.
Follow Me On Instagram: @Sammi Nu
Products Mentioned:
Straight Hair https://www.nusecretshair.com/#1-insta...
Loreal Hair Dye: https://rstyle.me/+kat-8i3F0ZnHThLfJpG...
Fun Shen Snap Clip Set https://rstyle.me/+eSjmjU4B7WUg2lExPvx...
FTC Disclaimer: Some of these links are affiliate links, which means I may receive a small commission if you decide to purchase from these links. These link are no additional cost to you and will not affect you in any way as consumer. It will certainly help out my channel tremendously. If you decide to support me, thank you in advance. It truly means a lot!
#DiyClipIn #howtomakeclipin #clipinextensions
Hey guys welcome back to my channel so for today's video. I want to show you how i made my own clipping extensions and i'm using here for my own hair company, new secrets, hair i'll, make sure to link everything down in the description box, for you guys, and what i like about this hair. Is that it's quality. It'S virgin hair and it will last you a very long time and i'm just dubbing up the wefts on my singer. Heavy duty sewing machine. I find this process to be very easy to go ahead and double the knots for your extension. You can always use your hand and um sew the extension, but i just find it a little bit more easy took me a while to learn how to use a sewing machine, but trust me. Your girl is practicing, but before i go ahead and add my clippings, i made sure to go ahead and use the l'oreal hair dye in jet black to go ahead and color the hair, because i wanted to match my natural hair and blend in properly. So before. I do that normally everyone will go in with the dye before, but i wanted to wash extensions. I don't know why. I have this thing that, in my hand, that i do for my own hair that i wash my hair first to get rid of anything, and then i add the color so because of that, i did the same thing with the extensions after reading the instructions, i Realized that girl, you didn't need to do all that, but it did came up very well. I love the coloring and everything and it looks shiny. It just looks phenomenal so after i wash it and everything and make sure to protect your hands by the way. I'M gon na go ahead and dye the hair, and i lay down on my counter a trash bag right so that it does not mess up my counter and doesn't get messy and i made sure to put on black clothes because gel you know black dye, you Don'T want to slip away from you, so it's just easy for me to go ahead and dye it this way, and i left it on for about 20 minutes or so and then i wrapped it up in the garbage bag and let some heat trap into it. So that it can process a little quicker and it came out really great so after i let the dye sit on the hair for about 20 minutes, or so i went ahead and rinse it out and add my lavish shampoo by motion once and then i went In with the condition treatment that came in the box dye, to my surprise, it fell heavily and made the hair felt super soft and also pretty shiny. So i'm happy with the products that came into the box dye, the hair looks so luscious and just complements my hair. So much that i really love this process, so i'm prepping the hair now for my blow drying process and i made sure to detangle. While i was using the condition, treatment and also throughout this process, i'm using my dyson blow dryer to blow dry this hair - it did not take a long time to blow dry, thankfully, because it can be very annoying sometimes to blow dry hair. But i just love how shiny and luscious this hair looks. It feels amazing - and i'm just so proud that i am selling this here on my website and after which i blow dry, my hair, i'm going to add the clipping extensions to the hair, and i went on amazon searching for some snap-on clip-ins and i found the Best clippings, in my opinion, these are for from the brand called fu sheen. I think, and it comes with about 30 snap clippings also tape measure scissors needle thread. Everything is like your one-stop shop for diy, clip-ins i'll, make sure to link everything down below and what i want to do with the hair is. I want to go ahead and mimic. My extensions that i have previously that i got from amazon i'm starting off with different inches. I went around like two inch, three, four, five, six, seven, eight and also nine, and i did two of each just to make sure i have enough clippings. You don't need a lot, but just for my preference and sometimes how i want to style my hair. I just want to have enough. So those are the amounts that i have two of each from about two to nine inches. So when adding these snap-on clips the hair any hair, ranging from two inches to three inches, i only use one snap-on clip because those ones are so small that you only need one any year, ranging from about four to six inches. I will use two clip ins because obviously they're in the medium range, and they do need one at each side to make sure that it lays flat and for the inches ranging from about seven to nine. I most definitely use three clippings because you need two at each end and one also in the middle, so that the hair lays flat on your scalp and it does not look too droopy and just so bulky blending into your hair. As you can see, i'm sewing on the clips now to the hair and i made sure to open them up a few times to make sure i'm not sewing them backwards, because trial would be a hot mess and it's pretty time consuming. Just so on these clips, to be honest with you, after a while, i got pretty annoyed with it, but i stuck with it and what i like to do is just to look on the clips and just go through in and out through the gold holes in There and it's pretty basic and once i'm through, i just cut the thread and just tie some knots in there to make sure that everything is sturdy and it stays in place and you're pretty much done. It'S pretty self-explanatory. It'S not very difficult at all. If you want to make your own clipping extensions, i will say all you have to do is make sure that you get here that you really love, that is of quality and again, if you want to purchase from me, everything will be down below, but it's pretty Easy to make your own clipping extensions if you wanted child after about a thousand years of sewing on those snap clips, i'm funny through, and i'm going in right now to curl the extensions i don't want to curl them in my hair, because i want to reduce Any tension and less manipulation of my hair to prevent any breakage. So i found this great idea to go ahead and curl the hair on my canvas head, which is just pretty genius. If you ask me and i'm doing this while i am prepping my hair for my wash day routine, i made sure to post that video before. So you could always check it out if you're intrigued, and if you want to see how i do my own routine and shenanigans. So i will make sure to link the video down below also for you. But this is an ingenious way for you to go ahead and curl your extensions and just look how phenomenal the hair is. Look, how beautiful and luscious it is, and one thing for sure is that it blends in beautifully with my hair. As you can see, this is the end result it just blends in it looks beautiful. I got so much compliment about this here. It'S absolute gold make sure to go ahead and purchase also make sure to like subscribe comment down below, and let me know your thoughts and i will see you in my next video bye.
Comments
African Queen: You did a great job.
0tismadaline: Wow thanks for sharing sweetheart