How To Use Shein Hair Products
- Posted on 08 May, 2020
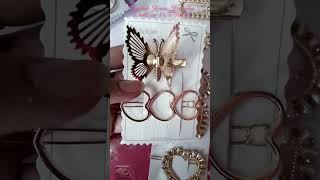
- Clip-in Hair Extensions
- By Anonymous
Michael Gray is a fashion and celeb hair stylist who works with Shein on various of different shoots and has worked with a variety of different celebs from Love Island stars to the TOWIE cast. If you want to know how to style your hair with our high quality Shein hair products Michael is giving a step by step breakdown of two hair looks - So, go shine like a celeb girl. You deserve it!
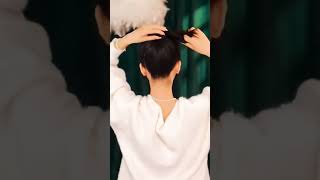
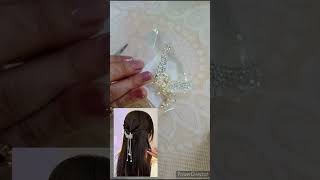
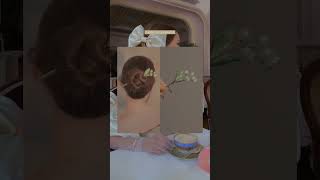
Hello, my name is michael gray, and i am a freelance hairdresser in london. I hope you're all well and having a good week so far, and now you all keep him safe. I know that past few weeks I've been doing a few hair tutorials and a few in survives and that's how been keeping busy keep positive. At the same time, over the past few months, I've been working with Sheen and I absolutely love the brand and I work with a good friend of mine, who is a me Neville she's, a regular model for Sheen. A couple of the looks that we're gon na be creating today, alright, so the looks I do stole Amy's hair for the shoots. So the first looking remember: crating is a really nice loose wave and want to use in the sheen accessories that I absolutely love. They have such a huge variety from headbands clips, hair accessories and crunches, and then the other look I'm gon na creating is a high texture ponytail. Firstly, I'm gon na start by brushing the hair through with a detangling brush, and this helps with control of hair and making sure that the hair is tangle free. So I'm always starting at the ends and working my way up to the rest of the hair. Once I feel the hair is all tangled free, then I'm going to use a heat foot spray and I'm just going to spray. The hair ever so lightly go section by section and then I will brush through that product again through the hair, to ensure there's an even distribution. Now I'm going to take a white tooth comb and I'm going to start by sectioning the hair through the center right down through to the nape of the neck, and I'm going to take a section at the bottom and I'm gon na clip this hair. To one side out of the way, and I'm going to repeat the same on the opposite side, make sure my hair is all tangled free and what I'm gon na do is I'm going to curl the hair going into the center? Let me using a fabulous curling. Tong, so I'm gon na get my first section, I'm going to place the curling tongs and an angle wrap that hair in once and then I'm gon na create some tension. Make sure that curl is nice and springy and then I'll leave the ends just so they're. Just a couple of inches away from the carnot on just a little bit straight, I'm taking my next strand, I'm going to repeat the exact same again. It'S bringing that curling Tong in tilting at an angle, making sure that I've got some tension. Through that right hand, wrapping that hair in keep that Conan Tom moving leaving those ends nice and straight just a little bit just to create a more softness. And then I'm wrapping that hair out I'm going to do the same on the opposite side, but bring that hair going in leaving that hair, nice and straight on the ends, make sure the curler toms tilt. Another angle unwrapping and then repeating the same. Again, then, repeat exactly the same: all the way up through the rest of the now I have got through to the sights I'm going to continue curling the hair away from the face. So I'm going place, my curling tongs in the mid laps make sure I got my tension. Wrapping the hair in leaving those and just slightly it's a bit straight on those ends and then continuing that same method all the way forward. And then I will continue the same method, all the way up to the party repeat, son, exactly the same on the opposite side, so making sure my curls are directed away from the face. Now the hair is all nice and curled. Three, I'm just going to use a product called gladness just to help with defining the curls and eliminating any frizz. So I'm just going to start by grabbing the hair through the ends I'm just going to lightly comb through now, I'm going to finish off the hairstyle with a little bit of back home to add some volume through that top section of the hair, bringing all that Hair back just combing back ever so slightly just to create more of a softness, and I'm going to finish off that hairstyle with a really cute pearl, headband just place it behind the ears, bring that forward and then just finishing off with just a little bit of Spray there you have it, that is the first look completed, and that is styled with a beautiful pearl headband by Sheen. The second look uncrated today is a textured high ponytail. The hair has already been pre cold already, so that I've already got that texture through the hair. Firstly, what I'm going to do is I'm going to make I'm going to introduce the ponytail above about the crown area. So I'm going to take my section from the top here go from the crown and then I take it to the back of the ear and I'm going to section all this hair forward and the repeat same on the opposite side. Now the hair is all sectioned forward. The first part that I'm going to choose split the ponytail into two, so all of this ham go to bring all up to the crown area. So now I've got the hair exactly where abouts I wanted to go. I have got a hair tie and two grips. What I'm gon na do is I'm going to thread a grip through one side. Then I'm gon na wrap that band all around that ponytail making sure it's still got that tension, so wrapping around once wrap him around twice and we'll push that him through and then bruise that cone tail back up. So I've got my foundation of ponytail that I'm creating so far now I'm going to bring her head facing forward, so you can see I love to leave a little bit of softening around the front. So I like to leave just a little bit of shaping round here, just to frame the face and then I'm going to bring all the hair back into the remaining of the ponytail. So it's always good, especially if you are boys, double checking to sort of see how much hair is of framing around the face anything longer than that can look a bit too lank, so I'll repeat the same on the opposite side. Now I'm happy with the amount of hair that is forward connect the remaining of this hair into this ponytail. So I'm bringing all this hair going back, you can use a brush or you can use your fingers and then, before I start to secure that I start to tease that out just herbs to slightly just add a little bit more softness and height through there. You can leave a little bit soften around the ears if you do wish to now feel happy with where the point head is placed, I'm going to repeat the exact same with the previous one, so I'm going to use a hair tie and grips, I'm going to Thread that through wrap that band around make sure it's all nice and secure bruising that back up, I will repeat the same by just teasing that hair out ever so slightly always good to step away. Have a look visualize the shape that you're creating now happy, with the shape that I've got. I'M going to start by splitting that hair through the ponytail and start to add some height, because I was filled, the bigger the ponytail, the better. So first thing: I'm going to start that's the base of the ponytail, so I'm going to start at the very bottom. I'M just going to clip that out the way it's going to get my section just going to spray lightly with some dry shampoo just help with the grit and then I'm going to just going to tease the base of the ponytail just add some height and I'm Going to repeat the same method, all the way up to the top of the ponytail. I now feel happy with the result of the ponytail that I created and I'm going to finish that look off with a sheen hair scrunchie. So I'm going to thread. Let'S punch you through the pairing term and then just Rouge that back up and that's just a really cute way. Just to finish the look, and I absolutely love a good scrunchie and I feel like this scrunch you've really sort of suits the hairstyle itself. She'S going to finish that look off with a little bit more the product just to help with any fine hair. I'M just going to tease this out ever so slightly just going to backcomb this front section ever slightly, just to create a little bit more of a softness, so just teasing that through separate that out and that really just sort of helps, frames and softens. The look and I'm gon na repeat the same on the opposite side, and there you have it that is the textured high ponytail. I hope you all enjoy the hair tutorials that I created today. A couple looks eye style on Amy Neville for the sheen photoshoots and if you decide to recreate any other, looks then please feel free to tag me or Sheen and use the hashtag stay in with machine. If you have any questions or if you want to me hair care tips, then please feel free to leave any questions in the comments below and I'll be sure to answer them, for you hope, you'll, stay, safe and I'll see you soon.
Comments
Emily Brinckmann: Can you please link the curling wand you used.
Gosia S: Is this natural or plastic hair?