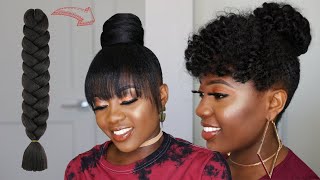
Knotless Box Braids On Straight Hair (For Loose-Textured Hair)
- Posted on 12 March, 2023
- Clip-in Hair Extensions
- By Anonymous
Want to know how to braid on straight hair? Here's everything you need and how to do it with tips that guaranteed to help.
Hair and Style details:
Ruwa hair (4 packs 3x)
Freetress Mazo Curls
Loc N Gel :https://amzn.to/3l67tRI (affiliate link)
Precison Ruler comb: https://indybindybraids.myshopify.com/...
Parting Chart Bundle: https://www.etsy.com/listing/142255552...
Precision Ruler Comb: https://indybindybraids.myshopify.com/...
Knotless Braid Tutorial: https://www.google.com/search?q=knotle...
visit Indybindybraids.com
Follow me on my socials:
Personal IG:
https://www.instagram.com/_indybindy/
Braiding IG: https://www.instagram.com/indybindybra...
Enroll in my course here: https://indybindybraids.teachable.com
✰ FAQ ✰
Where are you located?
-Orlando, Florida near UCF
how old are you?
-21
what do you use to edit?
-vllo and final cut pro
where are you from?
-Miami, Fl
how long have you been braiding?
-4 years
Hey babes today, I'm going to show you guys how I transformed her hair from this to this. So first, I'm prepping my hair. If you've never prepped hair like this before it is something to try, I'm basically just separating small pieces and laying them flat on a towel and the towel is to keep them from slipping because girl. If you knock this tray over it's over, like you have to pick them all up, so just be careful and I'm also turning them to the side a little bit just so that they're not all facing the same way and it's kind of easier to pick up. The size that I'm doing today is medium, so that's two rows beneath the ear and then four above and I have the perfect parting guide for you. Guys and it'll be linked in the description down below, and I literally referenced this all the time. For all my clients, so after parting in a t-shape, I applied my shine and jam directly to the part, and now I'm going to repart right on top of it, and that's going to make sure that my part is super crisp, because each hair basically needs to Be on one side of the part you do not want any hairs crossing over the part, because then it's not going to look as clean. So remember I'm doing two rows beneath the tip of her ear and they're, also in a bricklayer pattern so that it looks fuller, okay for Maria's, hair texture, the key is to use a product that has a good hold. So, as you can see, her hair is pretty straight or wavy. I think she has like natural curls, I'm not too sure, because she came with her hair already detangled and stretched, but you can clearly see that her hair has a looser pattern, and sometimes this just makes it harder for braiders to grip onto the hair. If that texture isn't there but you're going to create that hold with the product that you're using so the product I'm using is lock in or lock-in, I'm not sure, but this product is really great. For that hold it's really thick and you can even see it sitting on my hand. I can flip my hand upside down and it's gon na stick, so I'm using this product for Maria's hair texture, because it's going to provide me with that hold in that grip. That'S needed to make sure that my braids are even in tightness around the base. If you guys would like a more slowed down detailed version of how to do a knotless braid. I have the perfect video for that and it'll be linked right here in the cards. As well as Down Below in the description box, so a tip when braiding, looser, hair textures is to make sure that you're braiding very close to the base of the braid. So you see how my hands are very close to where I'm braiding and they're. Not a few inches down, that's going to make your braid very loose and not very structured, so make sure that you're braiding very close to where your braid is forming. Something that I do is make sure that I'm combing out not just the top of the braid. You essentially want the braid to be in the middle of your box, so you can hit the top hit the bottom and just make sure that the tension is even on all sides of the braid so that your braid ends up being in the middle of the Box, oh foreign, so here you can start to see where the boxes stagger on top of each other and by stagger I just mean that the line is going to go in line up directly with the braid, underneath it and fall right in between the part. If any of that sounds confusing, I really do recommend checking out my parting guide bundle and it's ten dollars for all sizes. So if you're thinking about doing a small, medium, medium, large jumbo or even triangle Parts, the guide is right there in that bundle and since I'm shamelessly plugging everything that actually really does help, I'm using my IBB Precision ruler comb to make sure that all my parts Are the same size? I know that some of you guys struggle with trying to get consistent sized parting in this Precision ruler comb. Is it okay? It has a ruler on one side, so you can actually measure how big your parts are and make them. Even you can order yours today at indybindy, braids.com foreign foreign toward the back of the braid, and that's going to make sure that I'm hiding her actual hair color, because you can see that this hair is like a light. Brown color. And I think it just looks more seamless when you're tucking hair to the back of the braid. So she also wanted the goddess boho look, so I'm adding the curls toward the end of the braid. The same way that I add the braiding hair to braids and I'm also adding the hair throughout the entirety of the style. But I have a more detailed tutorial on how I do that and how I place the curls and everything and, of course, it'll be linked. The main takeaway, though, is that you want to add the curly pieces in the same way that you're feeding in the curls at the end, as well as the braiding hair you're, just going to add in a curly piece but leave out one end of it and Kind of just place it on top of your comb or just like clip it to the side and that's going to let it hang out of the braid and give it that Curly Bohemian look. So, as I'm nearing the end of the style, I had about two rows left from this point, but you just want to make sure that your rows are u-shaped to fit the shape of your client's head, and this was the final look. She absolutely loved them. She was going on a cruise the next day and she was really feeling them if you guys, like this, video, go ahead and hit the Subscribe Button, as well as a notification Bell and I'll see you guys in my next video foreign


Comments
Kristina Palis Agoncillo: Beautiful! How long did this style take you and how long to you estimate it would last for clients with straighter hair?
torrie lashay: Beautiful… her hair is cute..
👉 BUY YOUTUBE VIEWS 👉 Link in Bio: you have talennt in video making