Hair Hack: How To Cut And Layer Your Hair/ Extensions - Lauren Pope
- Posted on 12 September, 2016
- Clip-in Hair Extensions
- By Anonymous
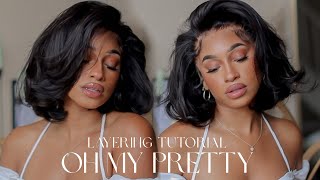
I wanted to show you how easy it is to cut in and layer Clip In Extensions at home, this is slightly longer then my usual vids but i had to fit a lot in so i hope its helpful to you guys!
HAIR - Hair Rehab London Luxe Volume Clip Ins (Colour Laurens Locks)
TOP - Topshop
STRAIGHTENERS - Cloud 9
ROOT SPRAY POWDER - John Frieda
Hope you enjoy and remember to show me the looks if you recreate them on Insta or Twitter.
Snapchat - laurenxpope
Welcome back, I've got a good one for you today right, so we're going to do how to apply clip ins, but then I'm also going to show you how to cut in and layer your clip in first up. These are the hair extensions. These are the luxe volume clip ins from Harry hug Gundam. This color is Lauren's and ops, and these are 18 inches. This is how they come in the pack. You'Ve got your sections here. I just take it all out. Some scissors you've got different size wefts with clips on. So that's your largest piece with four four clips on there and they're triple layered. Each weft is triple layered with this lace design. So it's super super flat, which is ideal. We don't want lots of bumps when we rank them in your middle section. You get two of those there's another one, that's to say, then the smaller section and then you've got two these smaller and then you've got four of the single pieces. First things. First, the easy thing for you to do when you're cutting is, if your head straight, I'm going to run the straighteners over my own hair. These are cloud9 straighteners, all right, so we've got smooth hair and I'm just going to in my way around a little bit because I'm slightly awkward to see all right, that's back. I would always use to dry shampoo before playing clip ends to just give you that little bit of extra grip, this one is kind of amazing. It'S the batiste have any volume. There is a really like a formula you have to stick to with these I'm going to show you the way I like to put them in and if that's the way you like to put really great, if not you can move them around, you can always start From the smaller piece pieces going up to the larger pieces, and then I save the single pieces for around the front of my face, you're going to get your two two clip sections they're going to go at the bottom, so I usually start around the bottom of My ear to create a line going across from one bottom of the ear to the other and then you're just going to temporarily clip this top section other way, then using a comb you're going to backcomb the root area where the clips are going to sit. Oh also never got piece brain where you've just back home that acts as such and like an anchor for the clips, really stick into. It'S obviously open up the clips and then push down. Let me show you a back view. Yo got my section across the to back home sections and then it Clips both downwards and then close them. Then you're going to section again so let loose this top bit now. I would usually go around, maybe in its centimeter and a half above the row. You'Ve just done to do exactly the same technique so back home spray, the back home and then get your stuck into clip piece. Now we're going to go for the three clip piece. This is your medium size, so at this pace, we're going to go again, probably around centimeter to half above this time. Remember you need to back her in the middle in the end and but you'll see already you're already starting to conceal your own hair. Second, three clip piece centimeter and a half above that one. This is your last large section now, depending on how short or how layered your own hair is. If your hair is, and if your hair is short and very layered, I would suggest taking your clips as high as you possibly can without them being visible. Just because the higher the clips are the more you're going to conceal those layers, and I think I'm going to go about always that as that 2 centimeters and that amount above that row, I've just done a better mind. Your clips you've now got four of them. So you're back combing needs to be at the ends and then, if not in the middle, but just either side of the middle okay. So now we have our four silver pieces. These are almost sight. I think them, like your face framing pieces, so push your hair down. If you have got a little bit dented and once you've been ripping up and again I'll just run, it straight is over as you've got four. Obviously, it's to each side, you can in your mat and I tend to hold them up and see where I need them, so you can see you're more than like you're going to have a gap of your own hair, they're chunk of extensions. So you want to fill in that gap with these everyone we're going to chop them in after so I'd, say: that's why I'm going to put them underneath so just above the ER and then the next one went slightly above and slightly slanted towards the face. I think when that's all layered that's going to be perfect placement for me, so I'm going to repeat exactly the same on the other side, but you got all your tippin's in so remember, I mention about the root thing. Little root trick, I'm actually going to powder a root onto these front ones. I don't really mind these back one's because you're not going to see you know it's a little bit windy and if it separates here, I just think that's slightly visible. So I'm just going to powder the root once this section and the top layer of clips you see what difference that makes all right. So now is the fun part. Well I say fun fights all sort of scariest parts. It'S at this point. It could go wrong. So I'm going to show you how to do it step by step and it's going to take a little bit of time, but I mean I don't know about you, but I would much rather take my time at something and know it's done right and just go In full hog and then it's ruined and then you've wasted a packer bin. So you need to get yourself one of these. This is a cut and finish hair. Trimmer I've got it from boots. You can go, but it's basic thing: a razor, a hair razor. So it looks like this and either side is a sharp razor, so you do have to be careful. It'S got little ridges, so it should protect your fingers, but I mean, if you're young again a doll to help you with this. I fact, if you y'all, don't even do this get out on to do this, but a star with the font sections. So, as you probably notice your hair just would section your hair before they cut it. So I'm going to do a similar things where you're parting ends, I'm going to run my finger downwards and grab that hair either side. So this section here and then the same on the other side in those sections you're more than likely. If you place in the same way that I have you more than likely got you to two front section pieces and there so you've got your four sections on both sides and start with this side. So you're always running your fingers down feeding where your own hair ends. So mine is around here and you're, going to really gently raise it downwards. You see I'm taking really minimal hair each time. That'S why I'm saying it's going to take a long time. So in again just follow it down and each time you go in just start that little bit lower and you should be able to see already. You got yourself some layers, which is what we wanted. So I'm quite happy with that. So for now I'm going to do exactly the same on this side. I don't know if you can view it as well on this side, most also finds I'm right-handed this sideways. Yesterday than this side, it's like you kind of almost have to go back on yourself. I would still use my right hand to do. It may help when you're doing it to look straight on into a mirror and just grab sections eat the same on each side and just see if they're equal sounds slightly longer. What you're looking for is a real graduation, not okay, instant step so you're going to bring all of it forward now so, where you've laid your clippings, you cause you've got like bits of separations we're just going to blend that now. My way of doing this is take it's one. Big section do the same trick when you've got your fingers and just really gently raise it downwards, with the razor almost like a three-quarter slant like this, you can see already you'll get in that more natural finish. I can see some pieces here need that little bit of lending so to take this, please all! Basically, what you can see by this point just go in visually, any bits you see that stick out just raise them down and then I'm pretty happy with that. Now I think it's sitting like as if it's my own hair, so much better than I see on this side now you're going to repeat the process all over again on the other side, so try and again keep the same level of patience, because I would just Hate for you now to go in a ruin it at this late stage. When is looking amazing so again remember to section off its back Bracey the whole half of this side, the head of the back I'll go and do the same technique again, and I think I'm pretty much done. I'Ve got it laid on the front. It'S choppy the ends, look natural, they don't look blunt or uneven, and you've done that yourself using super cheap drugstore products offer all the details of this below. So I do feel like this is a really good wall for a budget by. I think it's around. I almost have about six pounds, we do it more and but yeah hope you're showing that it is actually quite easy to do all this at home yourself. If you feel like this is a good way to do it. Let me know if you like: it's a bad way to do it. Let me know I'm always open to suggestions and I'm always up for learning new things as well. So if you have tips and tricks for me, let me know - or I hope you like this video - I hope it was useful and I'll see you very very soon.

Comments
Taylor Kate: I swear I've watched like 20 videos on how to blend extensions and this is the first one I've found that is actually helpful. Actually an easy method and don't need to be a bloody hairdresser to do it. Thankyou!
Sami Jo: Came across this video while debating doing a shadow root on my extensions and possibly ruining them. You just saved me so much time and possible heartache with that powder trick! Thank you thank you thank you
Jae Razo: Out of ALL the videos ive watched and searched for, on how to trim my own extensions. This was by far the easiest, quickest & most affordable way . Not to mention pretty accurate . Thank you
Tonya Dawn: I have watched soooo many of these to figure out how to blend my extensions and this one is by far the best one!! Thanks so much u seriously saved my sanity I was getting so frustrated!!! ❤️
Kat BeWitched: Nice job! Thank you. I am going to do mine tomorrow. Razor seems a better way to go than scissors I used last time. Your came out great. Thank you for sharing!
totallytony: loved this. I've never actually seen anyone cut there own extensions. I'm definitely going to be ordering the 18" luxe clip ins later this year! i love how great the quality looks in your videos.
Ezra Kobylnik: Great video! I feel more confident trying this out now, thank you
Katie Allison: This is an amazing way to do it yourself!! I dye my hair red and have done for years just wish I could get a shade that suits X
hexgamerzaedyn: Finally a video worth clicking and watching!! You actually explain it perfectly!! The other videos are simply not for DIY extension trimming
Danielle J: Great tutorial! Thank you ♡
Sara Samardzic: This is the one and only video that gave me the confidence to cut my own extensions! Thank you!!
kesa1986: This was the best hair blending video I've ever seen !
Sandra Saki: Beautiful as always. Great turtorial
Anna s: by far the best and most easiest way ive seen!! love your videos all of the looks you do are gorgeous xx
DarDar Kazzy: Hi Lauren. First of all, you are absolutely beautiful and I love your accent. This is my first time watching a video to learn how to trim and clip on extensions, Ive never worn them so putting them in myself should be very interesting! haha I just watched your video and you made it seem very simple to put them in. Actually, I picked your video out of all the other ones for some reason.♀️ Something just told me to pick yours. Lol I’m glad I did too, because I loved it!! ♥️ Is there anyway I can send you a before and after picture so you can see if I did a good job? Lol I promise I’m not a weirdo!! lol I’m just a 50 year old woman who has no clue how to put in extensions. I desperately need them too. I had to get a lot of my hair cut off because someone who colored it damaged it sooo bad that I had to cut a lot of it off. I have sooo many broken hair strands all over and a lot of my hair fell out!!! She actually burned the top of scalp too!! . It was so pink when she was done. It was an absolute horrific ordeal to go through. Well I’m off to the beauty store to buy that razor thingy you’re using. Lol I really hope I can do this without messing my extensions up. Wish me luck Lauren!! LoL
Devon Stone: This is hands down the Best technique to blend extensions!!
Ida Devine: Looks fabulous!!!! Great vid!!!!!!
Nae: So happy to have found this video Lauren in search for how to layer my extensions! My husband and I enjoy watching The Only Way Is Essex!! Looking so "reem" ! (New favorite word!) :D
Miffy's Bandswidth: Best hair clip extension video I have ever watched. Thank you
elena sanchez: I am very curious about how it would looked curled now !!! Please curl it and show us how it looks after you curl it !!!
Dante Velasquez: Very well done. And I am a hairstylist :-)
Neisha Molaison: Do you ever do makeup tutorials? Your makeup is so pretty in this video! <3
Miki Lynn: Not only did you teach how to trim and blend the extensions but how to correctly put them in! I’ve been doing it all wrong for years! Whoops.
Jade Alyss: Amazing job! Thank u for the trick
Glam Seamless: You look so gorgeous! Have your tried tape extensions? You would love them.
F A: best extension cutting video I have seen, Thankyou! x
Jessica Tilton: Great video! Thanks for posting!
Henna: Can you do this with hair thinning scissors?
Gabby G: Trimming starts at 9:30 ♀️
MissFlorence: You are freaking genius
LIEN M: love it!
Eva: Why do you tease the hair before putting the extensions? Does this make it hold better?
Florentyna: fantastic video! thankyou!!
F A: Best hair extensions blending video I’ve seen
Vianey Rangel: Supper useful thanks
Donna_Leesa: How do you remember exactly where to put the hair back in so all the layers are even again for next time? :) x
Riles E: I'm a hairdresser who does NOT use a razor on anyone's hair, but this tutorial was amazing! I'm planning on doing exactly what you did here on my extensions when they come. It's so fun learning from youtube videos like yours! There is a lot of info to learn online and I'm just so obsessed with taking recommendations from other people! Thank you, love! (I will say, I understand the use of a razor on extensions, I just prefer scissors only for natural hair. I refuse to use texturizing scissors on natural hair as well, but I can see how they would help with extensions. I do not instal extensions in the salon.)
helenmalaine: Wish you could come and do my hair for me on my wedding day!!!
Priscilla Christen: Wow you are so pretty! Love your hair!!!
Rachel S. White: I gotta binge watch TOWIE again.
Linda Cui: Nice vedio, very helpful
Kinia: Where did you bough this Hair trimmer? LOVE your Hair ☺xxx
F J: And after you take them out how do u know the place of the each peace
YGiann: the trimmer is not actually in the description maybe add it so we can find it?
Cazandanna: Can't see this tool on the Boots website - do you have a link? Thanks
Beach Life: I went on website and don't see "Laurens Locks" offered as a color choice as shown in this video...and this is the color that would match my hair, Do you still offer this color?
Klaire Martin: You look like Beyonce with the extentions
PU5H: God was having a good day when he created you!
Paula x: ❤️❤️
I See Si: Good video awful music
Zoe D: I think she means inches not cm lol
S A: gorg
Skye Goodman: She lowkey looks like Beyoncé
Pauline Nguywascinski: Tutorial took too long to get to the point. I just wanted to know how to cut and layer but you rambled.