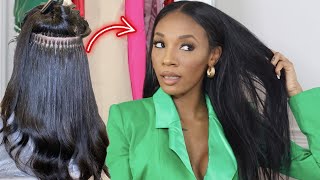
Want Long Curly Hair Try This! | Twist Out Using Curly Clip In Hair Extensions (First Impressions)
- Posted on 08 July, 2022
- Clip-in Hair Extensions
- By Anonymous
Using Curls Curls Curly Clip in Hair Extensions On My Natural Hair! First Impressions & Twist Out Demo. Links & savings below ⬇️
Link to the hair: https://www.curlscurls.com/kinky-curly...
Hair: Thick (10pcs) Kinky Curly Clip-in
Length: 20''
Texture: Kinky Curly(3c/4a)
Color: Natural color
$5 off CurlsCurls coupon code " CPA "
More Clip-in options:
https://www.curlscurls.com/clipin-exte...
CurlsCurls Official Contacts:
https://www.curlscurls.com/?yc=CPA1
https://www.instagram.com/curlscurlsof...
OVERVIEW:
I have been wanting to try curly clip ins for a long time now and I super excited when Curls Curls sent me their clip ins for natural hair! These are the most natural clip ins I’ve seen in person, it felt like I was holding someone’s twist out or wash and go in my hands. At first it was a struggle but once I got the hang of it, and figured out how to blend my natural hair with the clip ins I was good. My hair is about bra strap length and the clip ins reached my belly button when stretched so you can use clip ins on short hair or long hair as well (they also have blown out and kinky curly clip ins as well). Overall this was a learning experience and I can’t wait to experiment more with hair extensions on my type 3/4 natural hair! See time stamps and products used below and let me know in the comments if you have any questions
TIME STAMPS:
00:00 Introduction
01:30 Wash & Prep Clip ins
5:15 Clip ins Install/Twists
8:19 Night Time Routine/Take Down
11:57 How To Remove & Store Clip ins
12:39 Final Thoughts
PRODUCTS USED:
TGIN Moisture Rich Sulfate Free Shampoo
TGIN Green Tea Super Moist Leave In Conditioner
Pattern Leave-In Conditioner
Pattern Styling Custard
The Doux Crazy Sexy Curl Foam
Curlsmith Bonding Oil
Pattern Scalp Serum
Wet Brush Wide Tooth Detangling Comb
CONTACT INFORMATION:
Email For Subscribers - [email protected]
Business Email - [email protected]
Instagram - https://www.instagram.com/curlsofacpa/...
Blog - https://curlsofacpa.com/ (under construction but stop by and say hi)
OTHER INFO:
Shop My Amazon Favs (Hair, Body, Tech)
https://www.amazon.com/shop/curlsofacp...
My Music - https://www.epidemicsound.com/referral...
Editing Software - Premier Pro
Thumbnail Editor - Canva.com + PowerPoint
VidIQ YouTube Research Tool - http://vidiq.com/?afmc=72j
FTC Disclaimer: This video is done in collaboration with Curls Curls. Links within the description box may be affiliate links which allows me a small commission at no additional cost to you.
#naturalhair #curlscurls #curlyclipinhairstyles #twistout #longhair #curlscurls #curlyclipins #kinkycurlyclipins #clipinhairextensions #clipinsnaturalhair
What'S up beautiful people, my name is sable and welcome to my channel curls of a cpa where i take you on my perfectly perfect journey and today i'm going to show you how i went from this to this in seconds. Well, maybe not seconds, but let's get into it now, of course, my hair did not grow this fast. These are actually clippings. Yes, shout out to curls curls for sending your girl some bundles and also sponsoring this video. We love to see it her usual links to all the products that i use and mention will be down in the description box below, and i also have a link and description of the exact clip-ins that i have so you can figure out which ones are best For you and of course curls curls gave us a coat, so you can save some coin, so just use a code cpa to save some dollars honey. Also, curls curls is always having sales. So, whenever you're ready to get your clip in or wig fixed, just click the link in my description box to see how you can save this is going to be a detailed video i'll make sure to include timestamps. So you can kind of skip around, but because i'm a beginner, i wanted to make sure that i gave you guys all my tips for the installation for the parting, for how i prep the hair and all that so that, if you're a beginner as well, you Know you can benefit from that if you are not a beginner okay and if you have suggestions, if you see somewhere where i can improve, listen, don't be shy. Put it down in the comments below we all gon na be learning together, but that's enough talking. Let'S get into it all right, so i'm gon na do a mini unboxing. Everything you need is packed into this little orange satin bag, and you can use this to store the hair when you are not using it and inside the bag. Is the hair, of course, and some face masks a pamphlet with instructions on how to wash style and care for the clip-ins, and it also has product and tool recommendations as well, and then you get these three extra clips just in case you need them and because I wanted length and body i chose the thick 20 inch bundle that comes with 10 pieces and you get two five clips on a 10 inch weft. You get two four clips on a nine inch weft. You get two three clips on a seven inch weft two. Two clips on a four inch weft, and then you get two two clips on a three inch weft and the quality of this hair is really nice like it feels like i'm, holding someone's wash and go or twist out in my hands, and this shrinkage is definitely Real which you'll see soon and thankfully it doesn't smell, but i still recommend that you give it a nice wash and condition before styling and i'm going to show you how i do it to keep the hair together. While i wash i'm gon na use. One of my clips to clamp the wefts together, if i thought about it before i would have just separated the clip-ins after washing them, but using the clip did the trick. Now that the hair is all gathered, i'm going to start by running the clip-ins under warm water until they are soaking wet. Then i'm going in with the tgi and moisture rich sulfate free shampoo, which is one of the cleansers that they recommend. I make sure to emulsify the shampoo in my hands first and then i apply it to soaking, wet hair and if i have any trouble distributing the shampoo, i just add more water and then add more product. If needed and you'll see me smoothing lightly raking and finger detangling just to make sure that no strand is left behind and as i finger detangled, i did notice, there was a little shedding, but it really wasn't anything to be alarmed about i'll make sure to show You guys how much hair was lost after i'm done with the conditioning step and now i'm attempting to thoroughly rinse the shampoo, but it was a little difficult doing this. In the sink i mean, the hair is long, there's suds in the sink and then the suds in the sink is getting on the hair as it's being rinsed. It was just a whole thing, so i may try doing this in the shower in the future, but other than that. This shampoo is really easy to rinse out the hair, and the hair feels amazing. Next, i'm going in with the pattern. Beauty, leave-in conditioner, and this wasn't one of the recommended conditioners, but it's what i used in my hair and i think that it's similar to the ones that are on the list. So i decided to give it a try. I made sure to do a test on some other curls curls hair that i had and i liked how it made the hair feel and look so. This is sable approved, and i treat this how i treat my own hair. I apply the leave-in all over and then i separate each clip in and make sure each strand is coated, especially since the consistency of this leave-in is kind of thick. So you know you want to make sure you get into all the crevices and after working the conditioner in i let it sit for at least three minutes like the directions say - and this is how much hair was lost as i finger detangled during the wash and The conditioning stage - and i am back 10 minutes later and just to make my life easier - i'm gon na wash each clip in one by one instead of struggling like i did with the shampoo and y'all that little 10 minute condition session with this leave-in has the Hair feeling amazing, like here's, a close-up of how juicy and shiny this hair is like come through. Shine come through, curls come through definition and yes, my bathroom floor is wet right now from this demonstration, but i think it was worth it to get the shot and the key to using clip-ins is making sure that you stay organized, and so i just separated the Clip-Ins by size and here's a sneak peek of my little setup as you can see, your girl is prepared. Okay - and this is what my hair is looking like. After having the pattern leave and brewing under this cap for many hours like i don't, even i can't even tell you how long it's been per usual. I'M gon na put my hair in a couple sections to stay organized as i style, and i will be using the pattern - beauty styling custard as my styler today, which was definitely a mistake, but we'll talk about that a little later and i can't lie all it Took me a while to get the hang of this like knowing, if i should detangle my hair before adding the clip-ins or detangling with the clip-ins already in or how much hair to twist into the clip-ins, and some areas of my hair are more dense. So they are more strands in those sections, so it wasn't a cookie cutter experience and i definitely went through a good learning curve. Once i got to the middle, i began to get the hang of it. I'M gon na talk about all the lessons learned at the end, so just make sure you stay tuned for that. But, aside from my personal beginner struggles, this hair is really easy to work with it's 100 virgin hair. So you can treat it just like the hair on your head. Okay, you can clip it just straight into your hair. Without doing anything to it, you can do a wash and go. You can do a nice updo situation, it can be braided, twisted heat styled and even bleached and dyed. So it's giving versatility okay. Now, when i got to the front, i also had a hard time because the front of my head has the lowest density. So there are less strands to work with, so i have to be careful when it comes to styling this section, and i also have to make sure i don't apply too much tension in this area as well. It would have been helpful for the front to have a couple like one or two inch double wefts with like one clip in on it, because that would have been easier to kind of fit into this section. But i was able to improvise - and i just cut a couple of the two clip wefts in half and i used those for the front of my head. I finally made it work. I had to like, pin it underneath this twist to get it toast to stay, but now it's a little more comfortable, and this is partially user error like i think i could have avoided this. If i pre-measured the sections because then i would have made sure that the section was wide enough to accommodate the length of the two clip weft. But it's all a learning experience. I was able to just improvise and make it work and then to make sure that the clip-ins were not visible in the front. I ended up splitting each section in half and putting the clip in between the sections to just make a clip-in sandwich, and then i twisted all the hair together, and i think i did a good job in the front like it's definitely giving. How will they know how will they know that this ain't, all my hair now? I also did this when i got to the last section like in the middle of my head, but i didn't have enough hair to go on top, so it wasn't as successful. I'M just hoping that you know when i unravel the twist it'll look better. You know fingers crossed. Let me give you guys a 360. i'll, give you guys all the angles, so you can see what i'm working with, and this is what the ends look like. You know so overall this was okay, we'll see what it's like, you know with the takedown, but i'm just gon na put on my satin scarf go sit under my hooded dryer and go to bed, and here i am the next day right before bed and y'all. My hair is still not dry, so i'm just gon na put on my scarf and my bonnet and pray that my hair is dry in the morning because i am not having fun sleeping in these clip-ins. I feel cute though, but it's not fun. I will see you soon. What is up guys coming to you two days later, when i tell you my hair took forever to dry, but we'll get into that soon. But let's get these uh these twists up out of my head. Okay, i'm gon na take some of the oil i'm just gon na put it on every twist. That way, i don't have to remember you know as i go so i'm just gon na wrap it all over. There'S a close-up of the how the twists look, and so, while i take it out, i kind of talk about how my hair has been feeling what i've been going through, but, okay that doesn't look bad, hey y'all. I just had to take my shirt off. I was sweating bullets, but check out the back. The curls are looking all right yeah. So, as you can see like my hair matches the curl pattern, but as it gets to the bottom, the density is not there is. There is just not enough hair pearls, curls hollowed, your girl, i feel like we need some one clips that are dense like you know, that are like the double or triple wefts whatever you know, because this front section needed a little more hair, but my roots couldn't Take the tension and of course there was enough space because of the way that i parted it. So there's a lot of factors, but i basically had to make my own one clip, which then i also lost some hair, because there there's hair, that's sewn in like the middle of each clip. If that makes sense, you know learning experience, i'm sure, once all the twists are out, it'll be cute and i might even just throw in the um the clippings that i have left over. I don't know we'll see this actually looks like someone's had a hair someone's had a hair looks like this all right. So this is how it looks when i don't separate it completely, but the ends still don't match. So i'm just going to separate all the way and that'll also give the clip ins some body for me just kind of separating it a little more. You know so and then, as i go, i'm realizing it's actually my hair, that's frizzy, not the clippings, it's actually! The hair off my own head that betrayed me. The clippings feel good the clip-ins. They like the curls are really actually nice and smooth and juicy like yeah. They look good dang. I did not get my hair smooth. Oh, my gosh just got ta work on my technique. I also noticed there is less tension with the twists unraveled than when they were in. I don't know if it was like. Maybe the weight of the twist was kind of pulling on the clip-ins, but as i'm unraveling, i feel a lot of relief. It'S weird like some of my hair feels amazing and other parts are really frizzy. It has nothing to do with the clipping, but i'm just sharing all my observations, so i'm gon na forget nothing, and i love that i was able to cover the clippings in this back middle section, because i was a little worried when the twists were in just Hoping that next time i could have a little less frizz in this area, but who's really going to look at the back of my head, but now that all the twists are out and i'm dressed, i'm just going to use some of the pattern edge, control tame. Some of this frizz give me some shine, lay my edges down, and then i decided to just pin up one side, and these are my final results guys. Even though this was my first time, i think i did an okay job and y'all look at how long this hair is like it's all the way down. My back now before i share my final thoughts. I wanted to show you guys how i remove the clip-ins and it's pretty easy, just make sure you're, taking your time when you're separating the hair from your hair, and i made sure to use my pattern scallop serum to soothe my scalp, but it felt so good. Okay, this is what i am working with after i take all the clippings out. This is actually like really cute. It is really cute. Definitely frizzier than my hair usually is on like a day one, but that's. Okay. It'S still cute with his body has a cute little shape, and so, when i just want some more body and length, i can just put the clippings back in and to store the hair. All you have to do is put them in the satin bag. It came in and that's it friend, let's get into these final thoughts all right, so i'm just gon na try to pick it a little bit just to give it some body and also do a little bit more blending. I think that worked a little bit. I think it's working, so this is what it's looking like with all the hair pulled forward, as you can see, back hair is just i didn't twist it small enough, and so it's just peeking through so i'm just gon na go like that. That takes care of that. Okay. So for my final thoughts, i really like these clip-ins. These are the clip-ins that i have left over. These are the ones i kind of made into twos and ones, and i had to take them out because my edges, it was too much tension on my edges, the front part of my hair, like on this side and on the other side, it's a little more Fries than the rest of my head, and even the back of my head, like the nape art, is a little more sensitive, and so i just take them down and of course i took them down to kind of style, but this is a good little bundle of Hair, okay and then these are the ones that i actually did not even use, and so i have a good amount of hair left over, but i still have a ton in my head. Okay, in terms of how i liked working with the hair, i really liked working with the hair, it was easy to wash. It was easy to condition. It'S also easy to detangle. Next time i may detangle, like with the brush when it's outside of my hair, because i found that when i re-brushed my hair with the clippings, my hair got really frizzy and then it was harder to blend it right for those of you who watch me, i Try my hardest not to use my brush if i'm looking for light definition and because these clip-ins are so defined as defined as my most defined twist out would be using the brush in some sections was not helpful, but it feels really good. It feels like my hair, it doesn't have the elasticity of my hair, of course, like this is a little bit more springy than, of course, my own head, but overall i really enjoyed this process um. Now. Let me let me say this: it took me forever to do this, like it took me about three four hours to figure it out. This is my first time i'm trying to figure out placement, i'm trying to figure out parting, and so, in terms of my parting, what i will do next time is i'll. Make sure that i part and measure the front first. So what ended up happening was there? Wasn'T enough space in the front to put the clip in so i ended up having to cut them, and if i had more space, i think i could have been able to blend it a little better and then also find the balance between how much of my Hair to use and how much of the clipping to use you know what i'm saying that was a little challenging, but now i know that back. I had way too much of my hair to try to blend in with the clipping, because look at this, that's like a whole chunk and then this is clipping, and so maybe i need to put a clip in like right here test it since we're here all Right so i have one of the ones that i made, and so i think i'm gon na just put it. I just stuck it somewhere. Oh, i stand corrected. Let me do the other side too. Do i have any more one ones? Wait, a minute. Okay. I didn't pin that one right, but yeah that looks a little better, okay yeah. So after the fact you can kind of play around and put some in okay, oh okay! This is a good example, so this clip in because i did not use it for the twist out. The texture is different. So look, this side is the one that was twisted in my hair, and this is the natural curl of the clip in okay. This is me, so i can tell the difference when i put it up on my head. Let me just put that right. There blend it a lot better: okay, okay, okay, you're cooking with gas; oh okay, yeah! So i'm thinking for next time. What i will do is, i will twist the perimeter of my hair without any clip-ins and then once i'm ready to style i'll just clip them in wherever i need. You know some extra body because i feel like i could have gotten a better twist out, especially in the front without the clippings, in it just the front area, because the front of my hair, the density, is very low when compared to the other parts of my Hair - and it was just a lot and then the next thing is it's uh. It'S actually really humid in my house, okay and even outside - and i think using the custard - might have also contributed to some of the frizz, because the custard is very much humectant, rich. Okay and for me i don't mind frizz right, but i need my whole head to be frizzy. We gon na be frizzy, we need to commit, and so because there are only portions of my hair that got frizzy. I didn't really like it much, but i was still able to just kind of blend it in by doing the side part putting in a little edge control. You know and stuff like that, and so i do really like how my hair looks next time will friend do i'm going to use a light or like a lightweight cream that has good holds or i'm going to just use foam when i did my test of What products i wanted to use? I used the new foam from the dew and then i used a custard. Both curls look good, but the side with the custard. It was softer. So i was thinking. Oh, this is softer. This is what i will use, but no in terms of my drying time, my hair took two days to dry and then my hair would end up being frizzy, because i had to spend so much time under the dryer. So it's not even really worth it. Like did, i really have was the hair that much more moisturized i had to spend more time under the dryer right, so just make sure you use something lightweight, because it's not just your hair, that's going to be there right. It'S your hair and the clippings, and so it's double the trouble double the weight double the drying time. Okay and for me, i found the clippings they style better when they're wet, that's just for me or i'm able to, i guess, blend it better when it's wet. I don't know i need to do some more experimenting, but well, this was fire. Also, this here is 20 inches. This goes all the way like to my almost my belly button right and so because it's so long when you get to the ends, it is not as dense which, when you think about it, if you look at most people's hairs, i guess that's how their hair Is their ends are a little bit thinner but because my hair has a good amount of density in some parts, it does look a little strange and i mean that's mainly because the placement of the clip-ins and all that stuff. So i'm going to try a bunch of things. Hopefully curls curls will work with me again how you doing, but i'm going to try a couple things: one i'm going to try a twist and curl the next time around two. I might try clippings. That are a little shorter that are a little closer to my length so that i can um get that body that i like now. I have a length like it's giving length, but listen you live. You learn it's still cute or whatever. I want to try twisting the clip ins by itself, so it gets a twist out texture because right now it's giving well. I guess it's giving twist out texture, but it's giving more like mini twist out texture, maybe maybe wash and go, and so i'm thinking i'm going to try it a couple of ways. Let me know down in the comments, if you guys have any suggestions, if you are not new to clippings, and you have some advice for me, you can, let me know down below as well. All i know is i'm going to try this again. I would like to perfect this, but what i will say is i've seen a lot of people on the interwebs. When they do clip-ins, they will do it a couple of ways they will either i'm just do a half up, half down situation or they'll, actually tuck their hair away, so most of their hair is not out, and so i don't know, if maybe that's what i Need to do like, i said we gon na experiment. This was trial number one. We got many to go, but this hair is definitely really good quality. It washes well, it shrinks up basically acts like natural hair, so kudos to curls curls for making quality hair for the girls. You know look this. The curls are popping because they're definitely popping mine just need to ketchup. As for the products that i use on the clippings, i had tried using the pattern um hydration shampoo, since i was like. Oh i'm, going to use pattern products. Let me just keep it in the family, but that shampoo is kind of like a creamy one and it was very hard to rinse out the clippings, and so i opted not to use that. So i went back to the tgin one. This is the one that curls curls actually recommends and it's perfect. I can't wait to actually try this on my real hair, because i love how the clip-ins felt and looked when i used this, so they actually recommended this tgin green tea, super moist, leave-in conditioner, and this actually is amazing like after i use this in the clippers. I was like i need to put this in my hair. The slip is really nice. It really melts into the hair, really love using this, and this is recommended to be rinsed out. Okay, they don't recommend you keep the leave-ins in it's just kind of like use them as a deep conditioner. Oh, i love using the pot pattern leave-in as well the hair it drank it all up. Okay, it drank it up and then also when i rinsed out the hair was really shiny. It looked and felt like i used a deep conditioner, and so these two i can recommend because i have used them on clip ins and girls curls, hair whatever. As for the custard, the custard did well in the hair, but because it is so moisture rich, it took forever for the clippings to dry and my hair to dry. So the next time that i do a style with the clip-ins i'm going to use a foam. I actually did a test of the new bee girl foam from the dew, and this worked really well. It'S just that. I picked the custard because i felt like it gave a little more moisture. I felt like that's what my hair needed, but no use something lighter weight than like a heavy custard. You could even use a lightweight cream. I'Ve seen people use like misha beauty, creams on their clip-ins before, and so i would just say, use that as a guide. Curls curls also recommends some other options as well. It'S just really trial and error. You have to figure out what works best for your hair and the clip-ins. If you're planning to do like a twist out like this, you can also do a twist out where you just twist the clip in separate from your hair and then just kind of pin them in place um. That is an option as well. So then i guess you could use two separate products. Yeah the world is your oyster, so overall i mostly enjoyed this experience. The only thing that i didn't enjoy was sleeping in the clip-ins, but it was just the perimeter of my hair so, like i said, i will probably next time just not put clip-ins in the very back and the front of my head, like the sides just so That i can have a more comfortable sleep if i'm planning to sleep in them or i'll, just pin the clippings in twist the hair and take them out and then just place them in when i'm ready. You know, but just kind of finding ways for it to work with you for me um. My scalp is just sensitive like that, especially the back of my hair, because i've had a surgery, and so you just kind of make it work for you and you can use as much clippings or as little clippings as you want. You can just use this as a guide okay, but that is it for this video guys special shout out to curls curls for sponsoring this video, for believing in me for being patient with me y'all. When i tell you, i was supposed to been through this video and life just been lifeing and they've, been very understanding, so i'll have a special place in my heart and so links to everything will be in the description box. Also, a description of the clip-ins that i personally have, but they have a ton of other things, just make sure that you click the link. Explore use my code to save some coin and that's it. But that's all i got to say let me scoot over. So i can make room okay, so i'm gon na put some videos on the screen for your viewing pleasure. Okay and until next time, don't forget to like comment, share and subscribe, and i'm telling you peach, love and good hair. Daybots. Bye guys see you in the next one
Comments
Curls of a CPA: This was definitely an adventure let me know in the comments what you think of my results! I'm thinking I will try a wash and go next because the natural curls of the clip ins is so nice! Thanks for watching and if you have some advice drop the gems in the comment ⬇
Annyetta: The clip-ins matched your natural hair so well! You did great in my opinion
Breyn Schuster: This is beautiful! I’d love to see you do a wash and go with these clip-ins.
Christine Moise: Dave’s I loved this vid! So fun and detailed! And this look is a vibe
Roger Dewayne: FIRST, these curls match your pattern so well!
Apara: You did a very good job for your very first time. Thank you for sharing all of your learnings, very good tips!!!
S Maxwell: Sable I thought you did a really good job! I’m luvin the end result … my hair is going thru but when I get it together I may try this! Thank you for this review
Baking Cutie: Super cute with and without the clip ins!
Emeth: They look good. You did a good job using clip-ins for the first time.
BlackQueen24: Girl these clip in are fire
Roger Dewayne: Yea sis this was
Jermaine Au Natural: I was whoa! I know I’m behind a few video but geez that is some growth This hair was perfect!
Zina Mckenzie: WOW…. Love it..perfection
Carla Harewood: I just love you ... It looks good!
Llorzz: gorgeous gorgeous gorgeous
Jeannine Gorden:
King hill: Early ☀️
Tabetha Ray: Yes queen.
Kearsten W: Ka-uuuuute!!!
Llorzz: notif gang where y'all at?!?!