Big Voluminous Curls
- Posted on 09 July, 2022
- Clip-in Hair Extensions
- By Anonymous
Big Voluminous Curl tutorial using IGK products and T3 Micro Curling iron, shop the video below:
IGK products, use code CLAIREB20 for 20% off!
Dry Shampoo: https://www.igkhair.com/collections/dr...
Detangler + Heat Protectant: https://www.igkhair.com/collections/st...
Curling iron: https://rstyle.me/n/fzdcx6m6gn
*I do use affiliate links to make commission from sales
And follow me here:
♥ TikTok: www.tiktok.com/@claire.banx
♥ IG: http://www.instagram.com/claire.banx
I’m a South-Florida based creator who is obsessed with luxury and fashion. Subscribe to my channel for all things Chanel, hair tutorials, eco tips, fashion hauls, travel vlogs, bag reviews, favorites videos, unboxing videos, gift ideas and more!!!!
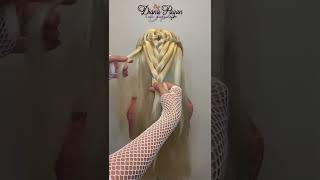
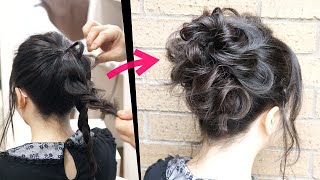
Hello, everyone and welcome back to claire bank style. Today, i'm gon na be showing you how i get this like extreme volume, extreme curl hairstyle. I know it's not gon na be for everyone, but i personally like to do this occasionally, because when i have like a long weekend or a busy few days, i can keep the curls in for several days and i don't have to restyle it. So the first day it looks really voluminous like this and as the days go on, it gets a little bit less curly, but it still looks great and you don't have to restyle it every day. So if that's what you're interested in you like that big volume kind of hairstyle - and you want to see how i got it, then please keep watching all right. So first things. First, i have this kind of big mop on the top of my head. I did brush through it earlier, but that's just because i did a beach clean this morning and it was like all tangled. So it is not clean. It is definitely due to be washed. I mean look at the back. That is just greasy and gross. So first thing i'm gon na do is i'm going to brush it out again, detangle it if it has any tangles and add some dry shampoo, so i like to use a little wet brush. This is a barbie one. Obviously i love it. So it's first! Oh, it's still a little tangly hold on. So i really like this igk good behavior. It'S like a detangler frizz control and it's a heat protector, so up to 450 degrees. So it's actually really really good and i just spray that kind of through the mid shaft and the ends and then detangle it and then just kind of brush through that see how smooth it goes through now, just adding a little bit more for heat protector, and I really like this product because it's gluten free, vegan, paraben, free, it's sulfate, free and it's mineral oil free. So if you know about like beauty, products and things that are really bad for your hair and skin, and even to like inhale the fragrance and stuff, this has basically none of the really bad stuff. So next thing we're gon na do is do a little bit of dry shampoo. You could do this at the end too, but i feel, like i get better volume on top if i dry shampoo it before i curl it. So i'm just gon na kind of take some sections and i do have extensions, so you can kind of see that here. Oh, this is the igk first class charcoal detox, dry, shampoo, just section the pieces up and then spray and then just wait 30 seconds before you do anything i kind of like to shake while i'm doing it and then i like, lift the top sections and spray A little more it makes it actually feel really clean. So then, the next thing i'm going to do is i'm just going to section up the bottom section section out rather section everything else up and use a little alligator clip to secure it. Just because it's easier than like wrapping a scrunchie around multiple times and then usually i will do one more spray at the base of each section before i curl it. There we go and the curling iron that i'm using today is my favorite curling iron. It is the t3 micro and i have the one inch barrel with the clip on it. I am going to be using it as a wand, but you'll see why i prefer to have the clip on it. Sometimes i use the clip, and sometimes i don't just kind of depends on the section. I also want to note that i've had this curling iron, since i want to say 2016, the brand actually gifted it to me back then, but i have since replaced multiple different barrels. I replaced. I haven't replaced the base actually and it's starting to come apart, but it's six years old, so it's actually fabulous. I was getting really really great. I'Ve always gotten really really great results from this until recently, and i've started to not get as much like as much volume as much hold, and i was kind of like wondering what was going on and i like to keep it at just the three little. It'S got five like heat settings and i would always keep it at three, and that was always enough for me and until now it just hasn't been enough. So i cranked it up to the fourth and i think that this the heating element has started to kind of dwindle down a little bit. So i mean it is six years old, but i just pumped it up one little notch and now i don't hold it as long so it ends up like it's not frying, my hair, you know what i mean, so you can add a little bit more of The heat protector, if you want to just gon na brush that through and then i take sections that are not like super tiny, i don't know if you can see like. Basically, it's gon na be two sections on this side and then two sections on this side and then i kind of reach this around my head and just start to wrap it away from my face. So once it falls down, it'll be going away and i don't wrap it flat like a ribbon. I hold on to the piece and keep kind of twisting it as i wrap it, and you can kind of see the twisting on the barrel. There just hold for a couple seconds and then you want to kind of catch it in your hand, and then i love these little clips. They'Re rose gold and they're. Really like great little duck clips. I will link everything down below in the description box. Um. If you do have a super thick long hair, you can also use these, but i don't have the need to use these yet so if you can get the clip to stick against your head, that's great! If you, if you have that little of hair, but if you don't it's okay, if it hangs down a little bit like that, and then i'm just going to kind of repeat the process all over this section and then move on okay, this one was falling a Little too much so i just popped in the little alligator clip and you can see it holds it a little bit better now. Moving on to this side - and i just do want to mention that this is technically made for like when you get out of the shower, like detangling, brushing through your wet hair, and then you can blow dry it with this in, but i've used it on dry, Hair and on wet hair - and it gives great hold and it's a great heat protector, so you can kind of decide if you like it on wet or dry or both okay, next section gon na spray, the roots with some dry shampoo and make sure you don't Accidentally clip your little curls underneath and then i just section my hair into basically the similar size sections from the bottom row. So this is a thicker kind of section of my hair, so i'm going to have more curls on each side, but just make sure you don't grab too much hair because then you'll have to keep the curling iron on the hair for a lot longer. That'S why you want to make sure that you have thinner sections so that you can get the hair, that's on the interior of the section curled enough and not damage the external hair. I know that was a mouthful anyway. Here we go. This section is going to be really tiny, and this is a little bit too big. So i'm going to even them out a little bit by sectioning kind of diagonal forward. You can slide the hair kind of up the barrel, so you have a little more room and we'll have a little bit of a tighter, more bouncy curl that way too, and then this is important because we want to have a lot of volume at the front. This is why we kind of go this way instead of this way like if i was using the clamp, i would go like this, but we wouldn't have a lot of volume, so we're going to reach around the back make sure that the curling iron is kind Of higher up than the section and wrap it there, then we pin it so that it has all of that volume right there. It'S going to come out really cute and then for this last section over here same thing: i'm going to reach around lift the hair higher than the section keep it up there, wrapping it around. So it kind of looks like a rope towards the end. There just give it one two three four and then pin it up nice and high, so you get lots of volume and you guys have probably noticed by now, but i start these sections kind of from the back to the front. I just think it's a little bit easier. I don't know why. Sometimes, if the end is like really skinny, i can slip it just under that clip at the end and that's why i use this barrel with the clip instead of just the like curling wand, because occasionally you just need that extra little help there. So for the top section i kind of go like this side and then this side and then this side and then this side, so the sections kind of overlap in the center and that gives them a lot of volume. Another reason i like to have the clamp is you can go just on that top section and you can really smooth down any flyaways before you curl the section. You want to be careful that you don't put the curler on top of the section that you just tried to bump up with volume, so you really have to be conscious of your positioning with the curling barrel or the curling iron on this top section slide. The hair down the shaft to have more room and then, if the ends are kind of sticking out like that fold them over and shove them inside that little loop-de-loop and that will help to curl the ends without more damage from the hot tool. I use these clips for the top, because i don't have extensions, so it's okay, if they're a little smaller, they don't get in the way as much and they work just as good. Now you want to kind of figure out how you want your front like your bangs or your part, to lay first, usually i kind of start on this side and then go towards the center, maybe a little more side. So this is going to be a section and then this is going to be. I think two or three sections, like i said, make sure the iron isn't resting on any other sections and getting rid of that volume you just created, and then this section we're going to slip under the clamp right there perfect, perfect, perfect. I feel like this channel is for people who watch tick tock and me you can get those flyaways it's a little trickier. This takes a little bit of practice, but then you can kind of roll it down just for a second there to get that heat on that section, so that it really pumps it up. When you pin it and then see this end, it's not as curled. So we're gon na grab it and push it inside that little barrel, okay, so i'm just gon na let this cool normally. I would like do my makeup if i were getting ready in the morning, but i've already done some makeup um and then i would take it down. But right now i'm gon na just do like some things around the house and i will be back shortly. We'Ll take it down and i'll finish it off and uh and say goodbye, so see you soon: okay, i'm back and i'm gon na spray it all with this beach club, volumizing, texture spray, and i will link everything down below all the links are affiliate links or Most of the links that i put in my description box are affiliate links, so it doesn't cost you any extra money, but i do get a small commission, but in fact, if you want to save money on igk, you can just use the code claire b20 and You'Ll save 20 so check that out and the volumizing texture spray, as the name would suggest, does help with volume i'm just going to start from the bottom. I don't really do these like take these out in any particular order. I just kind of try to find the clip and get it out. Okay. So next you can either use like a wide tooth comb, or if you really want to take some of the intensity out, then you can just use your brush again, which is what i'm going to do, i'm going to kind of start from the bottom. So this is the final look. As you can see tons of volume. We got rid of all that grease spot. We got tons of curls and, like i mentioned in the beginning of this video, this will last me another couple of days, so i don't have to restyle it, and i love that. I just think it makes it so much easier to just do it one day and then not have to think about it for the next few days, and if you want me to do a video on the protective hairstyles, i sleep in to keep this looking great And fresh, then, just let me know in the comment section and i will make sure to do that. Oh last thing: if you have any questions, you can definitely leave them down in the comments below, however, the best fastest easiest way to get a hold of me for a link or a quick question is just to dm me on instagram, i'm really active there and I do check my dms, like even the requests at least once a day, so if you did enjoy this video, please give me a thumbs up and if you're not already, please subscribe, i would love to see you in the next video ring the bell. So you don't miss any of my future uploads and i'll see you next time. Bye,

Comments
St. Barts 🍸: I love your Studio 54 super gleam! You look beautiful as usual!
Kristen Snider: I absolutely want to see what you do to maintain the curls when you sleep, etc.