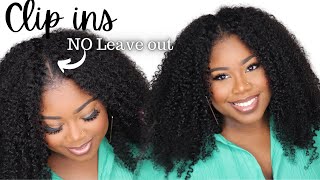
Diy Clip-Ins (Super Easy & Convenient) | Make Your Own In Less Than 25 Min
- Posted on 24 October, 2021
- Clip-in Hair Extensions
- By Anonymous
Hi guys, welcome back to my channel! These clip-ins are SUPER convenient and easy to install. Please subscribe & like this video if you enjoyed it!
LIKE, COMMENT, SUBSCRIBE!!
Contact: [email protected]
HAIR USED: www.twelve22hair.com
IG: @twelvetwentytwohair
Virgin Brazilian 2x22”
PRODUCTS USED
(all can be found @ your local beauty supply store)
Roberts Diamond Bond Protectant
2 Black Wig Caps
Salon Pro 30 Secs Bonding Glue
Wella Permanent Hair Color (Noir)
20 Vol Developer (to mix in with hair color)
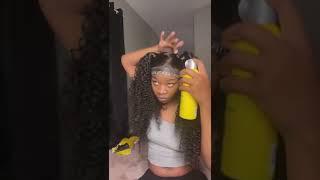
What'S up guys and welcome back to my channel? Finally, back with another video, i apologize for the mia um. If you follow me on instagram, then you know i recently purchased a home, so i've been handling that moving unpacking getting everything together. So again i apologize, but let's jump into this video so from the title i'm gon na show you guys how to make your own clip-ins. It'S super easy, um right here, i'm just kind of pre-measuring my tracks before i start sewing the clips on the track and so um i just kind of go in the same way that i would for, like my quick weaves and i measured my tracks from end To end - and i also like to double my tracks just for more thickness, so i'll kind of like fold - the bundle in half as i measure and then after i measure each section, i cut them and then kind of place them to the side so that they Don'T get mixed up, i only used two bundles for this um and by now you all should know that. I only use hair from my hair company, which will be linked below, but i mixed our straight hair with our natural wave hair. Just because that's all i had in my drawer so don't mind that but yeah, let's jump into sewing on your clips, so you want to make sure you use large clips if you use smaller clips girl you're going to be smaller all day. Okay use large clips because it's easier, it's faster and i just like it better so right here you can see how i have two tracks for one um, that's because i doubled when i was measuring earlier and so you're going to take your large clip you're going To take a straight needle do not use a curved needle. I personally find it to be a little bit harder to go through the holes on the clips. So i like to use a straight needle then after you cut your thread for the length that you want. You'Re just going to tie the end in a knot and that's going to keep it from slipping through the hose as you sew. So this is what the clip looks like. So we're going to be using this top hole to the left of the clip and then this top hole to the right, the one above the gold. Those are the only two i use. I don't have time to sit and sew through each hole, so just using those two works for me by all means. If you want to use all of the top holes, you can do that, but for me that would probably take way too much time. So i'm just going to do the top left and the top right and so you're just going to place it at the end of your track. Stick your needle through and you'll, see um that knot that you tied will keep it from going through, and then you just want to go through, maybe two or three times to make sure it's secure and tight and then you're gon na move on to your next Hole so i don't after i sew through each hole, i don't cut the thread like i keep going for the entire length of the track. That'S how i'm able to do this so quickly um, so you want to make sure you have enough thread when you cut it to be able to do that. You don't want to be short. You don't want to sit and have to tie at the end of each hole. That'S going to take way too much time. So just make sure you have enough thread to be able to to last you for the entire track. Also, i forgot to mention, but you want to make sure you're sewing your clip on while it's closed um, why does it really matter? No, it probably doesn't matter it's it's easier to do it. That way, so make sure it's closed when you sew it on now. For my shorter tracks, the tracks that are going at the very bottom of my head, i use three clips, for i think using three clips is pretty secure by all means. If you want to use more, you can um, but i'm trying to do this relatively quickly. It probably took me only about 20-25 minutes to do all of my tracks to sew the clips on to all of my tracks um, and this is how i did it so like i said, i just use three clips for the shorter tracks, one on the left. One in the middle and then one on the right end and then i move on to the next one and by the way, all right. So once you're done with your last clip, you just want to tie a knot um with the ends of the string, probably about three or four times just to make sure it's secure. And then, when you're done doing your knots, you're, just gon na cut the excess string, and so this is what your track will look like once you're done sewing your clips um for those that are not familiar with how clips work you literally just pop them open To attach them to your hair like that and then close them back to secure it and that's it so we're going to do this one more time um just so, you guys can get the hang of it. Um tied the knot at the end of my string placed the clip at the end of the track, looped it through about three or four times, and then it just kept going through the entire track. This is another three clip track um. This is the one that's going to go in the very back, so in a second i'll show you how i do the larger tracks me. My is all right. So here's a larger track. This is gon na be for, like the the center, the middle of my head um, so we're gon na use four clips for the longer tracks and i'm just gon na place them down where i want them to be. That way, i don't forget, as i'm sewing them on and that's it nothing changes for the longer tracks. It'S just that you're using one extra clip all right so to install my clippings here's what i did. I did basically the same base foundation as i would. If i was doing a quick weave, so i'm going to section off my leave out the part that i want to leave out of my natural hair and then i'm going to braid the rest. The reason why i braided the rest, instead of just placing the clip ins between my real hair, is because my hair short and i used 22 inch, um 22 inch hair, and so you can't really place that long of clip-ins in between short hair. It'S not going to blend right. It'S not going to look right. It'S not going to work now, if you're using shorter clip-ins that are more closely um in length to your real hair. You can place them in between your real hair, but i felt like it was not going to blend right, so i just went ahead and braided my hair down. Also too, i feel like this makes the clip-ins a little bit more secure when they have something to kind of like really hang on to um. I don't know if some maybe some of y'all have used clip-ins before, but if you have like more fine silky hair and you've used clip-ins before you'll know that kind of like they'll slip out like they won't really be that secure. So i've found that braiding, my hair, creates for a more solid and secure like placement of the clip-ins. Now i do not recommend that you make your braids this big if you're going to braid your hair for this. These were entirely too big, but i was being extremely lazy with this. I didn't feel like braiding, my hair, so i just did whatever i do recommend that you do smaller braids um, just because it'll be a little bit more concealed. Your head won't really feel as bulky. If you'll do, if you do smaller, braids it'll just come out way better, but i was being lazy, so i didn't do small braids, um and yeah. I probably did uh. Not probably i did one two three. I did five braids in total, but i do recommend you do smaller braids. As far as the ends of my braids so same thing, i do with the quick weave i'm just going to take the ends and tuck them in between each braid and then sew them down that way. They'Re not hanging out from the back um. You can't see them etcetera all right, so now it's time to attach our clip-ins you're, just gon na pop open those clips place them securely into your braid or in between your hair. However, you decided to do it and then snap the clips back to lock them and that's it. It'S super simple um i used. I think i had about seven pieces in total um. I only used two bundles. That'S all i had to to work with honestly um, but you can most certainly do more like if you want to do two and a half bundles. If you want to do three bundles, if you were to put them in between your hair, you probably couldn't use as much that's kind of why. I, like this method, a little bit better um, but i did only have two bundles, so i only had about seven pieces. Also, don't be like me, make sure you lay your edges down with the edge control um, and then i forgot to mention i braided my edges up too just because i wanted to give my edges a break from like heat and flat ironing et cetera um. Using these clip-ins, it's totally fine to braid your edges up as well. It won't harm your edges because you're not really attaching the clips like to your edges for referral. If that makes sense - and we are done super easy. Super simple probably only took me about five minutes to actually install the clips. So now i'm just gon na press out my leave out to blend it um and then i'm gon na curl, my hair, but i did that off camera y'all. I apologize. I have like three flights of stairs now um and i left my curling iron all the way at the top of my house. So by the time i got up top, i was like you know what i'ma just do it up here. I don't feel like going back downstairs right now, but i have plenty of other videos showing how i curl my hair. If you guys really want to see that um so yeah, sorry guys so - and here is our finished product - look how undetectable this is um now clip-ins are not meant to be long-term. Long-Wear they're, really just like an easy, convenient solution. If you're about to go out, your hair is not done or maybe your hair is oily and you want to throw some clippings in just to kind of spruce it up a bit. Um they're just really convenient. It takes five minutes to clip them in to install them, and it's just a simple solution like once. You make your clip-ins, you always have them. They can always be a go-to. You can kind of change your style up um. This is where i should have laid. My edges down, but you could change the style up if you want to pull the hair back, do something different with it. They'Re just super convenient. I used to wear clip-ins all the time in college like it was really my go-to um. If i didn't feel like getting a sew-in or doing a quick weave, clip-ins were like i said my go-to um, so yeah. I hope you guys enjoy. Oh also, i know you're gon na ask yes, i did dye this hair black to match my natural hair. I'Ll put it in the description below what i use um, but yeah, so just playing around with it. I hope you guys enjoyed this video as always. Thank you so much for watching make sure you subscribe. If you have not done that yet make sure you give this video a thumbs up, if you have any questions, feel free to leave them below and i'll answer them and i'll see you guys in my next video
Comments
Tajha Williams: I literally get all my hair knowledge from this channel. Appreciate you pretty girl
Angel Hooker: Love this. So much better than putting glue on your hair. Thank you
Ms Jksn: Congratulations on purchasing your home I have clip-ins in right now lol love them they are so easy to manage! I also agree with the same method you used which is also what I did lol it’s easier!
Ki Ki: So glad I followed you a longggg time ago! I never thought of doing this. It’s a great idea
Life_Wit_Ley: You are great at hair and your so skilled and techniqued at what you do I love it
Nakia Genwright: I also braid down my hair plus it’s better when your hair starts to revert if you are natural using straight hair bundles. Also keeps the hair secure to the braids definitely.
christabella201: Killed it....love this channel so much pretty lady. Pls keep dropping content
Jana K: Thanks, very helpful ♥️
Garisha Tucker: I’m loving these videos and grasping more info on hair!!!
Diamond Love: I just LOVE your hair vids !
LaDonna: Congratulations on your home!
Jahmee Sweat: Congratulations!! Thank you
SoThePop: I’m gonna try this! Is 3 bundles enough to make a head full of clip ins though?
Jo: Congrats on your home dear Love the clip ins
Kersha Beaver: I'm so going to try this
Jennifer Williams: I used to do this when I was relaxed to add highlights in my teen yrs. Im 30+ now.
Ashley Collins: Brilliant
Addis Kuskume: Good job my sis
Brie'Anna Daniels: I really want to do this, I tried the curve & the straight needle & for some reason I just could not pull the needle through the holes of the clips. It’s really stressing me out
Tracy Chen: A few questions: do yo sleep With them in? When you do a full head A’s in your video, do you also do up-do styles?
Addis Kuskume: You save my money
Im Here: Professionally done. And don't forget to tip ur self. About $.50.00°°dallars. okay Aye.
Michell Andrade: si no se quieren quedar calvas sin cabello NO se hagan esta técnica. LO DIGO POR EXPERIENCIA. ademas que ese clip es bastante incomodo; SI práctico pero super incomodo.
Suzi'sFitness: I wish took. ten mins