Davinci Resolve - Change Colors (Recolor)
- Posted on 22 November, 2019
- Fusion Hair Extensions
- By Anonymous
How to change the color of something (recolor) in DaVinci Resolve.
#DaVinciResolve #videoEditing
▶MORE DAVINCI RESOLVE VIDEOS
DaVinci Resolve - How to Setup & Use VST Plugins (Audio Effects)
DaVinci Resolve - Copy/Paste & Remove Attributes Between Clips (EDIT FASTER)
DaVinci Resolve - Color Pop
DaVinci Resolve - Add or Remove In & Out Points
I'll be using DaVinci Resolve 16.1 (free version) in this video.
When you want to change the color of an object, but not the whole image, it's easy to do in DaVinci Resolve. This video will show you exactly how to do it.
You could use this method to change the color of someones clothes, change the color of a flower, change the color of a car, or anything else - and leave the rest of the colors untouched.
To re-color something you'll head to the Color Page.
You'll use the Qualifier to select the color you want to change, adjust your mask with the Matte Finesse controls, and change the color with the Color Wheels or Hue controls.
Also, if there are other things in the scene that are the same color as your selected color, you can use a Power Window to exclude those objects. All of this will be covered in the video.
Learn this method! Knowing how to change the color of a single item is an important skill for the modern video editor.
▶Gear used to make the video (use our affiliate links to support the content and keep it free)
Shure SM7B
Rode PSA1 Mic Boom Arm
Cloudlifter CL-2
PreSonus Studio 1824c
▶My Links
https://twitter.com/BenoniStudio
https://www.instagram.com/benonistudio...
Save an EXTRA 10% on all Waves Plugins
https://www.waves.com/r/j2kruw
Support the stream: https://streamlabs.com/benonistudio
Buy your studio gear: https://www.amazon.com/shop/benonistud...
SUBSCRIBE ::: LIKE ::: COMMENT
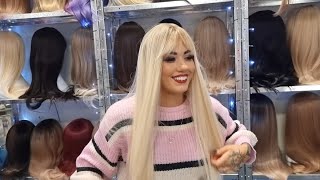
All right, let's change some colors here in the Vinci resolve as you can see, we have the original on the left and it the affected on the right. So this is actually pretty quick, pretty easy to do so. Let'S go ahead and do it we'll head over to our color page, make sure we have that clip selected and we'll go ahead and just get rid of that node and we will restart here right from the beginning. Okay, so first make sure I have my node here: alt s, we have it right there. So first thing to do is head over here to our qualifier right. There make sure we are on the target and go ahead and select in here and the viewer a pink color, because we're gon na change, this pink color our background, any different colors. So just click - and you can see down here that our qualifier settings have changed. We don't really see anything yet, let's go ahead and turn on our highlight mode, so we can see our selection there, okay and then we can adjust our settings down here. If we need to manually here, let's head over here to our highlight there, then black and white, and I'm going to clean the black, some and then clean the white to clear, as you can see clean, that up for our our mat. Okay, that should be good. Let'S turn off our highlight mode: we don't see anything yet right, but if we come down here and say change the saturation now we can see exactly what's going on so just pull that saturation all the way down, and obviously we have more two more to do In here so grab my plus selector there and grab that pink there, and that might do it looks pretty good. We head back here to our highlight there in black and white, looks pretty good, except for right over here. I might head over here and go to grow and maybe turn the radius up or down - maybe maybe just come back over here and have to do this sort of back and forth to make sure you're getting everything that you want. That'S pretty good right there. I think okay turn that off turn our saturation back up I'll, just double click to the back to the center head over here to occurs hue versus hue, and maybe just change that color to like a blue like we had in the beginning. Okay, pretty good, not perfect, yet I'm gon na do alt F, get this even bigger and make sure I might qualifier there. My plus, I want to make sure I add, in this pink here I got a little too much go to make sure I pull out the color of her hair. There make sure that's not in there right the + grab that again change this to shrink in this case, and that's pretty good there. Just your settings down here. If we need to there, we go and come back over here and clean that white. A little bit clean the black a little bit that cleans up her lips for us too, and see how it looks all right. You'Ve changed. The color looks pretty good a little bit of problem here in the whites, as we can see clean that white up a bit more. So it's a little more saturated, okay and of course, once we go back to our edit window here, that is updated here, forced, let me make sure these are not gained anymore. It'S all updated for us and ready to use now would be something a little more difficult and change the color of her top and make sure we don't change the color of her kettlebell. So, let's head over to color and make sure I hit alt F. So I go back to my standard view. Just gon na get rid of everything there. Oh s, to give me a new node and start of course, from the beginning. So first up we already know what we need to do so right now. Her top is pink and, let's just say, the client has a brand that is actually more focused around say purple or something like that right. So let's go ahead and change the color of her top here same stuff here that we did before qualifier our target selection and just grab some pink here. Okay plus grab some more pink around here, go into our highlight overview, so we can actually see that coming. It right there, I'm gon na grab some more pink here and here. Okay, so can see here on our mat. We need to clean up our blacks and our whites here. So let's go ahead, come down to Matt finesse and we'll clean those blacks, some and clean. The whites, the white is going to be what we actually affect, while everything in in black will be transparent. Okay, so just clean that up, I don't want to go too far with this they're so looks pretty good. It'S not perfect yet, but maybe we'll come over here to the next page and go to grow and pull this out bit. Maybe okay might need to select another color in here there we go that got it pretty! Well, okay! So let's go ahead! Turn off our highlight mode come back here to the curves, and you know we could do a lot of different things there with a lot of different, sliders or or color wheels, but we're just going to use our hue versus hue right here and change this to Purplish kind of a color right about there kind of matches our lights pretty well right, zoom in here looks pretty good overall might need to. You can see there's some pink right there as well come back to my qualifier plus and just grab that pink grab that pink right there. I'M gon na grow it out a little more and we'll take a look at that. All right, of course, that ball is gon na, be changed so a bit of an issue back here again you're just going to have to play with this a bit so right here, of course we're seeing that pink come through make sure I just have my plus Selected there make sure I have that selected as well and then clean this up a little bit on the blacks and the whites and I'll adjust the saturation here some too just to pull out some of that purple from her arm. But we do have a a issue there with the ball, but we can fix that up pretty quick by using a power window, so we'll go ahead and select our power window here and we could draw a shape - or in this case I think we can just Use a square - I want just put it over the ball here - send this out and make sure that it's just covering the ball here. So this play through here scrub through okay, that's going to get the ball there and it's gon na have to be a little bit bigger her and he all right. So, of course, the problem is now that we're not affecting her top we're just affecting the ball. So come down here and reverse that, and we should be good. It'S turn off this overlay and we should be good enough. There. We go changed her top to match those lights for the client who likes purple and didn't affect the ball or anything over here. Awesome. All right, so that's how you can change colors real, quick here in DaVinci Resolve start with your qualifier, make your selection add to your selection. Adjust your mask here, of course, again check your highlight mode and your mask mode. There, your black and white and just adjust things until it looks good to you if there's something that you want to exclude from that, you can put a power window over it and you might need to, of course, reverse it as we did here and, of course, Change your colors either using hue versus hue, or maybe using your car, wheels there, but it's going to be the same process, no matter what your uh, what you are changing the color of there. It is awesome. Ok, so that is changing colors here in DaVinci Resolve
Comments
OCTOKATS: Hi there! Great video. Question: Besides changing the background to a blue colour, is it possible to change the background on the colour palette to all "WHITE"? I didn't see the white on the colour panel.
PercussionTV: Thank you. Very straightforward!
Ppsy: It works so well , thanks !
Vaidute: thank you for the tutorial. After I changed the background color I went to the fusion and it did not show the changes I made, however, in the edit page it did. How can I see the clip with changes in fusion? (I also tried selecting the clip with changed background in edit page and going to fusion, but it did not show it as well (just original clip))?
Ppsy: So good tutorial, thanks !
Pixelwave Plays: Perfect! Thank you!
John w: amazing tutorial;. thank you
Jerry Roe: Outstanding tutorial... how would I go about applying this technique to something shot in Vlog.
YOUZE SIMS OF LAUGHTER: Am amazed in what u did here, thanks a lot
Time with Yevgen: Excellent! Thank you very much!
NGI: Thank you for the video. Can you tell us how to change the color into black or white? Those colors don't appear on the hue and hue.
JoshDidItt: I find it hard to change the color of trees or grass. How would we do that and make it look realistic?
cat club: thank you, that's what I was looking for,
DREHWERK: Thank you man!
Weeqat: This is good infos, do you know if it is possible to enter the targeted color codes ? Not doing it manually ?
Linnie ASMR: Great video!
Diego Garay: Thank you!!
VIZUALIZE FILMS LLC: wow this is great!
DNNY: Thank you! Much love
GoVideos: Great tutorial. Subscribed.
Puroo Roy: Can black be changed to another colour?
Akshat Srivastava Vlogs: great... nice video
Nai Plai: Excellent buddy thsnk you
Oscar Films: What if the background color was the same as the face? Where I wanted to extract the hair? how can I change the background color similar to the face without keying out the face? is it possible in DR?
Buzju Sleep: I need to get a specific color hex code for the background, is that possible?
jaime del salto: can youo do the same from a balck ground to make it white. i looking for a fire with white backgroud or no backgorudn at all
BeejOutbush: I selected black on a motorbike decal and did this to change the colour and it didn't change at all? What went wrong?
God Bahamut: I need your workspace brother!
Jake Rutigliano: Is it possible to change the girl’s hair color?
Nai Plai: How can swap a head for othe head
IDK: 1:02 why are all his clips of girls?!