Invisible Bead Hair Extensions [Best Tips To Remove, Install & Color Hand Tied Weft Extensions]
- Posted on 21 December, 2021
- Fusion Hair Extensions
- By Anonymous
I'm sharing how I move up invisible hand-tied extensions every 6 weeks, along with my best tips to ensure my clients leave with healthy-looking hair.
Using @donnabellahair extensions in color 6/10
Colored with @Kenra Professional demi color hair 7BC/6C
Learn how to do a full invisible hair extension install in detail: https://youtu.be/2a4vdvG_nb0
Shop https://donnabellahair.com
Use coupon code MIRELLA to save on your purchase!
For more education visit my website
Follow me on Instagram
https://www.instagram.com/mirellamanel...
Follow my Facebook Page:
https://www.facebook.com/MirellaManell...
Join me on TIKTOK
https://www.tiktok.com/@mirellamanelli...?
Learn with me!
https://mirellamanelli.com/online-hair...
Listen to my podcast!
https://mirellamanelli.com/hairbnb/
Book an appointment or shop at my salon
Shop all my favorite foils and color tools
https://framar.com/?rfsn=5729303.eb090...
You know you want that extra big ass color brush
https://zerotimesystem-com.3dcartstore...
Malibu CPR, DDL and color correction tools
https://malibuc.com/shop/rebelfemme
Use code MIRELLA to save 10% off your Hair Extension purchase: https://donnabellahair.com/discount/Mi...
Buy me a taco! I love tacos!
https://www.paypal.com/biz/fund?id=57J...
#hairextensions #beadedhairextensions #handtiedextensions
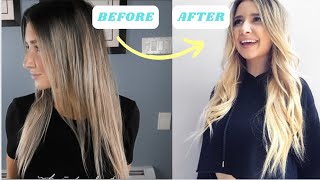
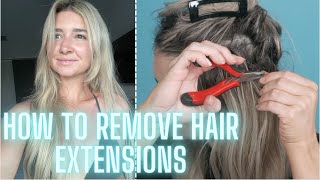
Hey it's marilla monnelli and welcome back to my youtube channel today, i'm going to show you how i do an invisible, bead reinstallment using all donabella hair, and i'm also going to share some of my best tips and tricks on how i add value to all of My hair extension appointments, but before we get started, make sure you hit that subscribe button and turn on all notifications, so you don't miss a tutorial. Now, let's go ahead and get started, it's been about six weeks since my models had her invisible, weft installation. So if you want to check out what that looks like you can check out the other video where i installed an invisible weft right at the top or in the description of this video. But this is basically a six week grow out and she only has two rows installed and we're going to be doing a move up appointment for her as well as a glaze just to freshen up her overall. Look i'm going to start out by detangling my model's hair, using this boar bristle brush by donna bella. It'S actually really important to educate your clients to maintenance, their hair in between their service by brushing their hair at least two times a day. So once in the morning and once at night and if they're able to even a third time throughout the middle of the day to prevent any tangles or unnecessary knots, the way i like to detangle is row by row. So i'm going to start from the bottom and work my way up and i'm just taking the brush on the top of the weft, as well as the bottom of the weft and just taking my time and being really careful to not pull on her real hair. Because we have the beads still installed here, so we don't want to create any unnecessary tension. So definitely take your time if you do experience lots of excess tangling, then this is the perfect opportunity for you to educate your client once again. Overall, my model did a really great job of maintaining and brushing her hair extensions in between her service. However, we did experience a little bit of excess tangling on the underside, so i just made sure to point that out to her so that way she can pay attention to it a little bit more when she goes home from her service today. Some great tips to educate your clients on is to wear their hair in a loose ponytail after they've brushed it at night or even a loose braid, and then, of course, a silk pillowcase. All of the tools that are necessary for maintaining your hair extensions at home are available at donabellahair.com and you can even use my special coupon code, which is morella to save on your purchase. So i'm just about done. Detangling my model's hair on the underside as well as a surface and then once i have that all done now, i'm going to section it all off and really clean it up for the move-up installation. The beauty of a move-up appointment is that it's already sectioned for you, so all you're doing is making sure to create a really clean section. She probably has some new growth, as well as those little baby hairs. So you just want to take your time in perfecting your section. I like to use a little bit of hairspray and take the boar bristle brush and just make sure to get a really clean section, keeping all of those little fly. Aways at bay and creating a nice taut section and holding it down with one of my clock clips. Next, i'm going to cut the threads and i'm going to do this using my stork shears. Now you want to be really careful when doing this process, because sometimes it can be hard to distinguish between the thread and the natural hair itself. So just take your time, there's no rush in cutting each of these threads out and you're just going to do them. One at a time until all of them are cut once that's done, you'll be able to lightly tug and pull onto the weft extension itself and just guide it out around the bead, and it should slip right on out if it doesn't. That'S probably because there's still a thread attached and you just want to find it and cut it, and it should come right on out next you're, going to take your luxe tool and loosen up the bead now generally in six weeks. For me, the beads are still in really great condition, so you don't necessarily have to replace them, although donna bella does suggest to replace them each and every single time. However, her beads were still in really great condition, so i just moved them down and then took a comb and continued to detangle and loosen up all of that natural shed that she has and then once i do, that, i'm able to then move up that bead With my luxe tool and secure it right back into place, this part is relatively simple because again that hair is already sectioned out for you, so the process can be relatively quick and smooth general rule of thumb, though, is if you're new to extensions and you're unsure Of the condition or quality of the bead just go ahead and replace it, but i've done this enough times to see and know that the bead is in great condition so detangling around it and then just moving it up is the quickest option. For me, a couple of tips when doing this process is after you've loosened up the bead, immediately, move it up and then use your fine-tooth comb to loosen all of the hair shed and then pull the hair, nice and taut. And then you can secure your bead. Just be sure to secure your bead so that it's parallel with your section and then continue until you're all completely done remember to replace your bead if necessary and then now we're getting ready to sew our weft. That'S already pre-cut and already ready to go right back into her hair. You just want to make sure that you de-thread any loose threads that are going on in there and then you're going to open it up. So that way, we can put it back in exactly how it was sewn in the first time, which was an invisible weft. Once i have my hair ready to go, i then isolate each of the sectioned out beads and pull each of those hairs right on up and make sure to secure them with a clip. You also want to make sure that this is really clean as well and you're not pulling on any hairs that are not attached to the bead itself. So this is really important because now we're going to layer in our bottom weft, even though your weft is already sectioned out and measured to the size from the previous install, you still want to double check and make sure that it matches up and if it doesn't, Then you can definitely readjust if you've done an invisible sew-in before this process is all the same. You'Re, basically going to have lots of little clips on hand. These ones are from donabellahair.com as well, and i like them, because they have lots of clips that come in a pack and there's plenty of them to add in so use as many as you need to securely fit your hair extensions right underneath each of those beads. You want to make sure that they're, nice and snug and as close as possible, so that way to sew in process, is seamless and easy. Once i have that weft secure underneath each of the beads, i bring the section of hair right on down and then just fit the last bit of weft extension right on top of those beads. Generally, i like to clip the weft from the top, and this is also a great gauge for you when you get ready to sew in with a needle and thread. So that way, you know exactly where each of the beads are at so basically just use whatever process makes sense for you. Overall, you just want to make sure that the weft is securely in place and it's not going to go anywhere when you get ready to do the sew in portion. The easiest way that i find to get my needle and thread started is to loop in the needle and thread on the third bead, and then i just simply tie a knot three times on the edge of that bead. There'S honestly, no reason to get super fancy on this portion so long as the thread is nice and secure and you're able to cut the thread pretty close to the knot. So that way, it's not visible once it's secure now you can go through comfortably and sew in on the right side and the left side of the bead until you get to the edge. I like to start on that third bead, because it gives me three beads to create a double strand that way. It'S almost like your anchor piece and the weft is not going to move. Typically, i do anchor pieces on each end of the weft and sometimes in the center, for a really large weft such as this one. I like to use my fingers to feel exactly where each of those beads are. At generally, i like to sew on the right and the left side of the bead and i'm a big advocate for not sewing right on top of the bead. However, when you are doing an invisible sew in method like this one, it kind of doesn't matter only because each and every single time you have to move this weft up, you're gon na need to cut it completely out anyways. So, at the end of the day, it doesn't really matter, but it's just a really great practice to get used to in case your client doesn't want the invisible bead. The move up appointment is going to be a lot easier. Once i get my anchor section completely done so again, starting from that third bead and then working to the exterior of this section and then gon na work. My way right back in so each of these beads are gon na, have a minimum of two sew ins on each side, making it super secure and then i'm just gon na continue on sewing on the left side and the right side of each bead. Until i get to the very end of the weft, when you do get to the very end of the weft, you want to make sure that you're creating those anchor pieces and the way you do that is by sewing right back in so going from right to Left until you get to the third bead in so basically mirroring what you did to even get it started, and then once you have that secure, then we're gon na end this thread by knotting it off. Now, i'm gon na show you in real time. So that way you don't miss it, but you can see that i am on that third bead, so i'm just gon na loop it through two more times to make sure that it's nice and secure, because at the end of the day you do not want your Weft to unravel so ensuring that you have a little added security right here on the edge is super important, so i'm just going to guide this thread right on through and then once i have my last loop that i'm going to do. This is where i'm going to tie my knot and there's a couple different ways. You can do this. You can just simply tie a knot right on over this bead. However, i like to do it this way, just so it gets as close as possible. So that way, i can cut the thread again pretty close to that weft. So i tie a knot and then i'm going to loop through this needle just two more times and each time that i'm doing this, i'm just kind of slightly guiding it closer and closer to the weft. You just want to be really careful, and this is another part where you just want to take your time with it and carefully guide the knot as close as possible to the weft. If you do this part too fast, it's not going to get as close as you'd like it to so. Just take your time and then once you have that knot and secured you're just going to take your stork shears and cut your thread and then don't forget to do a brush through of your section. This is really really important to make sure you're brushing in between each of your sections. So everything is nice and seamless and super clean as you work through i'm going to do the same exact process to the second row, and now i'm going to share my added tips on how i add value to each of my move up appointments i like to Always add in a shampoo and blow dry out of bare minimum for each of my clients during a move-up appointment, and the reason for this is because you could see all of that dead skin that was living in between the beads when she came in. So i like to just clean it up and make sure that she's at least freshly styled, but for added value i usually include a clear gloss or even a colored gloss at each appointment. So this is the perfect time to do this as soon as you're done with your invisible weft and you can see, we got a really great installation and you cannot tell where the weft begins and ends. So i'm going to actually mix up a demi permanent hair color and you want to make sure that it's something that's ammonia, free! I personally love using camera color. So i'm going to mix that up one to two mixing ratio. She decided that she wanted to add in a little bit more of a copper shade to her hair color. Something to keep in mind. Is you don't want to go too much darker or not even lighter? We can't use a lightening process on this, but you don't want to go too too dark with your formula. You want to stay at level, so we're going to be mixing up a combination of a 6 and a 7 for her and i'm gon na shampoo, her hair really really well. I usually start off with a clarifying shampoo just to get off that excess gunk. That'S on her hair and then i'm gon na do one more shampoo, that's moisturizing, because that's really great to prep the extensions for that color service and then finally, i'm gon na follow up with the demi permanent glaze right at the bowl process. Her for 15 minutes then do a thorough, rinse out and condition her hair. This is also a great time to add value by adding on a treatment to the hair, so keep in mind. Those hair extensions are real human hair extensions, so you want to treat them as though your client has naturally really long hair. So what better way to treat her hair than with a moisturizing treatment underneath the dryer once she's all done. I then blow dry it and style it and then, of course, take lots of pictures for social media. So that way you can build your hair extension business and get way more clients just by sharing your work on social and here's. The final result of this invisible bead, hair extension installment using all donna, bella hair. So, just to give you a little recap: we actually moved up two rows of color 610 22 inch, donabella, hair extensions and then after we did the sew-in. We threw on a gorgeous glaze with a copper shade on top of that color 610 for a very rich super hydrated and healthy, look to her hair extensions and now she's ready to rock this hair for another. Six weeks before we move up her hair. One more time, i really hope you enjoyed this hair tutorial and if you did, please give this video a thumbs up and make sure to subscribe and comment down below what your favorite part of this entire tutorial was and i'll be sure to respond. You can find me on my other social channels like instagram, facebook and tick tock, all under marilla minnelli, and if you love listening to podcasts, be sure to check out my podcast called hairbnb. It'S a podcast where i help hairstylist. Just like you simplify their hair beauty and business goals for more free education head on over to my website at marellabenelli.com and subscribe to my email list and get free education sent right to your inbox and finally be sure to check out my other hair tutorials right Here on this channel - and i hope to see you next time -


Comments
wakejaden: Thank you for this video! I’ve been using a different method but I love the idea of the invisible bead method but it’s like everyone acts like it’s a family clan secret lol
Nina Stylist: Beautiful work
Jaci Mckinney: Great tutorial!! Thanks for sharing!!
Shenae Niedermann: I’m so happy I found your videos! It helps so much thank you!
anna c: Thank you . very informative ❤
Luli Hair Bar: Great Video! Thank you so much for sharing!
Yamilet Estrada: Thank you so much for sharing! How much would you charge for something like this process? (:
INES Castillo: Thank you so much
Mane Vain: How long do your clients wear their extensions before they need new hair?
Donna Hartzman: Hi!! Did you do shampoo and color with extensions in? Thank you!!❤
Meli mel: Ok now I see why it costs 175$ thats insane amount of work. Good job
EnzoKittens: What type of thread is best to use.. cotton or nylon
JoHanna Dwigans: If you have a blonde client how would you do the color touch up with the move up? …hope that makes sense
Marlana M: You’re God sent thank you ♥️
Jennifer Holliday: You are amazing!
LEVEL UP! with Randy Coombs: What would you charge for a move up appointment?
Jessica Urbina: How many bundles would you recommend getting?
Edie Boudreaux: Was there 3 wefts per row? Thought I saw 2 wefts for the lower portion and one weft across the top of beads.
vanessa corona: Can’t you just move up the beads 2-3 times before removing in all ? Or is that something you can’t do with the method ?
tracey scherer: actually no need to cut the thread as all ya need to do is go in and un squish the beads and all of it will slide down out together in one shot. no struggles with trying not to cut own hair. no cutting needed at all.